Kohler Courage XTR-6 User Manual
Page 12
12
śǯȱ
ȱ¢ȱȱȱȱȱȱȱ ȱȱ
ęȱ ȱǰȱ¢ȱȱȱ ȱ
the base clean.
Ŝǯȱ
ȱȱȱęȱȱȱȱ
precleaner (if equipped).
7.
Reinstall the air cleaner cover and tighten the
knob securely.
Şǯȱ
ȱȱȱ¢ǰȱȱȱ
Kohler parts.
Foam Air Filter
Yearly or every 100 hours of operation replace the
ȱȱęȱ(Kohler part number 14 083 09-S).
ȱȱȱęȱȱ¢ǰȱȱȱȱ
ȱ¢ȱŘśȱȱȱDzȱȱĞȱȱ
extremely dusty or dirty conditions.
ŗǯȱ
ȱȱȱȱǰȱȱȱȱęǰȱ
and the precleaner, if equipped. See Figure 17.
Řǯȱ
ȱȱȱȱȱȱęȱȱȱ
ȱȱȱȱęǯȱȱȱȱȱȱ
ęȱȱȱȱȱȱȱ¢ȱ ¢ǰȱ
ȱȱęǯ
3.
When replacement is necessary, use genuine
Kohler parts.
Śǯȱ
ȱȱęǰȱȱȱȱȱȱ
base and cover for damage. All air cleaner
ȱȱęȱ¢ǯȱȱȱ
questionable air cleaner components.
śǯȱ
ȱ¢ȱȱȱȱȱȱȱ ȱȱ
ęȱ ȱǰȱ¢ȱȱȱ ȱ
the base clean.
Ŝǯȱ
ȱȱȱęǰȱȱȱȱȱȱ
tighten the knob securely.
Precleaner
1.
Wash or replace the optional precleaner (Kohler
part number 14 083 02-S)ȱ¢¢ȱȱ¢ȱŘśȱȱ
ȱDzȱȱĞȱȱ¡¢ȱ¢ȱ
or dirty conditions.
Řǯȱ
ȱȱȱȱȱȱȱȱȱ
cover. See Figure 17.
3.
Remove the precleaner and wash with detergent
in warm water.
Śǯȱ
ȱȱȱ¢ȱȱȱȱ
of detergent are eliminated. Squeeze out excess
water (do not wring), and allow the precleaner to
air dry.
śǯȱ
ȱȱǯ
6.
Reinstall the air cleaner cover and tighten the
knob securely.
7.
When replacement is necessary, use genuine
Kohler parts.
Cooling Areas
To ensure proper cooling, make sure the grass screen,
ȱęǰȱȱȱ¡ȱȱȱȱȱ
are kept clean at all times.
NOTE: Operating the engine with a blocked grass
ǰȱ¢ǰȱȱȱȱęȱ ȱ
cause engine damage due to overheating.
Spark Plug
Yearly or every 100 hours of operation, remove the
spark plug, check its condition and reset the gap or
replace with a new plug as necessary. The standard
spark plug for model XT-6 is a Champion
®
ȱŞŞŗśȱ
(Kohler part number 14 132 06-S). The standard spark
plug for models XT-7 and XTR-7 is a Champion
®
ŗŘȱ(Kohler part number 12 132 02-S).
Equivalent, alternative brand plugs can also be used.
1.
Before removing the spark plug, clean the area
around the base of the plug to keep dirt and
debris out of the engine.
Řǯȱ
ȱȱȱȱȱȱǯȱȱ
the plug if worn or reuse is questionable.
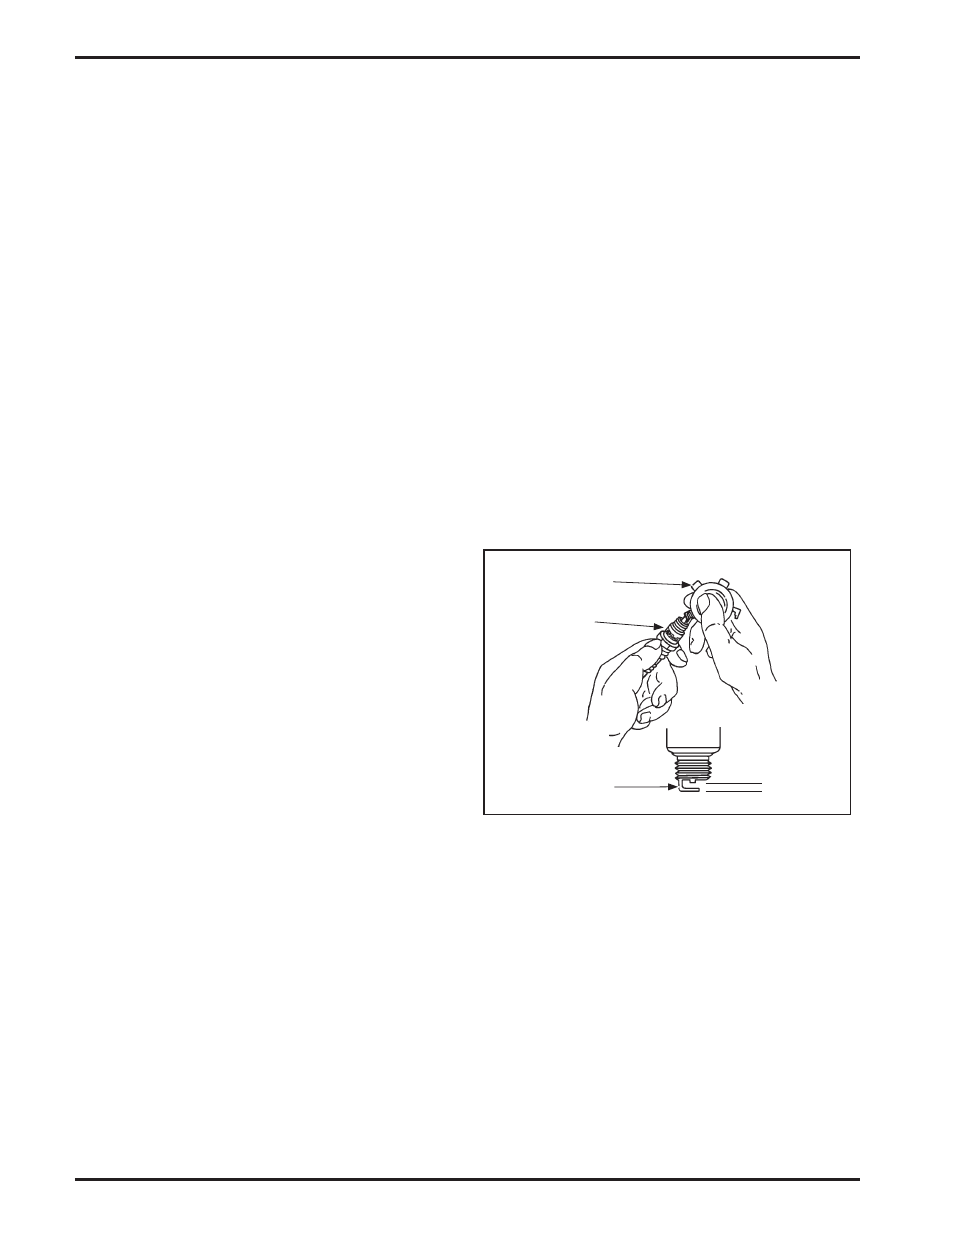
řǯȱ
ȱȱȱȱȱȱǯȱȱȱŗŞǯ
Feeler Gauge
Ground
Electrode
Spark Plug
Gap
Figure 18. Spark Plug Gap.
NOTE: Do not clean the spark plug in a machine
using abrasive grit. Some grit could remain in
the spark plug and enter the engine causing
extensive wear and damage.
Śǯȱ
ȱȱȱ¢ȱ¢ȱȱȱȱ
electrode. Gap spark plug to 0.762 mm (0.030 in.).
Reinstall the spark plug into the cylinder head.
Torque the plug to ŘŘȬŘŚȱȉȱǻŗŜȬŗŞȱĞ. lb.).