Kawasaki 840443 User Manual
Page 9
P
PL
LU
UN
NG
GE
E C
CU
UT
TT
TIIN
NG
G
N
Ne
evve
err ffe
ee
ed
d tth
he
e b
blla
ad
de
e iin
ntto
o tth
he
e w
wo
orrkk p
piie
ecce
e u
un
nttiill tth
he
e b
blla
ad
de
e
iiss a
att ffu
ullll ssp
pe
ee
ed
d.. IIff tth
he
e b
blla
ad
de
e iiss n
no
ott a
att ffu
ullll ssp
pe
ee
ed
d,, tth
he
e ssa
aw
w m
ma
ayy kkiicckk b
ba
acckk
cca
au
ussiin
ng
g sse
erriio
ou
uss p
pe
errsso
on
na
all iin
njju
urryy..
• Mark out the line to be cut so it is easily visible.
• Start inside the area to be cut out.
• Depress the lock-on button and press the trigger to start the saw.
• Set the shoe against the work piece.
• When the blade reaches full speed, slowly feed the blade into the work piece.
M
ME
ET
TA
AL
L C
CU
UT
TT
TIIN
NG
G
N
Ne
evve
err u
usse
e g
ga
asso
olliin
ne
e o
orr a
an
nyy fflla
am
mm
ma
ab
blle
e lliiq
qu
uiid
d a
ass a
a
llu
ub
brriicca
an
ntt.. S
Sp
pa
arrkkiin
ng
g ffrro
om
m tth
he
e m
mo
otto
orr m
ma
ayy cca
au
usse
e iitt tto
o iig
gn
niitte
e iin
ntto
o fflla
am
me
ess..
• When cutting metals other then copper, brass or aluminum, always use a lubricant,
such as cutting oil, to keep the blade cool. This will prolong the life of the blade as
well as speeding up the cutting process.
• Make sure the work piece is held securely in place. Hold smaller pieces, such as
pipe or conduit, in a vise or attach to the workbench with clamps.
• To eliminate vibration, always cut close to the clamping point.
• When cutting thin sheets of metal, place a piece of plywood on either side to control
vibration and prevent tearing.
M
MA
AIIN
NT
TE
EN
NA
AN
NC
CE
E A
AN
ND
D C
CL
LE
EA
AN
NIIN
NG
G
A
Allw
wa
ayyss rre
em
mo
ovve
e tth
he
e b
ba
atttte
erryy p
pa
acckk b
be
effo
orre
e a
atttte
em
mp
pttiin
ng
g
cclle
ea
an
niin
ng
g o
orr m
ma
aiin
ntte
en
na
an
ncce
e..
T
Th
hiiss C
Co
orrd
dlle
essss JJiig
gssa
aw
w iiss llu
ub
brriicca
atte
ed
d b
be
effo
orre
e iitt lle
ea
avve
ess tth
he
e
ffa
acctto
orryy.. This lubrication should last for the life of the tool. No
further lubrication is required.
U
Usse
e o
on
nllyy m
miilld
d sso
oa
ap
p a
an
nd
d a
a d
da
am
mp
p ccllo
otth
h tto
o cclle
ea
an
n tth
he
e tto
oo
oll.. Never let any liquid get
inside the casing. Never immerse any part of the tool in a liquid. Always keep the
ventilation openings clear.
O
OP
PE
ER
RA
AT
TIIN
NG
G T
TH
HE
E O
ON
N // O
OF
FF
F S
SW
WIIT
TC
CH
H
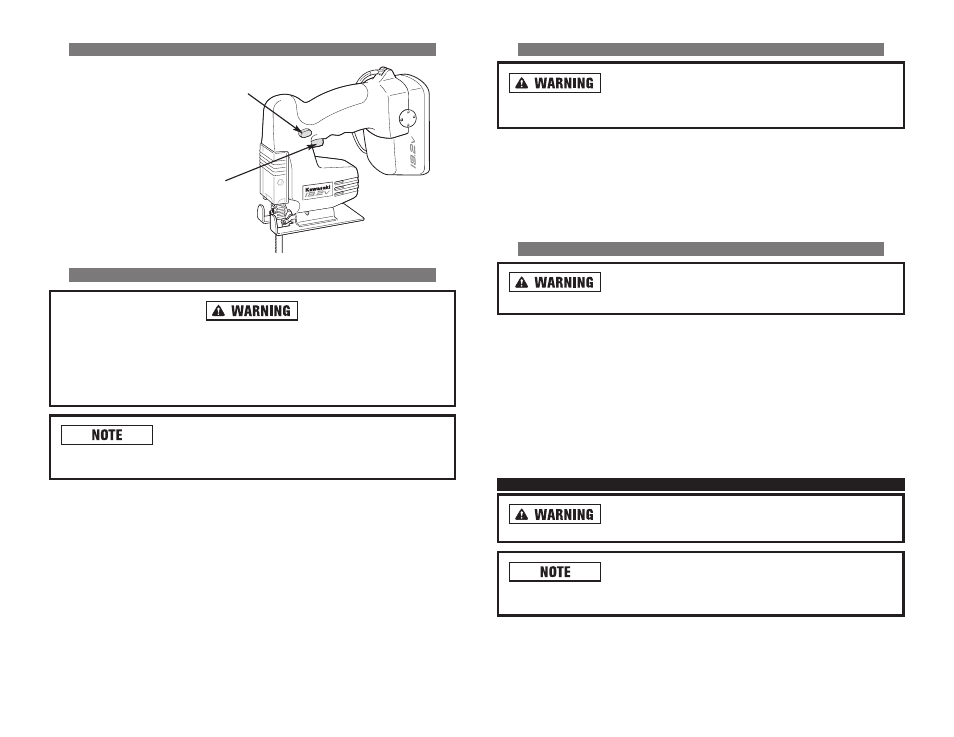
• Depress the lock-on
button to one side.
• Press the trigger in to
turn the Jigsaw “
“O
ON
N”
”
and release the trigger
to stop the Jigsaw.
G
GE
EN
NE
ER
RA
AL
L C
CU
UT
TT
TIIN
NG
G
A
Allw
wa
ayyss h
ho
olld
d tth
he
e ssa
aw
w iin
n ffrro
on
ntt o
off yyo
ou
u a
an
nd
d a
aw
wa
ayy ffrro
om
m yyo
ou
urr b
bo
od
dyy.. K
Ke
ee
ep
p yyo
ou
urr
h
ha
an
nd
dss a
an
nd
d ffe
ee
ett w
we
ellll a
aw
wa
ayy ffrro
om
m tth
he
e w
wo
orrkk p
piie
ecce
e..
N
Ne
evve
err ffe
ee
ed
d tth
he
e b
blla
ad
de
e iin
ntto
o tth
he
e w
wo
orrkk p
piie
ecce
e u
un
nttiill tth
he
e b
blla
ad
de
e iiss a
att ffu
ullll ssp
pe
ee
ed
d..
IIff tth
he
e b
blla
ad
de
e iiss n
no
ott a
att ffu
ullll ssp
pe
ee
ed
d,, tth
he
e ssa
aw
w m
ma
ayy kkiicckk b
ba
acckk cca
au
ussiin
ng
g sse
erriio
ou
uss
p
pe
errsso
on
na
all iin
njju
urryy..
D
Do
o n
no
ott ffo
orrcce
e tth
he
e ssa
aw
w.. E
Exxcce
essssiivve
e ffo
orrcce
e m
ma
ayy rre
essu
ulltt iin
n a
a
b
brro
okke
en
n b
blla
ad
de
e.. Use only enough pressure to keep the saw moving through the
work piece.
• Put on eye protection.
• Clear the saw of any foreign material.
• Make sure the work piece is held securely in place. Hold smaller pieces in a vise
or attach to the workbench with clamps.
• Mark out the line to be cut so it is easily visible.
• Pull the trigger to start the saw.
• Set the shoe against the work piece.
• When the blade reaches full speed, slowly feed the blade into the work piece.
15
16
TRIGGER
SWITCH
LOCK-ON
BUTTON