Kawasaki 840443 User Manual
Page 8
A
AT
TT
TA
AC
CH
HIIN
NG
G T
TH
HE
E B
BL
LA
AD
DE
E
A
Allw
wa
ayyss rre
em
mo
ovve
e b
ba
atttte
erryy p
pa
acckk b
be
effo
orre
e iin
nsstta
alllliin
ng
g o
orr rre
em
mo
ovviin
ng
g b
blla
ad
de
e..
W
Wh
he
en
n rre
em
mo
ovviin
ng
g tth
he
e b
blla
ad
de
e ffrro
om
m tth
he
e tto
oo
oll,, a
avvo
oiid
d cco
on
ntta
acctt w
wiitth
h sskkiin
n a
an
nd
d u
usse
e
p
prro
op
pe
err p
prro
otte
eccttiivve
e g
gllo
ovve
ess w
wh
he
en
n g
grra
assp
piin
ng
g tth
he
e b
blla
ad
de
e o
orr a
acccce
esssso
orryy.. Accessories
may be hot after prolonged use.
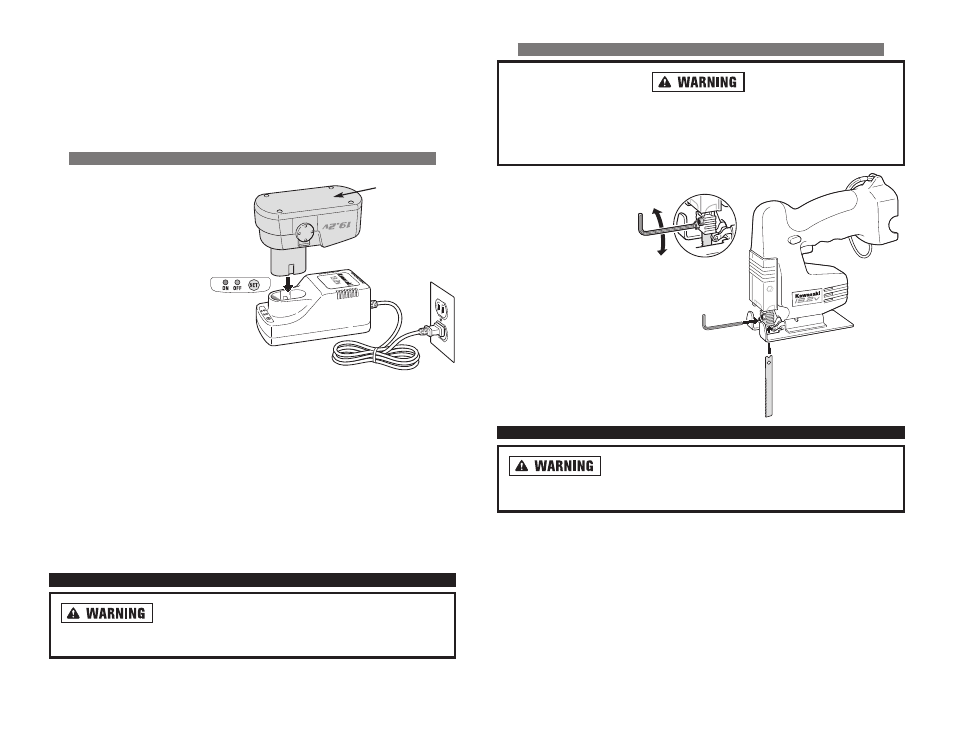
1. Loosen the two screws
on the blade holder
by turning them count-
er-clockwise. Push the
blade shank into the saw
blade holder as far
as it will go. Make sure
that the blade’s teeth
are facing forward.
2. Tighten the screws slowly, first one
side, then the other, until the blade
reaches the desired position.
Tighten the screws completely to
hold the blade in place.
O
OP
PE
ER
RA
AT
TIIN
NG
G T
TH
HE
E JJIIG
GS
SA
AW
W
N
Ne
evve
err tta
ap
pe
e tth
he
e ttrriig
gg
ge
err ssw
wiittcch
h d
do
ow
wn
n tto
o p
prro
ovviid
de
e cco
on
nttiin
nu
uo
ou
uss
h
hiig
gh
h ssp
pe
ee
ed
d.. The tool may fail under such conditions causing fire or personal
injury.
14
T
Th
he
e b
ba
atttte
erryy p
pa
acckk a
an
nd
d cch
ha
arrg
ge
err h
he
ea
att d
du
urriin
ng
g cch
ha
arrg
giin
ng
g.. Place the charger on a flat,
non-flammable surface away from flammable materials with at least four inches of
clearance to allow proper air circulation around the charger and battery pack.
W
Wh
he
en
n tth
he
e b
ba
atttte
erryy p
pa
acckk rre
eq
qu
uiirre
ess rre
ecch
ha
arrg
giin
ng
g,, a
a 1
1 h
ho
ou
urr cch
ha
arrg
ge
e a
allllo
ow
wss tth
he
e tto
oo
oll tto
o
o
op
pe
erra
atte
e a
att ffu
ullll p
po
ow
we
err.. A charging indicator light on the charger will illuminate to
show that charging is taking place.
C
CH
HA
AR
RG
GIIN
NG
G B
BA
AT
TT
TE
ER
RY
Y P
PA
AC
CK
K U
US
SIIN
NG
G O
ON
NE
E H
HO
OU
UR
R C
CH
HA
AR
RG
GE
ER
R #
#6
69
90
05
50
07
7
C
CH
HA
AR
RG
GE
E B
BA
AT
TT
TE
ER
RY
Y P
PA
AC
CK
K::
1. Plug the charger into the
nearest 120 volt electrical
outlet. The step of the bat-
tery has positive and nega-
tive terminal markings on it.
Align the markings with the
identical markings on the
top of the charger base.
Insert the battery pack into
base. Pack will not insert
properly if reversed.
2. Make sure the trigger on the
Cordless Jigsaw is in the
“
“O
OF
FF
F”
” position and remove the battery pack from the Cordless Jigsaw.
3. If, when first inserting the battery pack, the red “
“O
ON
N”
” button does not light up,
press the “SET” button on the charger. When the battery is charging, the red
light is “
“O
ON
N”
”.
4. After approximately one hour of charging, the red indicator light should go
“
“O
OF
FF
F”
” and the green light should come “
“O
ON
N”
”. The green light indicates that the
battery is fully charged.
5. When fully charged, reattach battery pack onto Cordless Jigsaw, making certain
latches fasten securely. Cordless Jigsaw will not operate properly if the battery
pack is not seated properly.
A
AS
SS
SE
EM
MB
BL
LY
Y
B
Be
e a
aw
wa
arre
e tth
ha
att tth
hiiss tto
oo
oll iiss a
allw
wa
ayyss iin
n a
an
n o
op
pe
erra
attiin
ng
g cco
on
nd
diittiio
on
n
b
be
ecca
au
usse
e iitt d
do
oe
ess n
no
ott h
ha
avve
e tto
o b
be
e p
pllu
ug
gg
ge
ed
d iin
ntto
o a
an
n e
elle
eccttrriicca
all o
ou
uttlle
ett.. Always turn
the switch “
“O
OF
FF
F”
” and remove the battery pack before changing blades.
LOOSEN
TIGHTEN
13
BATTERY
CHARGER
BATTERY PACK