Part names, Power sources, Playback from the first track – Kenwood DPC-X447MP User Manual
Page 4: Selecting play mode, Program playback, Searching for mp3/wma, Sound skip guard function (asp), Charge check ower in ok p, Bcdef: file search a, Hijkl: file search g
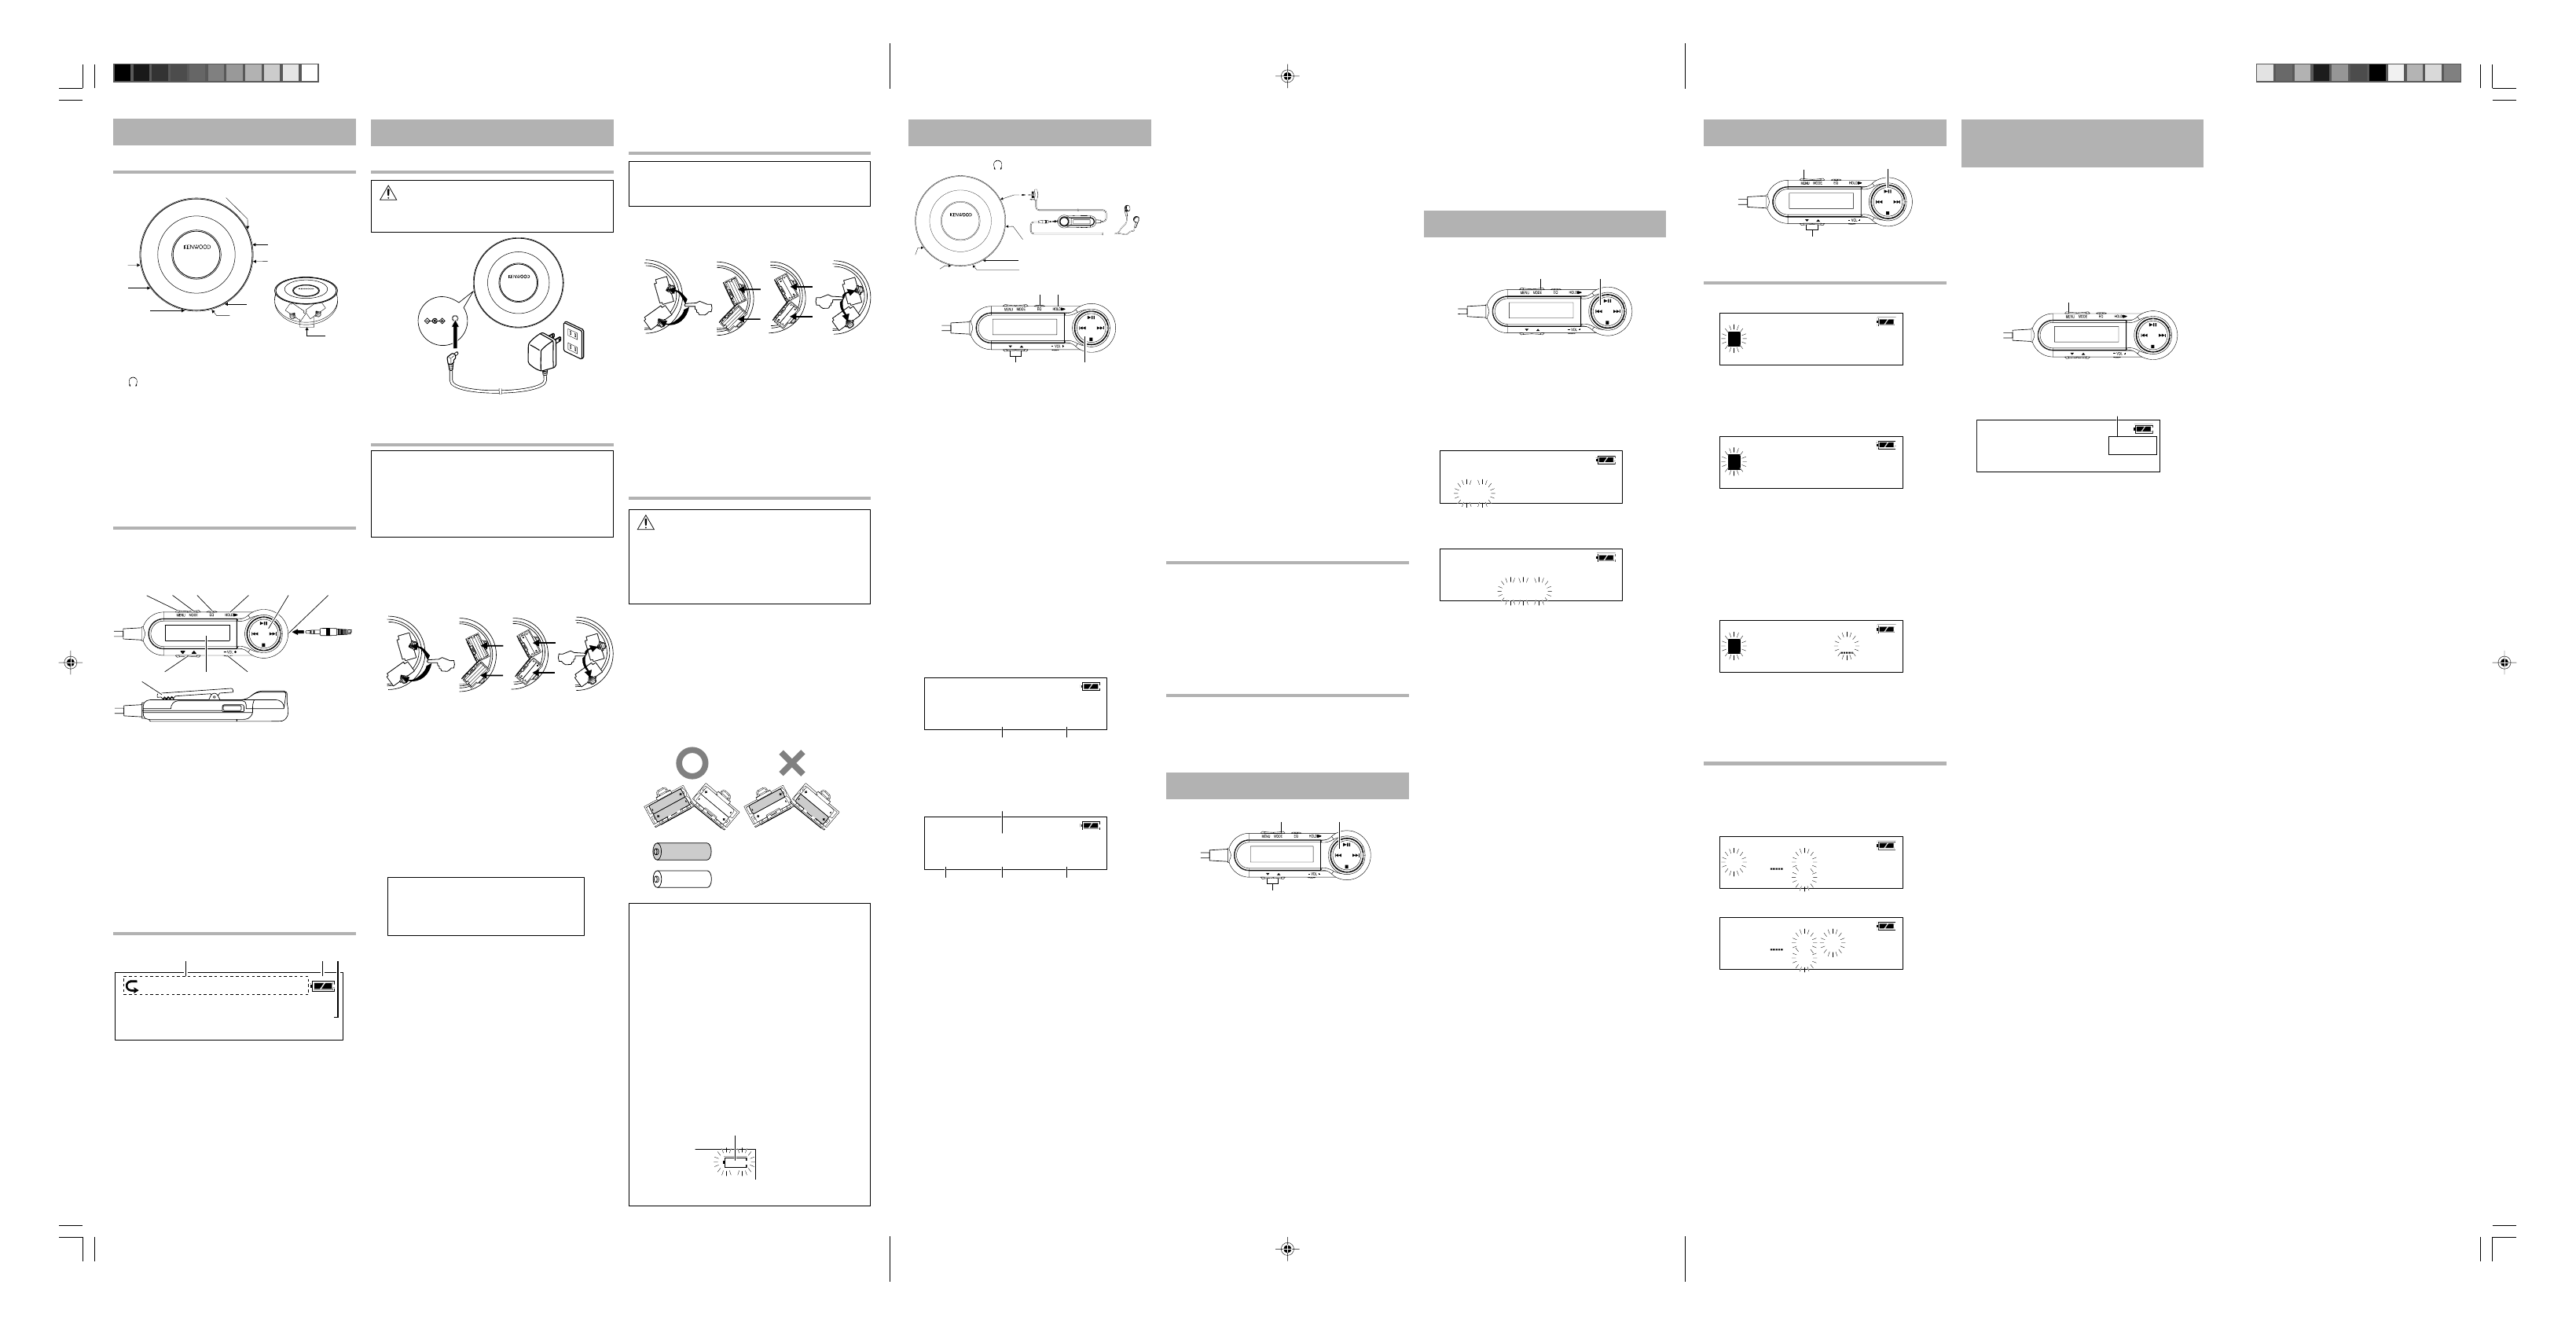
Unit
Remote control
Display (Remote control)
Å VOL (Volume) knob
ı LINE OUT jack
Ç
PHONE (Phones/Remote) jacks
Î
7 (Stop/Off) key
‰ HOLD switch
Ï Batteries case
Ì
38 (Play/Pause) key
Ó OPEN switch
(Slide to open top cover)
¬ DC IN 4.5V (External power) jack
The keys on the remote control unit with the same
names as on the main unit have the same function
as the keys on the main unit.
Part names
Å MENU key
ı MODE key
Ç EQ key
Î HOLD switch
‰
38 (Play/Pause) key/ 4,¢ keys
7 (Stop/Off) key
Ï Phones jack
Ì VOL (Volume) knob
Ó Display
¬
∞ 5 keys
Ô Clip
Å Play mode indicator/ Program mode indicator
ı Battery duration indicator
Ç Character information display
Power sources
To the DC IN 4.5V
(External power) jack
AC power
outlet
AC power
adaptor
Using the AC adaptor
(For Europe)
1
CAUTION
Use the enclosed AC adaptor (AC-45060A) for
this product.
Rechargeable battery operation
(For Europe)
2
Note:
Rechargeable batteries are not provided with
this unit. Always use the separately sold re-
chargeable batteries NB-3A70. Rechargeable
battery models other than the NB-3A70 may
be unable to be recharged.
7
Loading the batteries
1 Open the battery cover.
2 Insert 2 or 4 rechargeable batteries and close the
cover.
÷ Make sure the positive (+) and negative (-) poles
are properly aligned.
÷ When using two batteries, these can be loaded in
either battery case.
÷ During battery charging or use of the unit, the
battery may become warm. This is normal and
does not indicate a malfunction.
7
Charging the rechargeable batteries
1 Plug in the AC adaptor.
2 Press and hold the 7 key until "Charge" appears
in the remote control display (3 seconds or
more).
3 After the batteries have been charged, remove
the AC adaptor.
÷ When using a rechargeable battery which is
new or which has not been used for more than
2 months, the operating period may be shorter
than normal. This is due to the properties of the
battery and not a malfunction. After recharging,
use the battery on the unit until it is exhausted.
The original performance of the battery can be
recovered by repeating this cycle a few times.
÷ Make sure to close the top cover of the unit
before proceeding to recharging.
÷ Make sure that no alkaline batteries are loaded
in the battery cases before charging the re-
chargeable batteries.
÷ Recharging completes in about 10 hours. Do not
attempt to recharge the batteries after this period.
÷ Rechargeable batteries can be recharged. When
the playable time per recharge reduces, please
newly purchase the optional (NB-3A70) recharge-
able batteries.
When operating the unit with alka-
line batteries
3
Note:
Alkaline batteries are not provided with this
unit.
1 Open the battery cover.
2 Insert 2 or 4 alkaline batteries and close the
cover.
÷ Make sure the positive (+) and negative (-) poles
are properly aligned.
÷ When using two batteries, these can be loaded in
either battery case.
÷ Use commercially available LR03 batteries. The
unit may not operate normally if manganese
batteries are used.
÷ Replace 2 or 4 batteries at the same time.
When operating the unit with 2 recharge-
able batteries and 2 alkaline batteries 4
CAUTION
Do not load one rechargeable and one alka-
line batteries together in the same battery
case. Otherwise, battery burst or fluid leak
may cause a fire, injury or damage to the
battery case and its surroundings.
This unit can be operated with 2 rechargeable bat-
teries and 2 alkaline batteries.
÷ When 4 batteries are used, make sure they are
arranged so that batteries of the same type are in
line horizontally (see illustration).
÷ Always use the separately sold rechargeable
battery NB-3A70.
÷ Exchange the same type of batteries at the same
time.
Rechargeable batteries (NB-3A70)
Alkaline batteries
Battery duration indicator
The duration at which the battery indicator starts
to blink is variable depending on the type of
battery used.
Rechargeable batteries
When the batteries is nearly exhausted:
]In a while, the power will be turned off
automatically. Then recharge the bat-
teries.
Alkaline batteries
When the batteries are half exhausted:
]Playback is possible while the indicator
is blinking.
Battery duration indicator
PHONE(Phones/ Remote) jacks
1 Slide the OPEN switch in the direction of the
arrow to open the top cover.
2 Insert disc and close the top cover.
÷ Insert with labeled side up.
÷ Secure the disc by pushing a position near
the center hole unit it clicks.
÷ Close securely by pushing the front cen-
ter position of the top cover unit it clicks.
3 Set the HOLD switch to off.
÷ For the Hold function, read "Hold function".
÷ Before any operation, be sure to set the
HOLD switch to off.
4 Press the 38 key.
÷ The power comes on and playback be-
gins.
÷ Certain CD-R/CD-RW (CD-DA, MP3/WMA)
discs may not be played due to recording
conditions of the discs.
CD-DA:
PLAY
ASP
CD
01
00:01
MP3/WMA:
File:Keep
On
01
001
00:01
5 Use the VOL knob to adjust the volume.
7
To pause playback temporarily
Press the
38 key during playback states.
÷ Pressing the key again resumes playback.
7
To stop playback
Press the
7 key during playback states.
÷ The total number of tracks and the total
playing time of them will be displayed.
7
To turn power off
After stopping playback, press the
7 key again.
Auto power-off function
If no operation key has been pressed for 1
minutes while the unit is in the stop mode, the
power is turned off automatically to prevent
battery power consumption.
Playback from the first track
5
Track number
Elapsed time of track
being played
ID3 Tag display
File number
Elapsed time of track
being played
Forder number
∞/5
38/7/4/¢
EQ HOLD
7
Selecting the folder
(Only MP3/WMA)
Use the
∞ or 5 key to select the folder.
÷ Press the 38 key starts playback from the
first file in the selected folder.
7
Skipping tracks
Press the
4 or ¢ key.
÷ When the ¢ key is pressed, playback will skip
to the start of the subsequent track.
÷ Each time the key is pressed, playback
will skip to the next track.
÷ When the 4 key is pressed, playback
will skip to the start of the track being
played back.
÷ Each time the key is pressed, playback
will skip to the previous track.
7
Fast forward, fast reverse
Hold the
4 key or ¢ key pressed during
playback.
÷ Fast forward is engaged by pressing and
holding down key
¢ while playback is in
progress.
÷ Fast reverse is engaged by pressing and
holding down key
4 while playback is in
progress.
÷ Playback will resume when either key is
released.
Hold function
Slide the HOLD switch in the direction of the arrow
to switch the HOLD function on.
÷ When the HOLD switch on the unit is switched
on, the unit's keys cannot be operated.
÷ When the HOLD switch on the remote control
is switched on, the remote control's keys can-
not be operated.
Changing the tone
Press the EQ key for the following selections.
1 "FLAT"
4 "ROCK"
2 "CLASSIC"
5 "POP"
3 "JAZZ"
6 "BASS"
Selecting Play Mode
6
∞/5
38/4/¢
MODE
Press the MODE key for the following selections.
(Press the playback status)
1 One-track repeat ("
P1" lights up)
The track being played will be played repeatedly.
÷ To play the next track repeatedly, press the
4 or ¢ key.
2 Album repeat ("
PALBUM" lights up)
(Only MP3/WMA)
All of the tracks in the folder containing the track
being played will be played repeatedly.
÷ To play the next folder repeatedly, press the
5 or ∞ key.
3 All-track repeat ("
PALL" lights up)
All tracks on the disc will be played repeatedly.
4 Intro Scan ("INTRO" lights up)
The first 10 seconds of all tracks on the disc will
be played in the recorded order.
5 Random playback ("RAND" lights up)
All tracks on the disc will be played in a random
order.
6 Normal playback
÷ If Intro Scan or Random Playback is selected
while playback is in progress, Intro Scan or
Random Play operation will commence when
the track being played back is over.
÷ The program of tracks is also valid in Re-
peat or Intro Scan playback.
Program playback
7
Favorite tracks (max. 64 tracks) can be programmed.
7/4/¢
MODE
1 Press the MODE key during stop status.
÷ Stop status is engaged when the 7 key is
pressed while playback is in progress.
2 Use the 4 or ¢ key to select the folder, and
press the MODE key.
÷ If the medium being played is a CD,
simply select the track to be programmed.
PROG
STOP
00
000
P-01
Use the
4 or ¢ key to select the file, and
press the MODE key.
PROG
STOP
01
000
P-01
÷ Repeat step 2 to select other folders/files or
tracks in the order you want to program them.
÷ Up to 64 tracks can be programmed in this unit.
3 Press the 38 key.
7
To clear the programmed contents
Press the
7 key.
÷ The "PROG" indicator is turned off when the
program is cleared. However, the programmed
contents are stored.
÷ Program mode can be canceled when the 7
key is pressed or the top cover is open while
stop status is engaged. The programmed con-
tents are cleared.
Searching for MP3/WMA
∞/5
38/7/4/¢
MENU
Searching for folders/files 8
1 Press the MENU key once.
BCDEF:
File
Search
A
2 Use the ∞ or 5 key to select the alphanumeric
character group.
Use the
4 or ¢ key to select the desired
character.
HIJKL:
File
Search
G
1 "A B C D E F"
2 "G H I J K L"
3 "M N O P Q R"
4 "S T U V W X"
5 "Y Z 0 1 2 3"
6 "4 5 6 7 8 9"
7 "*
= + p 3 7"
3 Press the 38 key to enter the selected
character for use in search.
HIJKL:G
Get
The
Pih
G
÷ If you made a mistake during entry, press
the
7 key.
4 Use the 5, ∞ or 4, ¢ key to select "3", and
press the
38 key.
Selecting folders/files 9
1 Press the MENU key twice.
2 Use the 4 or ¢ key to select the folder
selection mode or file selection mode.
Folder selection mode:
P3
D/:Point
Doggy/..
M
File selection mode:
P3
D/:Point
Doggy/..
M
3 Use the 5 or ∞ key to select the folder or file,
and press the
38 key.
Sound skip guard function
(ASP)
(CD-DA only)
0
ASP (Anti Skip Protection) :
When ASP function set to ON, the audio signals of
a certain period is stored in memory so that, even
when the signal from the optical pickup is inter-
rupted by an external shock, this unit can continue
music without interruption.
The ASP function is activated permanently during
playback of MP3/WMA files.
MENU
Press the MENU key during stop status.
01
00:0
PLAY
ASP
CD
0
:
2
CD-DA:
Records approximately 40 seconds of data.
MP3 file: (Bit rate 128kbps)
Records approximately 120 seconds of data.
WMA file: (Bit rate 64kbps)
Records approximately 480 seconds of data.
÷ Depending on the extent of the impact,
the data in the memory may be used up,
so the playback skip protection may mo-
mentarily be ineffective.
Light at ASP ON
Å
ı
З
О
У
¬
Ф
М
‰
П
1ALL ALBUM INTRO PROG RAND
••••••••••••
••••••••••••
Å
ı З
З
М
О
П
ı
Е
‰
У
¬
DC IN 4.5V
HOLD
OPEN
VOL
38
7
Charge
Check
ower
IN
OK
P
*5514_EN
04.9.27, 1:08 PM
3