Kawasaki 691170 User Manual
Page 8
FFO
OR
RW
WA
AR
RD
D//R
RE
EV
VE
ER
RS
SE
E A
AN
ND
D T
TR
RIIG
GG
GE
ER
R L
LO
OC
CK
K L
LE
EV
VE
ER
R
B
Bee ssu
urree tth
hee ttrriig
gg
geerr iiss rreelleeaasseed
d w
wh
heen
n cch
haan
ng
giin
ng
g tth
hee p
po
ossiittiio
on
n o
off tth
hee lleevveerr..
Always store the tool in the ““L
LO
OC
CK
KE
ED
D//O
OFFFF”” position.
A
Allw
waayyss cch
heecckk tth
hee d
diirreeccttiio
on
n o
off tth
hee C
Co
orrd
dlleessss D
Drriillll''ss rro
ottaattiio
on
n b
beeffo
orree u
ussee..
T
TO
O S
SE
EL
LE
EC
CT
T T
TH
HE
E D
DIIR
RE
EC
CT
TIIO
ON
NS
S
O
OFF R
RO
OT
TA
AT
TIIO
ON
N::
• To select forward Cordless Drill
rotation, press the trigger lock
from left to right flat against the Cordless
Drill body.
• To select reverse, press the trigger lock lever
in the opposite direction.
• The center position locks the tool.
T
TO
OR
RQ
QU
UE
E S
SE
ET
TT
TIIN
NG
GS
S
T
To
o p
prreevveen
ntt d
daam
maag
giin
ng
g tth
hee tto
oo
oll o
orr d
drriivviin
ng
g ssccrreew
w tto
oo
o d
deeeep
p
iin
ntto
o w
wo
orrkk p
piieeccee,, rreelleeaassee tth
hee ttrriig
gg
geerr w
wh
heen
n yyo
ou
u ffeeeell tth
hee ccllu
uttcch
h sslliip
p..
T
TH
HE
E C
CO
ON
NT
TR
RO
OL
L R
RIIN
NG
G A
AD
DJJU
US
ST
TS
S T
TH
HE
E L
LE
EV
VE
EL
L O
OFF T
TO
OR
RQ
QU
UE
E::
• For light duty work, use lower settings.
• For heavy duty work, use higher settings.
P
PR
RO
OP
PE
ER
R S
SE
ET
TT
TIIN
NG
G FFO
OR
R D
DR
RIIV
VIIN
NG
G S
SC
CR
RE
EW
WS
S::
1. Set the ring on the lowest
setting to begin.
2. Try tightening the first screw.
If the drill drives smoothly,
proceed with the next screw.
3. If the Drill’s clutch slips,
increase the torque setting
and try again until the Drill
drives the screw without incident.
14
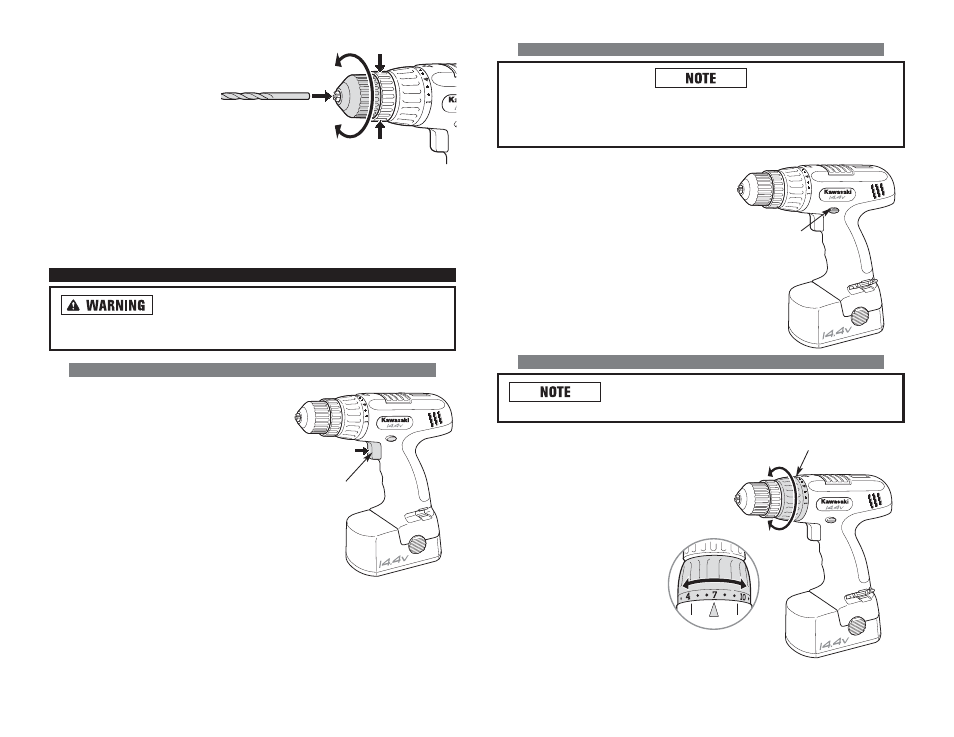
1. Hold the rear end of the chuck
in one hand and use the other
hand to rotate the front end in a
counterclockwise direction to
open the jaws of the chuck.
2. Insert the shank of the bit (or
other accessory) fully into the
keyless chuck, taking care to
keep the bit in the center of
the jaws of the chuck.
3. Turn the front end of the chuck clockwise to hold the bit in place.
4. Tighten securely by turning the front end of the chuck clockwise while holding
the rear end.
O
OP
PE
ER
RA
AT
TIIN
NG
G T
TH
HE
E D
DR
RIIL
LL
L
N
Neevveerr ttaap
pee tth
hee ttrriig
gg
geerr ssw
wiittcch
h d
do
ow
wn
n tto
o p
prro
ovviid
dee cco
on
nttiin
nu
u--
o
ou
uss h
hiig
gh
h ssp
peeeed
d.. The tool may fail under such conditions causing fire or
personal injury.
V
VA
AR
RIIA
AB
BL
LE
E S
SP
PE
EE
ED
D T
TR
RIIG
GG
GE
ER
R S
SW
WIIT
TC
CH
H
T
TH
HIIS
S T
TO
OO
OL
L IIS
S C
CO
ON
NT
TR
RO
OL
LL
LE
ED
D
B
BY
Y A
A T
TR
RIIG
GG
GE
ER
R S
SW
WIIT
TC
CH
H::
• The speed of the Cordless Drill depends
on the amount of pressure you put on the
trigger.
• The more pressure you apply, the faster
the Cordless Drill will go.
• Release the pressure and the Cordless Drill
will slow down.
13
TIGHTEN
LOOSEN
HOLD
TRIGGER
LOCK
TRIGGER
SWITCH
CONTROL RING