Kawasaki 691170 User Manual
Page 7
R
RE
EM
MO
OV
VIIN
NG
G // A
AT
TT
TA
AC
CH
HIIN
NG
G B
BA
AT
TT
TE
ER
RY
Y P
PA
AC
CK
K
R
RE
EM
MO
OV
VE
E B
BA
AT
TT
TE
ER
RY
Y P
PA
AC
CK
K::
1. Press both release buttons on either side of
the Cordless Drill to release the battery pack.
2. Pull battery pack free of Cordless Drill.
A
AT
TT
TA
AC
CH
H B
BA
AT
TT
TE
ER
RY
Y P
PA
AC
CK
K::
1. Align the raised portion of the battery pack
with the groove in the battery compartment
of the Cordless Drill.
2. Press the battery pack into place. Make sure
the latches are securely fastened. Do not use
the Cordless Drill if the battery pack is not
seated properly.
C
CH
HA
AR
RG
GE
ER
R
B
Beeffo
orree u
ussiin
ng
g b
baatttteerryy cch
haarrg
geerr,, p
plleeaassee rreeaad
d ccaarreeffu
ullllyy aallll
iin
nssttrru
uccttiio
on
nss aan
nd
d ccaau
uttiio
on
naarryy m
maarrkkiin
ng
gss o
on
n b
baatttteerryy cch
haarrg
geerr,, b
baatttteerryy p
paacckk aan
nd
d
p
prro
od
du
ucctt u
ussiin
ng
g b
baatttteerryy..
T
Th
hee cch
haarrg
geerr w
wiillll n
no
ott aau
utto
om
maattiiccaallllyy ttu
urrn
n ““O
OFFFF”” w
wh
heen
n tth
hee
b
baatttteerryy p
paacckk iiss ffu
ullllyy cch
haarrg
geed
d.. The charging indicator light will remain ““O
ON
N””
until the charger is disconnected from the electrical outlet.
U
Ussee o
on
nllyy tth
hee cch
haarrg
geerr w
wh
hiicch
h aacccco
om
mp
paan
niieed
d yyo
ou
urr p
prro
od
du
ucctt o
orr d
diirreecctt rreep
pllaacceem
meen
ntt aass
lliisstteed
d iin
n tth
hiiss m
maan
nu
uaall.. Do not substitute any other charger. Use only Alltrade
approved chargers with your product.
D
Do
o n
no
ott d
diissaasssseem
mb
bllee cch
haarrg
geerr..
D
Do
o n
no
ott u
ussee cch
haarrg
geerr iiff iitt h
haass b
beeeen
n d
daam
maag
geed
d,, lleefftt o
ou
uttd
do
oo
orrss iin
n tth
hee rraaiin
n,, ssn
no
ow
w,, w
weett
o
orr d
daam
mp
p een
nvviirro
on
nm
meen
nttss,, o
orr iim
mm
meerrsseed
d iin
n lliiq
qu
uiid
d..
T
Th
hee b
baatttteerryy p
paacckk aan
nd
d cch
haarrg
geerr h
heeaatt d
du
urriin
ng
g cch
haarrg
giin
ng
g.. Place the charger on a flat,
non-flammable surface away from flammable materials with at least four inches of
clearance to allow proper air circulation around the charger and battery pack.
W
Wh
heen
n tth
hee b
baatttteerryy p
paacckk rreeq
qu
uiirreess rreecch
haarrg
giin
ng
g,, aa 3
3--5
5 h
ho
ou
urr cch
haarrg
gee aallllo
ow
wss tth
hee tto
oo
oll tto
o
o
op
peerraattee aatt ffu
ullll p
po
ow
weerr.. A charging indicator light on the charger will illuminate to
show that charging is taking place.
C
CH
HA
AR
RG
GIIN
NG
G B
BA
AT
TT
TE
ER
RY
Y P
PA
AC
CK
K
C
CH
HA
AR
RG
GE
E B
BA
AT
TT
TE
ER
RY
Y P
PA
AC
CK
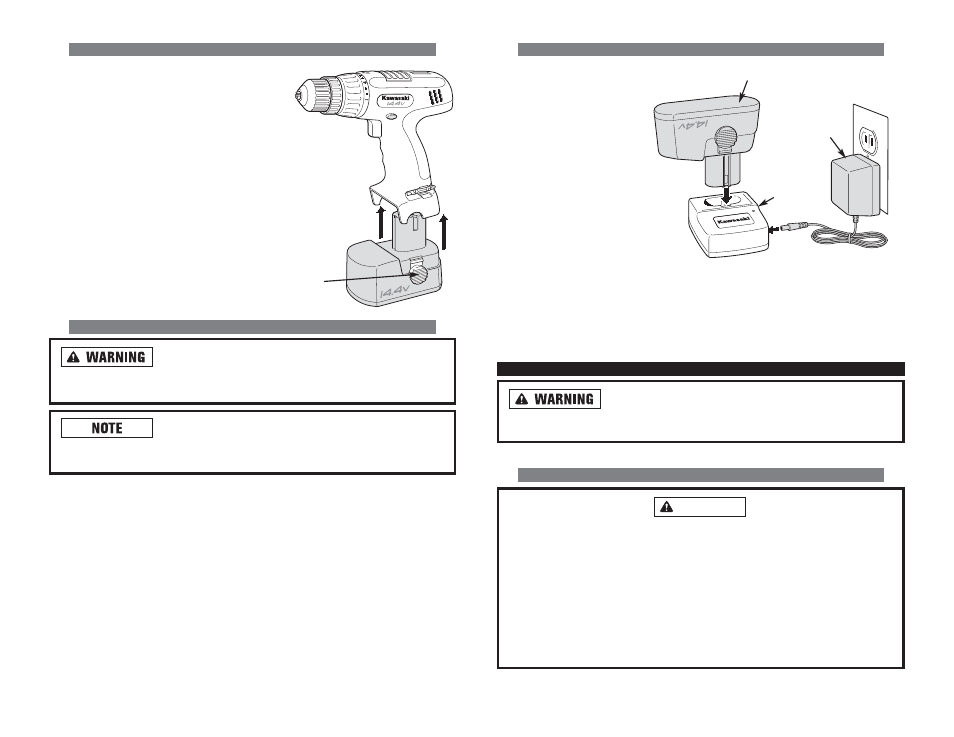
K::
1. Make sure the trigger
on the Cordless Drill
is in the ““O
OFFFF”” position
and remove the battery
pack from the Cordless
Drill.
2. Plug 120V AC Adapter
into household outlet
and into side of battery
charger. Insert battery
pack into battery charger.
When the battery is placed
in the charger, the red
LED indicator light will remain on.
3. When fully charged, reattach battery pack onto Cordless Drill,
making certain latches fasten securely. Cordless Drill will not
operate properly if the battery pack is not seated properly.
A
AS
SS
SE
EM
MB
BL
LY
Y
B
Bee aaw
waarree tth
haatt tth
hiiss tto
oo
oll iiss aallw
waayyss iin
n aan
n o
op
peerraattiin
ng
g cco
on
nd
diittiio
on
n
b
beeccaau
ussee iitt d
do
oeess n
no
ott h
haavvee tto
o b
bee p
pllu
ug
gg
geed
d iin
ntto
o aan
n eelleeccttrriiccaall o
ou
uttlleett.. Always turn
the switch ““O
OFFFF”” and remove the battery pack before changing bits.
IIN
NS
ST
TA
AL
LL
LIIN
NG
G D
DR
RIIL
LL
L B
BIIT
T IIN
NT
TO
O K
KE
EY
YL
LE
ES
SS
S C
CH
HU
UC
CK
K
B
Beeffo
orree iin
nsseerrttiin
ng
g aa d
drriillll b
biitt o
orr o
otth
heerr aacccceesssso
orryy,, make sure the forward/reverse
and trigger lock lever is in the center ““O
OFFFF”” position to prevent accidental starts
that may result in injury.
D
Do
o n
no
ott aatttteem
mp
ptt tto
o ttiig
gh
htteen
n d
drriillll b
biittss ((o
orr aan
nyy o
otth
heerr aacccceesssso
orryy)) b
byy g
grriip
pp
piin
ng
g tth
hee
ffrro
on
ntt o
off tth
hee cch
hu
ucckk aan
nd
d ttu
urrn
niin
ng
g tth
hee tto
oo
oll o
on
n.. This may cause personal injury
and/or damage to the chuck.
W
Wh
heen
n rreem
mo
ovviin
ng
g tth
hee b
biitt ffrro
om
m tth
hee tto
oo
oll,, aavvo
oiid
d cco
on
nttaacctt w
wiitth
h sskkiin
n aan
nd
d u
ussee p
prro
op
peerr
p
prro
otteeccttiivvee g
gllo
ovveess w
wh
heen
n g
grraassp
piin
ng
g tth
hee b
biitt o
orr aacccceesssso
orryy.. Accessories may be hot
after prolonged use.
WARNING
12
11
RELEASE BUTTON
BATTERY PACK
120V AC
ADAPTER
LED LIGHT
BATTERY
CHARGER