Shark GI576 User Manual
Page 5
USER MAINTENANCE INSTRUCTIONS
7
STORAGE
1. Always turn the variable steam
control to "0" after you have emptied
the water tank.
2. Allow the iron to cool down.
3. Always store the iron in the upright
position to protect the soleplate.
4. From time to time, clean the exterior
of the iron with a damp cloth and
wipe dry.
5. If you use spray starch, wipe the
soleplate occasionally with a soft
damp cloth to prevent the build-up of
deposits.
6. If the iron has not been used for a
few weeks, hold the iron horizontally
and allow to steam for 2 minutes
before ironing.
EMPTYING THE IRON
1. Always empty iron after each use.
2. When finished using the iron, turn
the variable steam control to “0” and
the temperature control dial to “MIN”.
3. Unplug the iron from the electrical
outlet.
4. Set variable steam control to “MAX”.
5. Turn the iron upside down over the
sink with the tip pointing downward
and allow the water to flow from the
opening.
6. Set variable steam control to “0”.
7. Allow iron to cool in an upright
position before storing.
WARNING!
Use caution when
emptying the iron. Burns may occur
from touching hot metal surfaces,
hot water or steam.
In order to remove calcium and built-up
particles, the self-cleaning system should be
run at least once a month. (Fig. 9)
• Fill the water flask provided to the half-full
mark and then pour into the water
reservoir.
• Set the variable steam control to the no
steam position (“0”).
• Insert the plug into the wall socket.
• Set the temperature control dial to the
maximum temperature.
• Wait until the temperature indicator light
goes off and steam iron has reached
preset temperature.
• Remove the plug from the wall socket.
• Hold the steam iron horizontally over a
sink.
• Place the variable steam control lever to
“Self-Clean” position. Hot water and
steam will be emitted from the soleplate.
Swing the steam iron lightly back and forth
gently to allow lime and dust particles to
come out.
• When the water reservoir is empty, slide
the variable steam control lever from “Self-
Clean” position to “0”.
• Stand the iron upright and insert the plug
into the wall socket to let the iron heat up
again.
• Move the iron over a clean cotton cloth to
clean the soleplate and let the remaining
water on the soleplate evaporate.
SELF CLEANING
NOTE:
The anti drip function reduces
water dripping and water stains. It does
not prevent water dripping and water
stains if you press the steam burst
button too often or if the temperature is
too low. The amount of water droplets
will eventually decrease after the iron is
used for 2 to 3 tankfuls of steaming and
ironing.
Fig. 9
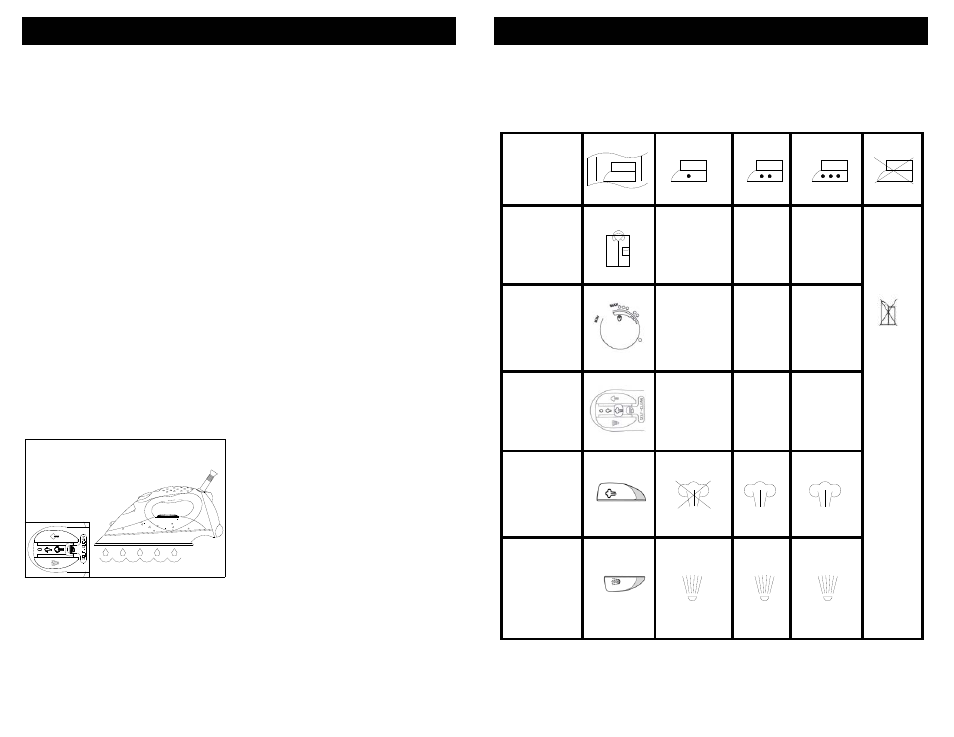
DIRECTIONS
ON LABEL
FABRIC
TEMP.
CONTROL
STEAM
CONTROL
BURST OF
STEAM
SPRAY
P
le
a
s
e
n
o
te
th
a
t
o
n
th
e
la
b
e
l m
e
a
n
s
‘T
H
IS
A
R
T
IC
L
E
C
A
N
N
O
T
B
E
IR
O
N
E
D
!”
COTTON
LINEN
SYNTHETIC
FIBERS, e.g.
acrylic, nylon
polyester
SILK
WOOL
MIN
•
• • • • •
MAX
0
MAXIMUM
STEAM
MINIMUM
STEAM
8
IRONING CHART
NOTE:
Before starting to iron delicate
fabrics, it is best to first test the
temperature of the iron on a hem or an
inside seam.
To select iron temperature, align
temperature selected on dial with
the indicator on the water tank.