Getting to know your iron, 11 operating instructions – Shark GI576 User Manual
Page 3
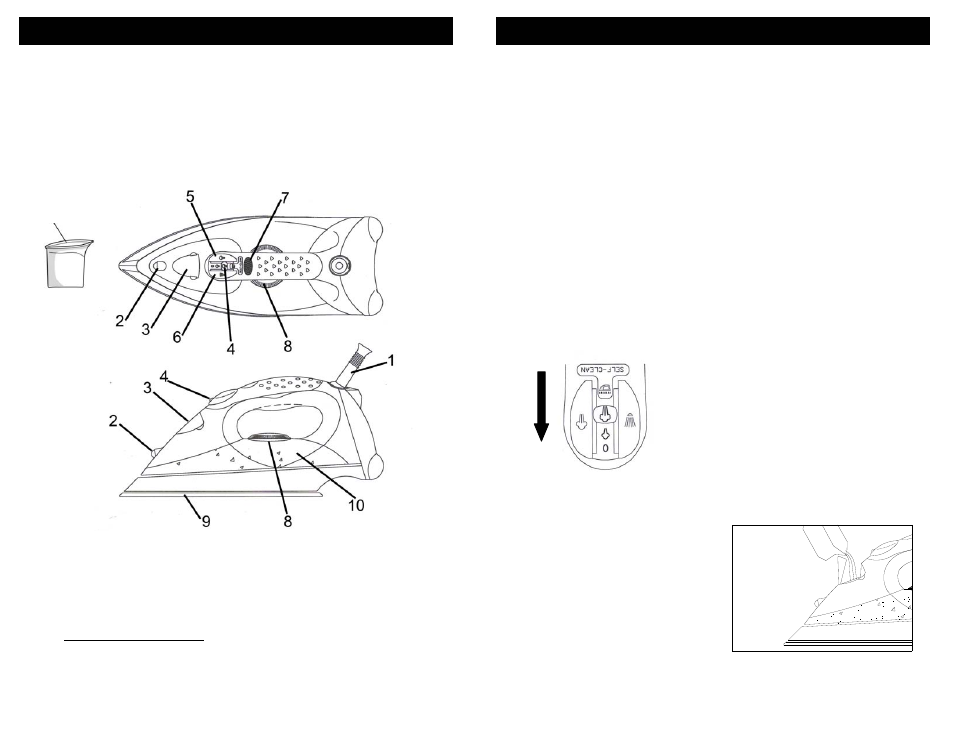
GETTING TO KNOW YOUR IRON
Before using your 1400 Watt Iron,
remove any labels, stickers or tags that
may be attached to the body or
soleplate of the iron.
When turned on for the first time, your
new iron may emit an odor for up to 10
minutes. This is due to the initial
heating of the materials used in making
the iron.
3
1. Power Supply Cord
2. Spray Nozzle
3. Water Filling Inlet
4. Variable Steam Control
5. Burst of Steam
6. Spray Button
7.
Temperature Indicator Light (amber)
& Auto Shut-Off Light (red)
8.
Temperature Control Dial
9.
Stainless Steel Soleplate
10. Water Level Window
11. Water Flask
The odor is safe and should not reoccur
after initial heating.
Also, before ironing with steam for the
first time, allow iron to heat, hold in a
horizontal position and hit the burst of
steam button several times. The iron
may emit some small particles from the
steam holes. This is normal and will
clear after pressing the burst of steam
button several times.
Technical Specifications
Voltage:
120V., 60Hz.
Power:
1400 Watts
11
OPERATING INSTRUCTIONS
This appliance is for HOUSEHOLD USE
ONLY and may be plugged into any
120V AC polarized electrical outlet. Do
not use any other type of outlet.
WARNING!
TO PREVENT THE RISK
OF BURNS, use caution when filling
iron with water. Burns can occur
from touching hot metal parts, hot
water or steam.
NOTE: Because of the soleplate design,
ordinary tap water may be used with this
iron. However, in very hard water areas,
we recommend using distilled or
demineralized water.
CAUTION
: Never fill the iron with
fabric conditioner, starches or any
other liquid, as these will damage the
steam mechanism. Do not use
contaminated water.
1. Turn temperature dial to "Min" and
slide the variable steam control lever
to the “0” position.
2. Holding the iron at a slight angle,
pour water slowly into the water
filling inlet. )Fig. 2) Fill tank to
desired level or to the "MAX" water
level marking using the water filling
flask. (When the iron is upright, see-
through water tank allows you to
gauge the amount of water.) DO
NOT overfill the tank.
DRY IRONING
All marked settings on the temperature
dial can be used for dry ironing. Slide
the variable steam control lever to the
“0” position as shown in Figure 1. This
will cut off the steam flow if water is in
the tank.
1. Turn temperature dial to "MIN" and
slide the variable steam control lever
all the way to "0".
2. Plug the cord into a polarized, 120V
AC electrical outlet. The temperature
indicator light will come on,
indicating that the iron is receiving
power.
3. Turn the temperature dial to the
desired setting. (See "Ironing Guide"
for a guide to temperature selection.)
4. Place iron on its heel (on a stable,
protected surface) while iron is
warming to desired temperature.
5. When the desired temperature is
reached, the temperature indicator
light will go “Off”.
STEAM IRONING
WARNING!
DO NOT aim iron at face,
towards yourself, or anyone else
while using or adjusting steam.
Burns or serious injury may occur.
WARNING!
Before filling the iron
with water, be sure the iron is not
plugged into the electrical outlet. The
iron may be filled with water while it
is hot.
3. Plug the cord into a polarized, 120V
AC electrical outlet.
Fig. 2
4
Fig. 1
For Dry Ironing:
ANTI-DRIP FEATURE
Built-in Anti-Drip feature helps reduce
water spots by cutting the water flow
when the iron temperature is too low to
build sufficient steam. The anti-drip
function reduces water dripping and
water stains. It does not prevent water
dripping and water stains if you press
the steam burst button too often or if the
temperature is too low. The amount of
water droplets will eventually decrease
after the iron is used for 2 to 3 tankfuls
of steaming and ironing.