Setting the character pitch, Entering the pitch lock mode, Réglage du pas de caractère – Star Micronics LC-4511 User Manual
Page 40: Passage en mode blocage de pas
29
Setting the character pitch
The character pitch setting controls how many characters are printed per inch. Use
the following procedure to select the pitch you want.
❏
Make sure the printer is off-line (
ON LINE
indicator is not lit).
❏
Press
PITCH
to change the pitch selection.
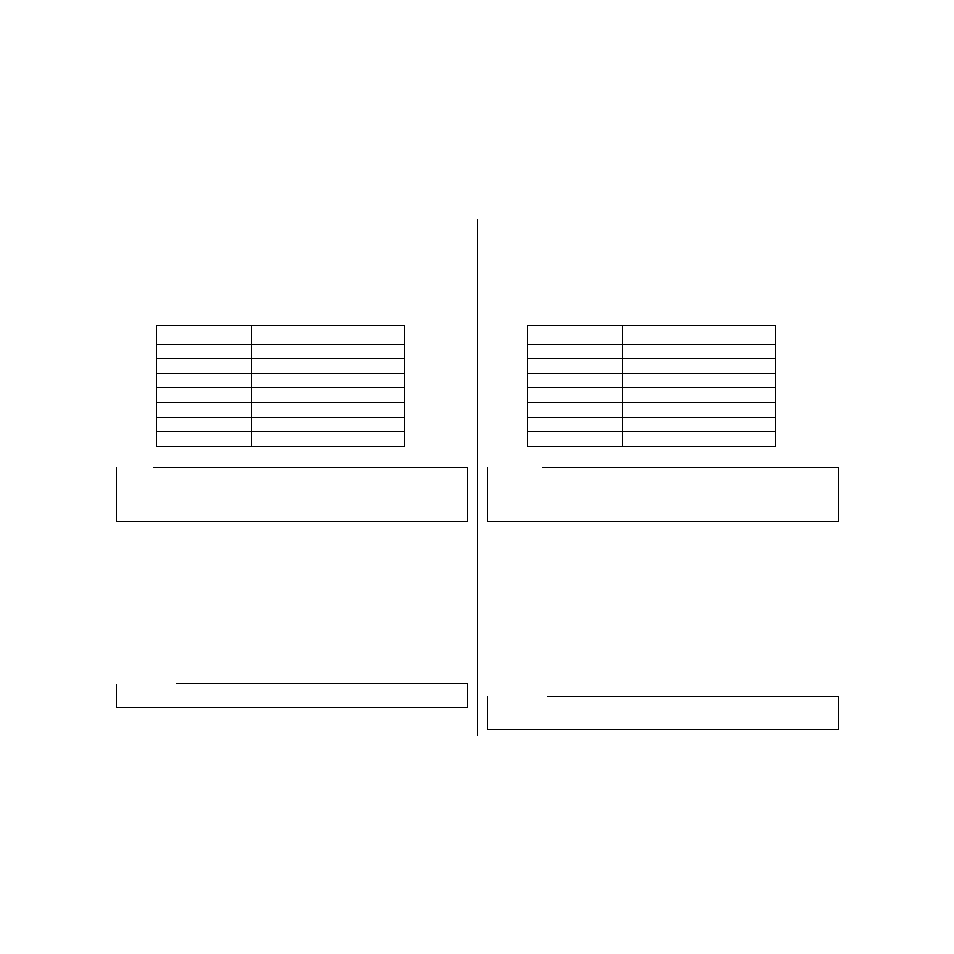
The following shows the meanings of the indicators that light on the control panel
when you press
PITCH
.
Entering the Pitch Lock Mode
When the printer is in the Pitch Lock Mode, the pitch settings you make on the
control panel are used even if your software tries to override the pitch. Use the
following procedure to enter the Pitch Lock Mode.
❏
Turn off the printer.
❏
While holding down
PITCH
, turn printer power on.
The printer is now in the Pitch Lock Mode. You could enter the Pitch Lock Mode
and Font Lock Mode (page 27) at the same time by holding down both
FONT
and
PITCH
when you turn on printer power.
To exit the Pitch Lock Mode, simply turn the printer off.
Lit Indicators
Meaning
10CPI
10 characters per inch (Pica)
10CPI + 15 CPI
12 characters per inch (Elite)
15 CPI
15 characters per inch
10CPI + COND
17 characters per inch (Condensed Pica)
10 CPI + 15CPI + COND
20 characters per inch (Condensed Elite)
PROP
Proportional
COND + PROP
Condensed propertional
Note:
The pitch setting you make with the above procedure can be changed if the software
you are using overrides the setting from the control panel. You can prevent this by
using the following procedure to put the printer into the Pitch Lock Mode when you
turn it on.
Important!
Pitch lock will not function if you are using Windows Truetype fonts.
Réglage du pas de caractère
Le réglage de pas de caractère contrôle le nombre de caractères qui sont imprimés
par pouce. Utilisez la procédure suivante pour sélectionner le pas désiré.
❏
Assurez-vous que l’imprimante est hors ligne (voyant
ON LINE
éteint).
❏
Appuyez sur
PITCH
pour changer la sélection de pas.
Le tableau suivant indique les significations des voyants qui s’allument sur le
panneau de commande lorsque vous appuyez sur
PITCH
.
Passage en mode Blocage de pas
Lorsque l’imprimante se trouve en mode Blocage de pas, les réglages de pas que
vous effectuez sur le panneau de commande sont utilisés, même si votre logiciel
essaie de neutraliser le pas en question. Utilisez la procédure suivante pour passer en
mode Blocage de pas.
❏
Eteignez l’imprimante.
❏
Tout en tenant enfoncée la touche
PITCH
, allumez l’imprimante.
L’imprimante se trouve maintenant en mode Blocage de pas. Vous avez la possibilité
de passer en mode Blocage de pas ainsi qu’en mode Blocage de police (page 27) en
même temps, en tenant enfoncées les touches
FONT
et
PITCH
lorsque vous
allumez l’imprimante.
Pour sortir du mode Blocage de pas, il vous suffit d’éteindre l’imprimante.
Voyants allumés
Signification
10CPI
10 caractères par pouce (Pica)
10CPI + 15 CPI
12 caractères par pouce (Elite)
15 CPI
15 caractères par pouce
10CPI + COND
17 caractères par pouce (Pica condensé)
10 CPI + 15CPI + COND
20 caractères par pouce (Elite condensé)
PROP
Proportionnel
COND + PROP
Proportionnel condensé
Remarque:
Vous avez la possibilité de changer le réglage de pas effectué au moyen de la
procédure ci-dessus si le logiciel que vous utilisez neutralise le réglage sur le
panneau de commande. Vous pouvez empêcher cette action en utilisant la procédure
suivante pour mettre l’imprimante en mode Blocage de pas lorsque vous l’allumez.
Important!
Le Blocage de pas ne fonctionnera pas si vous utilisez des polices Truetype de
Windows.