Retrait du bloc-pile, Before you start – Shark UV617 User Manual
Page 4
Assembling Your Cordless Sweeper
Retrait et Élimination de la Pile
Before you start:
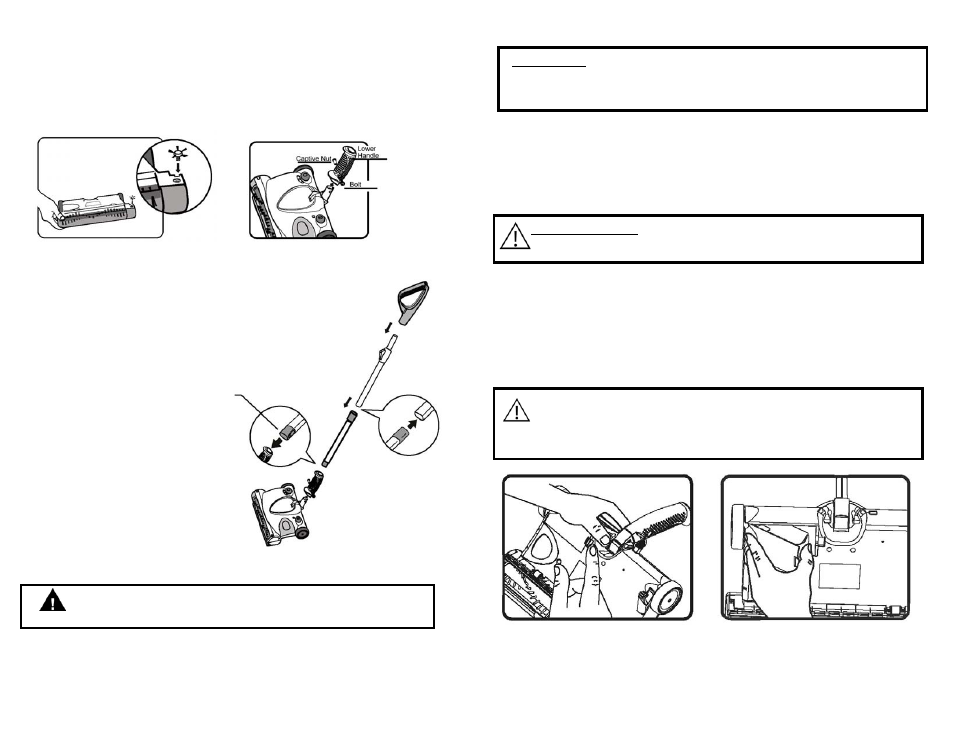
Your Cordless Sweeper will require very little assembly. You should remove it from the
carton and familiarize yourself with all the components listed per the exploded view
drawing (pg.2) This will help you in the assembly and operation of your cordless
sweeper.
Note: The charging adapter is shipped inside the dust cup.
Insert into Lower
Handle
Fig. 3
Fig. 2
1.
In the event that the edging tool is not attached to the sweeper, insert the edging
tool into the "square" hole under the bottom of the sweeper power head. Gently
but firmly push until the edging tool locks into place. (Fig. 1)
2.
Insert the lower handle. Fasten it with the captive nut and bolt that is
provided. (Fig. 2)
3.
Attach the telescoping tube to the extension tube
by pushing the plastic insert into
the bottom part of the telescopic pole.
(Fig. 3a) Push in until the "tab" on the
plastic insert snaps into the open
slot on the telescopic tube.
Push the telescoping tube
into the upper handle. (Fig. 3)
Insert the extension tube into the
lower handle firmly in place. (Fig. 3b)
4. Place the handle into the upward
storage position.
5. Plug the charging adapter into the
sweeper power head charging jack.
Plug the charging adapter cord
into a standard electrical outlet
(120V, 60Hz.) The green charging
indicator should illuminate. If it does
not, depress the On/Off switch one
time.
Fig. 1
Fig. 3a
Fig. 3b
REMARQUE: Si vous n’êtes pas certain de la façon de retirer votre bloc-
pile, nous vous suggérons d’emporter votre balayeuse à un
technicien de petits appareils électriques réputé afin qu’il le
fasse pour vous.
Suivez ces étapes lorsque le retrait de la pile est nécessaire.
Cette balayeuse est dotée de piles ni-cad. Vous devez les éliminer correctement.
Lorsque les piles ne sont plus en état de fonctionner, elles doivent être retirées de la
balayeuse et éliminées. Ne retirez pas les piles pour une raison autre que leur
élimination. Les piles doivent être recyclées ou éliminées correctement selon la
réglementation locale. Veuillez consulter vos Pages jaunes ou votre centre de
recyclage local pour plus de renseignements.
AVERTISSEMENT:
N’utilisez jamais de piles ordinaires en remplacement :
elles pourraient couler et endommager l’appareil.
N’utilisez que les blocs-pile de rechange XB617U.
Retrait du Bloc-Pile
1.
Retirez la poignée de rallonge et la coupelle à poussière.
2.
Retournez l’appareil à l’envers. Prenez soin de ne pas mettre l’appareil en
marche (Fig. 17).
3.
Poussez sur l’onglet de verrouillage et tirez sur le bloc-pile (Fig. 18).
4.
Mettez le bloc-pile de côté.
5.
Insérez le nouveau bloc-pile dans l’appareil. Assurez-vous que les onglets se
verrouillent en position.
MISE EN GARDE:
Cet appareil contient des piles ni-cad. Les piles
doivent être recyclées ou éliminées correctement
selon la réglementation locale. Veuillez consulter
vos Pages jaunes ou votre centre de recyclage local
pour plus de renseignements.
Fig. 18
Fig. 17
CAUTION: ALWAYS USE ADAPTOR SUPPLIED (ONLY)
WITH SWEEPER
28
3