Operating instructions – Shark EP733W User Manual
Page 6
OPERATING INSTRUCTIONS
OPERATING INSTRUCTIONS
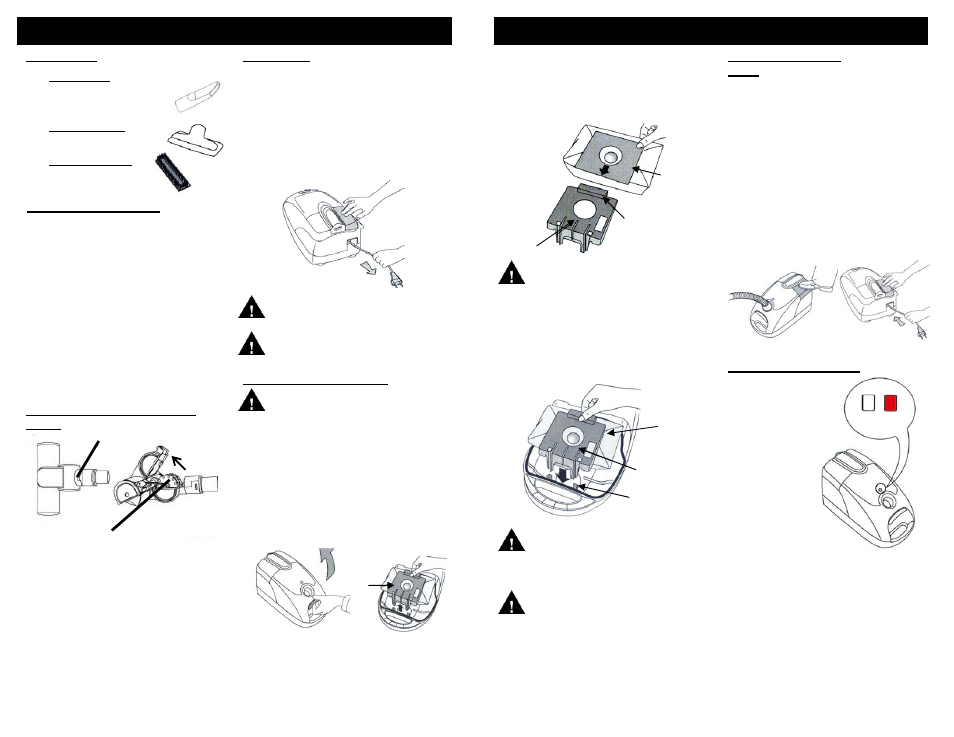
Fig. 11
Dust Bag
Support
Dust Bag
Retaining Clip
Dust Bag
Cardboard
Section
3. Holding the dust bag retaining clip,
insert the rear part of the cardboard
section of the dust bag into the plastic
support. Once that rear part is in,
release the retaining clip to lock the
dust bag in place. (Fig. 11)
1.
Crevice Tool
For radiators, crevices,
corners, baseboards and
between cushions.
2.
Upholstery Tool
The upholstery tool is
used for furniture.
3.
Upholstery Brush
This snaps onto the
upholstery tool.
Turbine
Tilt
Upwards
Locking Latch
1. Slide locking latch forward then tilt the
top housing of the brush upwards. The
top housing is hinged and will tilt up
approximately 45° only. (Fig. 7)
2. Inspect turbine wheel and air passage
for debris and/or blockage. Remove
debris if present.
3. Inspect the rotating brush for built-up
hair or string. If present, remove by
carefully cutting with scissors. Avoid
damaging or cutting bristles.
4. Once clean, close the top cover of the
turbo brush and slide the locking latch
toward the rear of the brush to lock.
Cleaning the Air Driven Turbo
Brush
The efficiency of your air driven turbo
brush depends on the bristle brush
rotating at high speed. Strong air suction
is needed to accomplish this. In order to
ensure that maximum air suction is
maintained, please read the following
instructions:
1. Change the dust bag frequently.
2. Replace the pre-motor and post
motor filters as needed..
3. Ensure that the rotating brush is kept
free of hair and string which may
accumulate and decrease brush
performance.
4. Keep Air Driven Turbo Brush turbine
free of dirt and foreign matter. (See
Fig. 7 below for cleaning instructions.)
Fig. 7
Your vacuum cleaner includes a power
cord which is automatically retractable.
To extend the power cord, pull from the
rear and extend to desired length. When
cleaning is finished, first turn the unit off
and disconnect from the electrical outlet.
Then press on the cord rewind button to
retract the power cord. If the cord does
not fully retract, pull it out again and then
press on the cord rewind button again.
(Fig. 8)
Fig. 8
Warning: To reduce the risk of
electric shock, the hose, power
nozzle power cord and the power cord
must be disconnected before changing
the bag or performing maintenance/
troubleshooting.
1. To open the dust bag compartment,
remove the flexible hose and the
power nozzle power cord. Place your
fingers in the opening indentation, lift
the front cover up. (Fig. 9)
2. Remove the dust bag support from
the dust bag compartment. (Fig. 10)
Fig. 9
Lift
Fig. 10
Dust Bag
Support
Warning: Hold the plug when
rewinding the cord. Do NOT allow
cord to whip when rewinding.
Caution: Do not pull the power cord
beyond the red mark on the cord as
doing this will damage the cord.
Accessories
Power Cord
Note:
Once all attachments are in place,
unwind a sufficient length of the power cord
and insert the plug into the wall outlet. A
yellow mark on the power cord shows the
ideal cable length. Don't pull the power
cord beyond the red mark.
1. Insert the power plug into the wall
outlet.
2. Press the Power On/Off button located
on the unit to turn the vacuum cleaner
"On". (Fig. 13)
3. To rewind the power cord, press the
cord rewind button with one hand and
hold the plug of the power cord with the
other hand to ensure that it does not
whip causing damage or injury.
(Fig. 14)
Using your Vacuum
Fig. 13
Fig. 14
Air Driven Turbo Brush
Caution: Make sure that the dust
bag cardboard section is firmly
in place in the dust bag support.
4. Insert the dust bag support back into
the dust bag support guides in the dust
bag compartment making sure that no
part of the bag is in contact with the
rubber seal and that it is hanging
correctly inside the dust bag
compartment. (Fig. 12)
5
Inserting a New Dust Bag
Empty Full
Fig. 15
The dust bag full
indicator may turn on
(red) while you are
cleaning to indicate
that the paper dust
bag is full and
Requires
replacement.
(Fig. 15)
Always change
the dust bag
when the dust bag
full indicator light
comes on.
Follow instructions on page 5 and 6
“Inserting a New Dust Bag” when
changing the paper dust bag.
Dust Bag Full Indicator
Fig. 12
Dust Bag
Support
Dust Bag
Dust Bag
Support Guide
Caution: Make sure that the dust
bag support is fully inserted into
the dust bag compartment.
5. Close the dust bag compartment
cover.
Caution: The dust bag
compartment will not close if the
dust bag is not inserted into the unit.
Never use the vacuum without a dust
bag inserted into the unit. NEVER
reuse the paper dust bags.
6