Not for reproduction, Troubleshooting & repair – Snapper 5/14 SERIES User Manual
Page 26
26
Troubleshooting & Repair
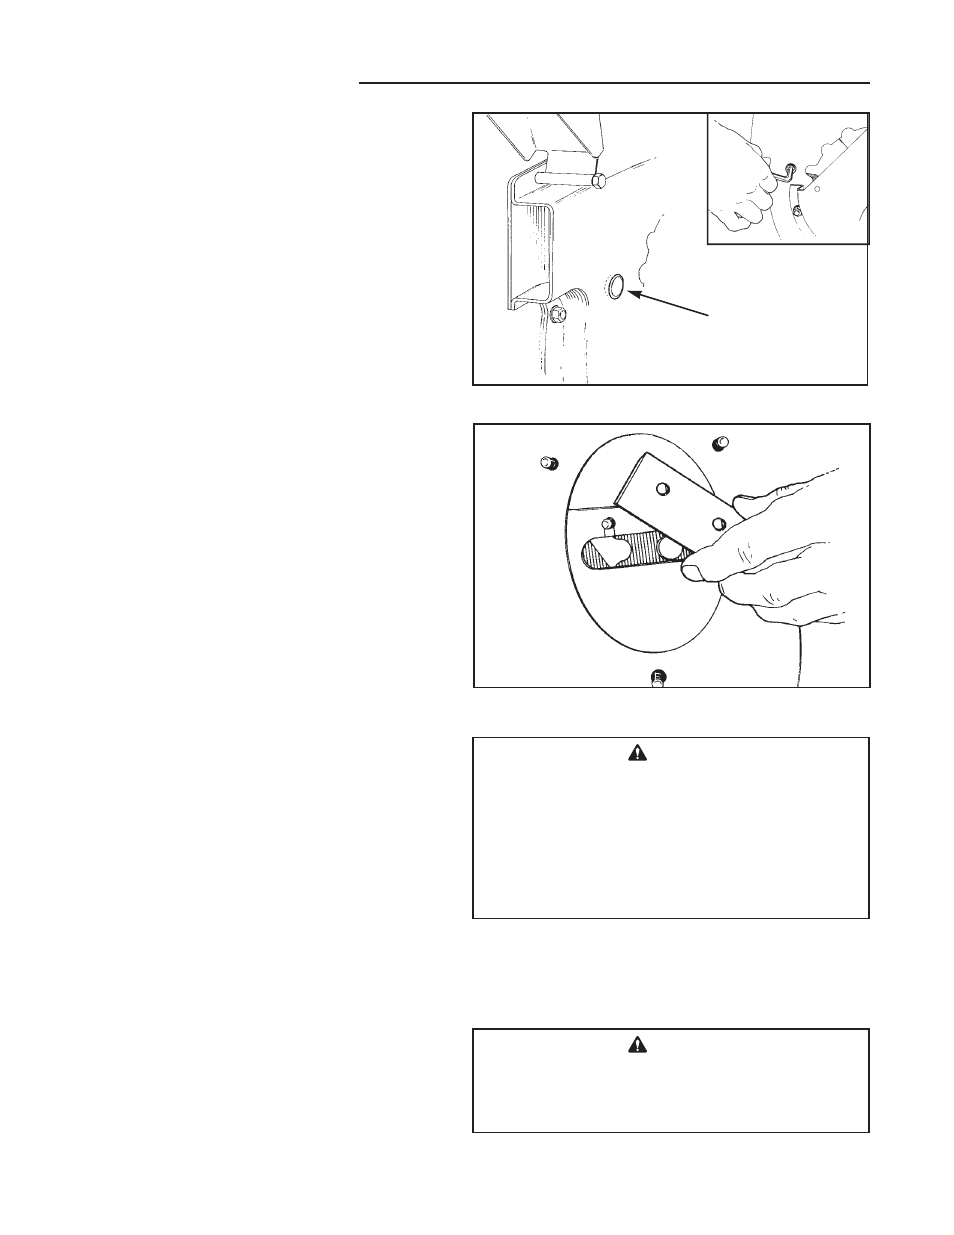
4. Using a 1/4” hex wrench, loosen and remove the two
socket head cap screws holding the chipper knife in
place (access the screw heads from the rear of the
unit), and remove the chipper knife. See Figure 24
for location and temporary removal of an access plug
that permits removal of the capscrews.
5. See Figure 25. Remove both knives through the
opening in the front of the chipper/shredder, and
sharpen equally or replace both blades to ensure
proper balancing and correct chipping action.
• Slow-speed water-cooled grinding is suggested to
help maintain blade temper and a long-lasting
sharp edge. Rapid grinding and heating of blades
will soften the edges, making repeated sharpening
necessary.
• Chipper knives require a 30° bevel on the cutting
edge (as shown in Figure 22) for efficient chipping
action.
• Contact your local dealer or blade sharpening ser-
vice if you prefer not to sharpen the blades your-
self.
6. Clean the chipper knife mounting areas before rein-
stalling the blades to ensure a flat mounting surface.
7. Install the new chipper knives using the two cap-
screws, and two new lockwashers. Never reinstall
chipper knives using used lockwashers, as used lock-
washers may not hold the knives adequately.
8. Reinstall the access plug (Figure 24) removed earlier
for capscrew access.
9. Reattach the shredder hopper and chipper cone
using the hardware removed during disassembly.
Replace any hardware that appears to be damaged
or worn excessively.
10. Check all hardware for tightness and correct assem-
bly before attempting to start your unit. Do not
attempt to start the unit if extra hardware is left over
after reassembly is complete. Check for proper chip-
per knife assembly before proceeding.
11. Test your unit before attempting to use it to perform
chipping. Start unit, and check for unusual noise or
vibration.
• Shut unit off immediately if either situation occurs,
and re-inspect chipping knives to confirm correct
positioning and assembly has been done.
• If assembly is correct, blades may not have been
sharpened evenly, causing an imbalance.
Remove blades and sharpen evenly.
• Recheck unit. If problem persists, contact your
local dealer for assistance.
Figure 24. Chipper Knife Access Plug
Figure 25. Removing Chipper Knife Through Front
Opening
*2445
Access
Plug
*2446
Deflector Shield
The deflector shield must pivot freely at all times, or
processed material could back up, clogging the unit and
requiring disassembly to clear.
WARNING
Never use a malfunctioning unit to process
material, even if it appears to be chipping materi-
al adequately. An unexpected kick-back could
occur, causing serious personal injury to you or
bystanders.
Serious equipment damage could also result,
voiding the warranty and requiring extensive
repairs by a qualified service location.
WARNING
Never use the unit unless the deflector shield is
in place and operating properly. Material could
be ejected out of the discharge chute with great
force, injuring you or bystanders.
Not
for
Reproduction