Snap-On 870013 User Manual
Page 5
COMPONENT INSTALLATION
Never use a non-relieving air coupler with the angled
finish nailer. Always use couplers that release any built-up charge in the angled
finish nailer’s firing mechanism. A non-relieving air coupler can allow the angled
finish nailer to discharge a fastener while the tool is disconnected from the
power source. Failure to comply with this warning can result in serious or per-
manent injury or even death to the operator or to bystanders.
When selecting an air compressor, it must comply with the requirements of the
American National Safety Institute - ANSI B19.3.
Choose an air compressor that can supply more than the required air pressure to
ensure optimum efficiency. Always use clean, dry compressed air with a maximum
pressure of 200 psi. Use a pressure regulator and set the pressure between 70 –
120 psi. (5.0 – 8.5 kg/cm
2
G). Before each use, check the pressure regulator to
ensure it is functioning within the proper pressure range.
Using an air pressure of more than 120 psi can
cause the angled finish nailer to malfunction or possibly explode
causing severe injury or property damage.
SELECTING A PROPER AIR HOSE
Use an air hose with the largest diameter and shortest length possible to ensure
continuous, efficient nailing operations. Using an air pressure of 70 psi (5.0
kg/cm
2
G), an air hose with an inside diameter of 1/4" (6.5 mm) or greater and a hose
length of less than 6.6 ft (20 m), it is recommended that a 0.5 second interval be
allowed between each nailing. Air supply hoses shall have a minimum working pres-
sure of 150 psi (10.7 kg/cm
2
G) or 150% of the maximum pressure produced by the
compressor or whichever is higher.
Low air output by the compressor or a longer hose with
a smaller inside diameter in relation to the nailing frequency may decrease
the driving capability of the air nailer.
SELECTING A QUICK DISCONNECT
1. Remove the plastic protective plug
from the tool’s air inlet.
2. Insert a 1/4" NPT male quick
disconnect into the air inlet. Install the female portion to the air hose.
Thoroughly clean and maintain the angled finish nailer after every use.
Lubricate moving parts to prevent rust and minimize friction-related wear. Wipe
down the entire tool and remove all dust from the moving parts. Properly store
the angled finish nailer in a suitable case to keep it ready for the next job.
All maintenance and repairs should be performed by an authorized repair
facility. Call 1-888-278-8092 to obtain a list of repair facilities in your area or
to make arrangements to return the tool for service.
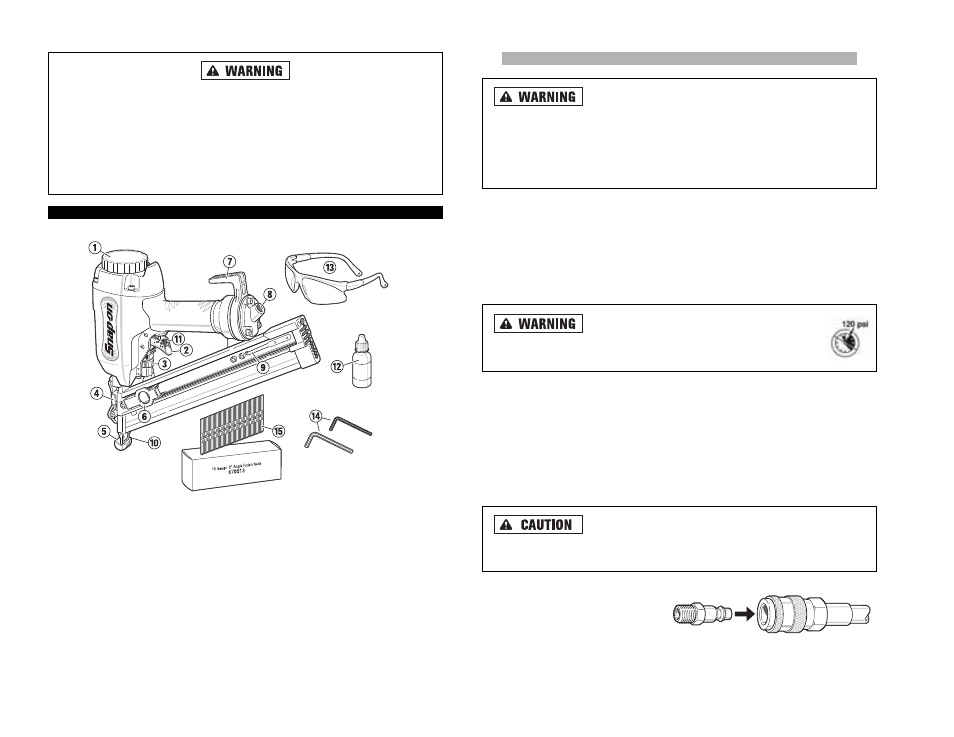
FUNCTIONAL DESCRIPTION
CONTROLS AND COMPONENTS:
1. Exhaust Cover
2. Trigger
3. Nail Depth Adjuster
4. Latch
5. No-mar Nosepiece
6. Pusher
7. Hanging Hook
8. Air Inlet
9. Nail Release
7
10. Work Piece Contact
11. Trigger Actuation Mode Selector
ACCESSORIES:
12. Lubricant
13. Safety Glasses
14. Hex Wrenches (2)
15. Fasteners
8