Operating instructions operating instructions cont – Shark EP708 User Manual
Page 3
OPERATING INSTRUCTIONS
OPERATING INSTRUCTIONS cont.
Assembling Your Vacuum Cleaner
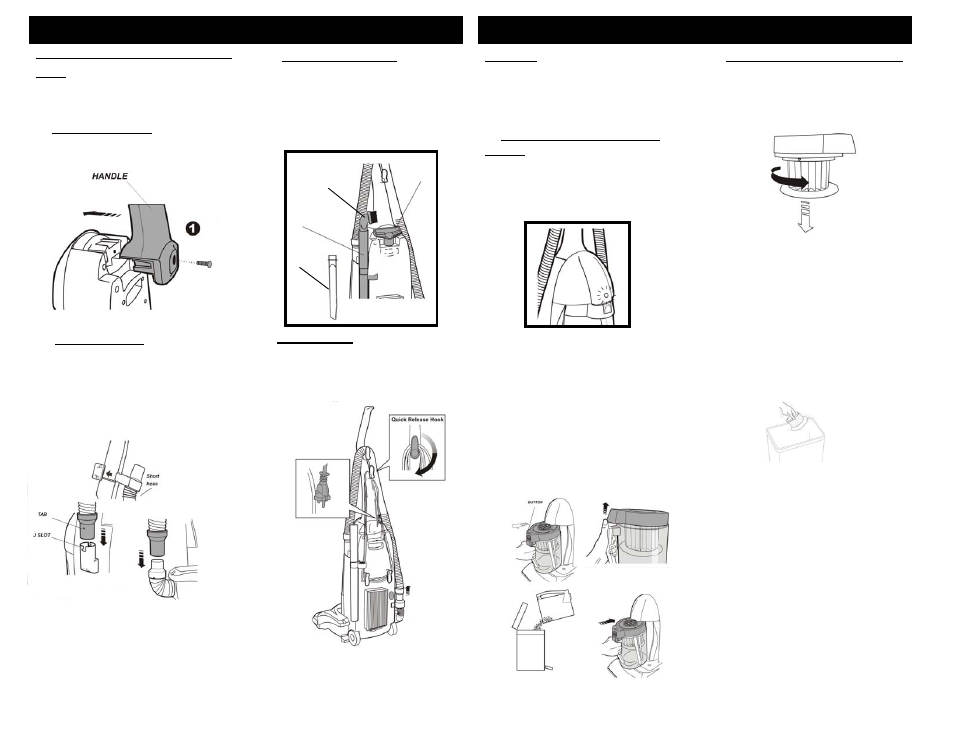
4. Cord Storage
On the back of the vacuum, there
are three cord hooks around
which to wrap the power cord.
Only the top cord hook has the
quick release feature.
Upholstery
brush
Dusting
brush
Extension
tube
Crevice
tool
To use the hose with an
attachment, pull out the hose
connector from here (see arrow
above) and fit the desired
attachment into the connector.
Pull out to
use with
attachment
Warning:
To reduce the risk of electric
shock, the power cord must be
disconnected before removing the dust
cup, dust cup filter,changing the filters or
performing maintenance/trouble shooting
checks.
5
5. Removing & Emptying Dust
Cup
The “Dust Cup Full” indicator will
illuminate when the dust cup is full or
the air flow is blocked. For best
performance, the dust cup should be
cleaned regularly.
To empty the dust cup:
• Press the dust cup release
button. (Fig. A)
• Hold the handle of the dust cup
and pull out. (Fig. A)
• Push the cover of the dust cup
open with your thumb. (Fig. B)
• Empty dust cup directly into
dustbin. (Fig. C)
• Replace dust cup into unit and
ensure that it “clicks” into the
correct position. (Fig. D)
6. Cleaning HEPA Dust Cup Filter
• To remove the HEPA filter from the
dust cover, push the cover up with
your thumb.
• Twist the HEPA filter to the right
and pull down. (fig. E)
Warning:
Always empty the dust
cup and clean the HEPA dust cup
filter before each use and during
prolonged usage. Never over fill the
dust cup - remove dirt and clean the
HEPA dust cup filter each time the
dust cup is emptied during prolonged
usage or risk motor damage.
Please Note: The HEPA dust cup
filter should be replaced every 12
months depending on usage.
Warning
: It is very important to ensure
that the fine dust which adheres to the
filter media is completely removed. This
fine dust powder that is left on the filter
will severely reduce the suction
performance of your vacuum. Clean
HEPA filter everytime the dust cup is
emptied.
Fig. A
Fig. B
Fig. C
Fig. D
Fig. E
• The filter is cleaned by tapping or
hitting it on a hard surface,
typically the inside of a trash can.
(fig. F) Alternatively, the filter may
also be washed by running it under
the tap allowing the water to run
on the dirty side. Do not "wash"
HEPA filter more often than once
every three (3) months. Putting
water on the inside or clean side
will not clean the filter. IF
WASHED, the filter must be
allowed to dry overnight before
replacing in the vacuum cleaner.
Fig. F
3. Attachment Storage
Attachments are stored on the
back of the unit. Please note that
the crevice tool is inside one of the
extension tubes. All attachments
can be used either with the flexible
hose alone or with the extension
tubes.
Note:
Always remove the power plug
from the wall outlet before assembling or
removing accessories.
1. Handle Assembly
I
nsert handle in place and secure
with screw.
2. Hose Assembly
Insert the short hose into the slot
before use.
Be sure to align the tab with the “J”
slot. Once the hose is inserted into
the adapter, it should be twisted to
the right to lock the tabs into the
“J” slots.
4