Starting procedure, Operation, Instrucciones de arranque – Shindaiwa DH2510 User Manual
Page 7: Operación
7
Starting Procedure
2. Set the throttle trigger to the “fast idle”
position by performing the following:
a. Depress and hold the throttle lock, and
then squeeze the throttle trigger.
b. Depress and hold the “fast idle” button.
c. While depressing the fast idle button,
release the throttle lock and throttle
trigger.
3. Prime the carburetor by repeatedly
depressing the carburetor primer bulb
until clear fuel can be seen flowing
through the transparent primer bulb.
Ignition
Switch
Throttle
Trigger
Throttle
Lock
Fast Idle
Button
Primer Bulb (viewed
from rear)
WARNING!
KEEP CLEAR OF THE CUTTING
ATTACHMENT DURING STARTING
OPERATIONS! THE CUTTERS MAY
MOVE WHEN THE ENGINE IS
STARTED!
■ Place the trimmer on the ground
during all starting operations.
■ Make sure you have a secure
footing, and keep a firm grip on the
unit as well.
■ Keep all bystanders and pets well
clear of the trimmer during starting
operations.
Choke
Closed
Ignition ON
Figure 7
Figure 5
Figure 6
Figure 4
IMPORTANT!
Engine ignition is controlled by a two-
position on-off switch mounted on the
throttle body. This switch is typically
labeled “I” for ON and “O” for OFF.
If the engine does not start–
■ Repeat the appropriate starting proce-
dure for a cold or warm engine.
■ If the engine still fails to start, use the
procedures for “Starting a flooded
engine,” on the next page.
WARNING!
The cutting attachment will move
when the engine accelerates!
When the engine starts or fires–
1. Open the choke by moving the choke
lever backward (toward the fuel tank).
2. If the engine does not continue to run,
repeat the appropriate cranking
procedures for a cold or warm engine.
3. When the engine starts, clear excess
fuel from the combustion chamber by
accelerating the engine several times
with the throttle lever.
4. Operating the throttle will automatically
disengage the fast idle setting.
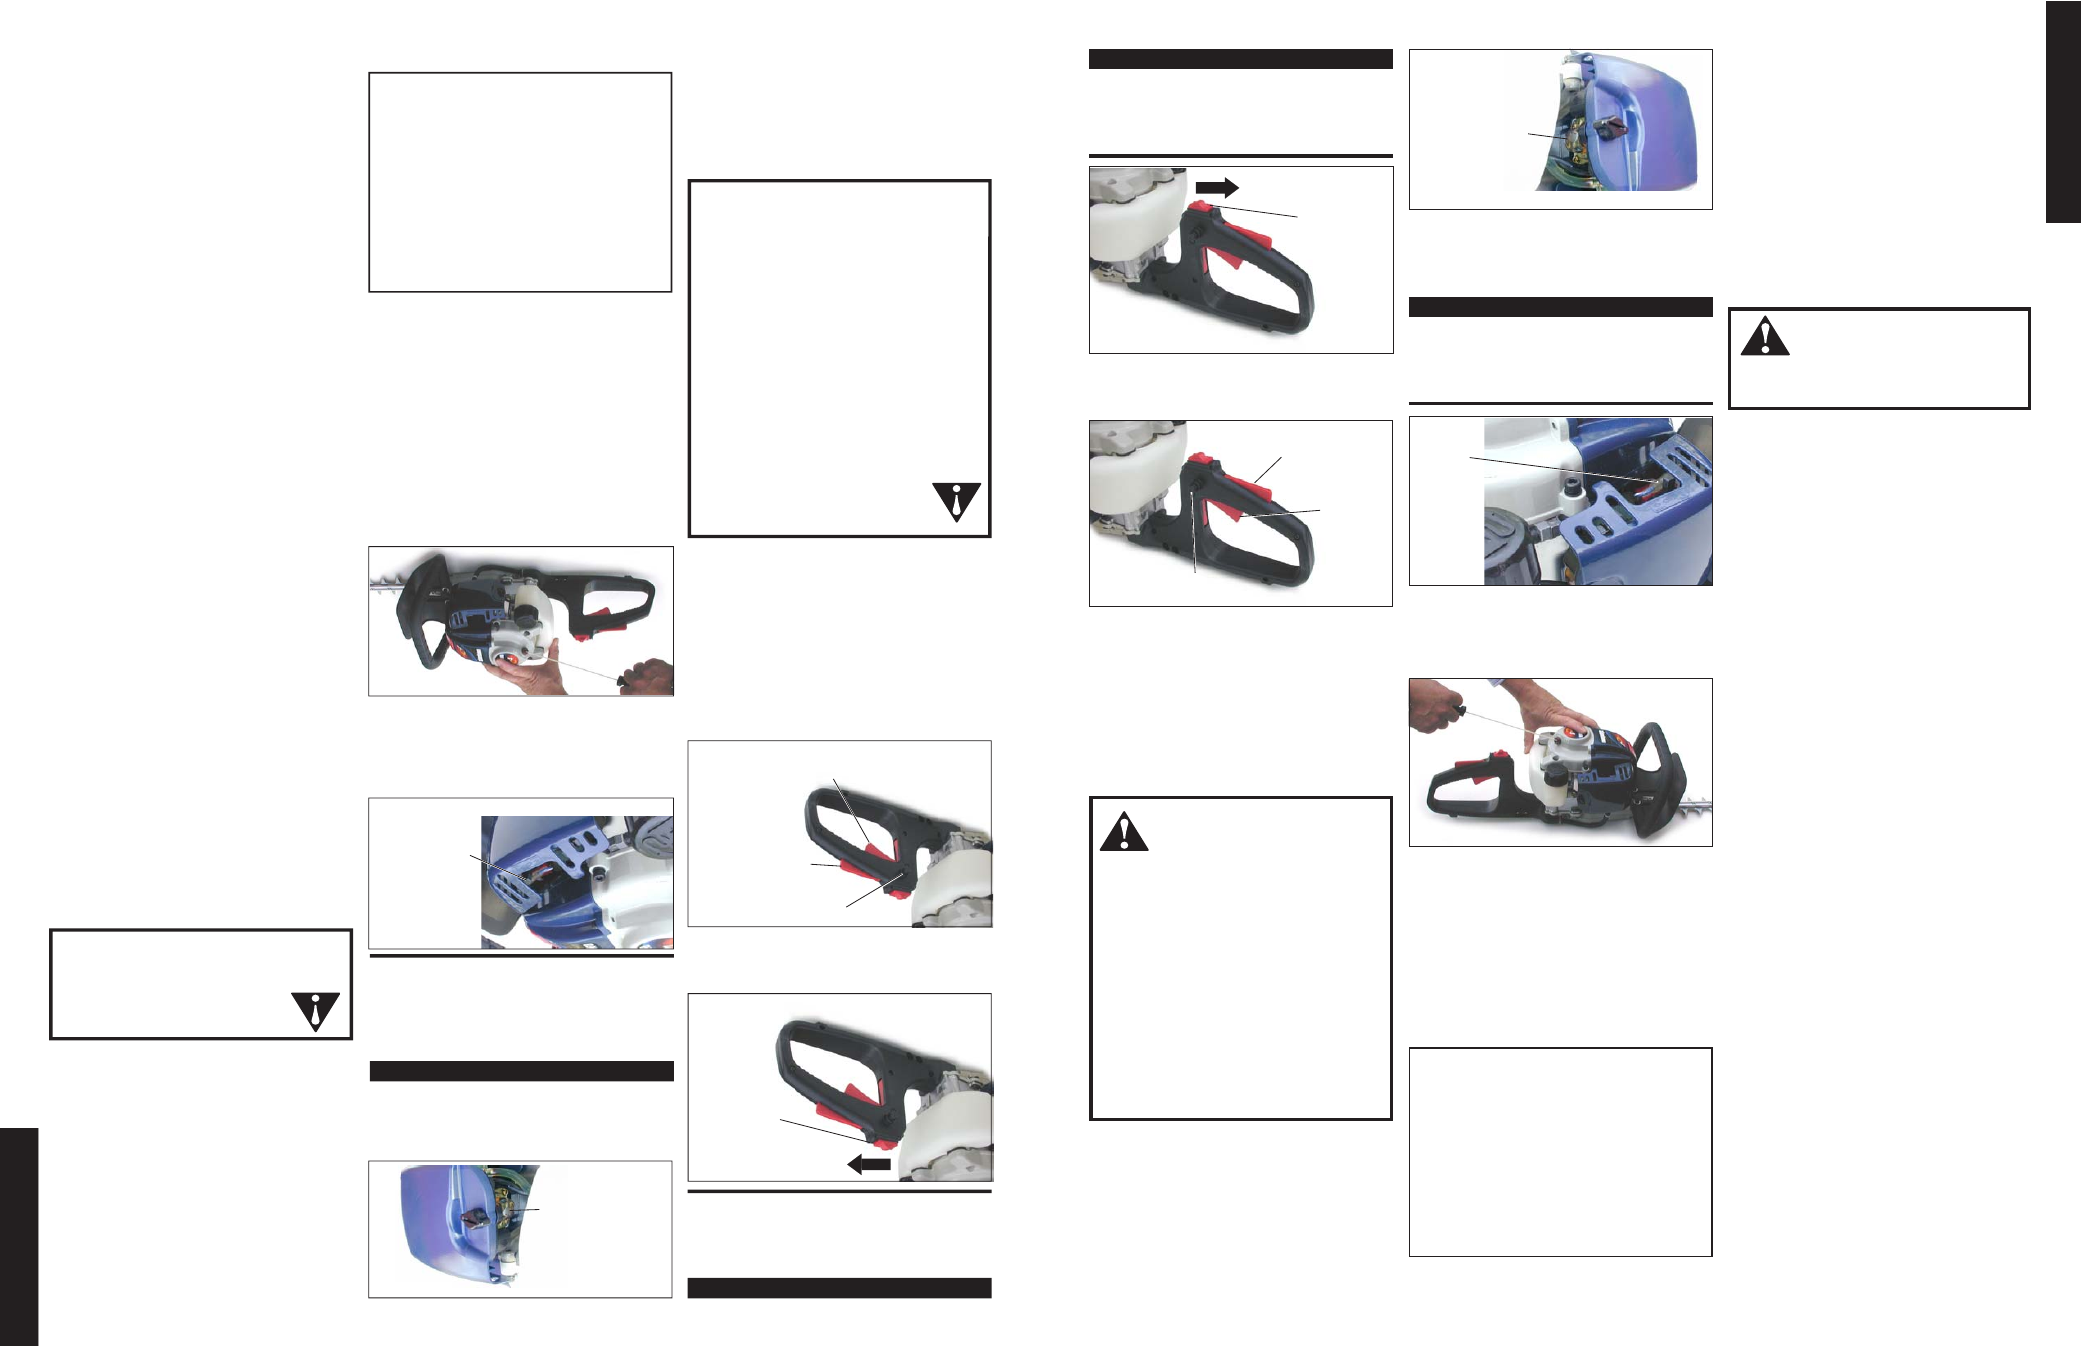
1. Place the unit on the ground. Grip the
engine cover with your left hand and
the starter handle with your right hand
(shown).
2. Pull the starter handle slowly toward
you until you feel the starter mecha-
nism engage.
3. Start the trimmer by pulling the starting
handle rapidly outward.
Cranking the Engine
Figure 8
1. Move the ignition stop switch to the
rear (towards the grip) to the “I” or ON
position. See Figure 4.
4. (Cold engine only) Choke the engine
by moving the choke lever forward to
the “closed” position. See Figure 7.
IMPORTANT!
The primer system only pushes fuel
through the carburetor. Repeatedly
pressing the primer bulb will not flood the
engine with fuel.
Operation
■ Squeezing the throttle increases engine
speed, causing the clutch to engage and
operate the cutters.
■ Releasing the throttle decreases engine
speed, causing the cutters to slow, and
then stop altogether as the clutch
disengages.
■ Use a sweeping motion when cutting,
and vary throttle settings often.
■ Avoid cutting material larger than 1/2
inch in diameter.
ENGLISH
CAUTION!
The recoil starter can be easily
damaged by abuse!
■ Always engage the starter before
attempting to crank the engine.
■ Never pull the starter cord to its full
length.
■ Always rewind the starter cord
slowly.
Instrucciones de Arranque
2.
Trabe el gatillo de aceleración en la
posición de marcha acelerada según las
siguientes instrucciones.
a.
Oprima el gatillo de aceleración y el
seguro del gatillo de aceleración a la
misma vez.
b.Oprima el botón trabador y lentamente
suelte el gatillo y el seguro del gatillo de
aceleración a la misma vez.
3.
Oprima la bomba de cebado varias
veces hasta que sienta resistencia y vea
combustible fluir por la bomba.
Consulte Figura 6.
Botón del
Interruptor
Seguro del gatillo
de aceleración
Botón
trabador
Bomba de cebado
(vista posterior)
¡ADVERTENCIA!
¡Manténga las manos y el cuerpo
alejados de las cuchillas en todo
momennto! Las cuchillas se moveran
al arrancar el motor.
■Ponga la cortadora de setos sobre
el suelo durante todas las
operaciones de arranque.
■
Cerciórese de estar en posición
firme sobre el suelo y sujete la
máquina firmemente.
■
Mantenga a todos los niños,
transeúntes y animales domésticos
alejados de la cortadora de setos
durante todas las fases de
operación.
Estrangulador
cerrado
Posición de
encendido
Figura 7
Figura 5
Figura 6
Figura 4
¡PRECAUCIÓN!
El arrancador le durara más si se
opera de acuerdo a las siguientes
recomendaciones.
■Siempre engrane el arrancador al
comenzar el arranque del motor.
■Nunca extienda la cuerda del
arrancador hasta el tope.
■ Permita que la cuerda vuelva
enrollar en el arrancador.
¡IMPORTANTE!
El sistema de encendido lo controla un
interruptor deslizante de dos contactos.
El rotulo STOP aparece grabado en el
tope del botón del interruptor.
Si el motor no enciende–
■
Repita las instrucciones aplicables para
el arranque de un motor frío o caliente.
■
Consulte las instrucciones "Arranque de
un motor ahogado."
¡ADVERTENCIA!
Las cuchillas se mueven al acelerar
el motor. Mantenga las manos y el
cuerpo distanciados de las cuchillas.
Cuando el motor enciende o intenta
encender.
1.
Mueva la palanca del estrangulador
hacia atrás para abrir el estrangulador.
2.
Después que el motor arranca accione
el acelerador varias veces para eliminar
el exceso de combustible de la cámara
de combustión.
3.
Si el motor se para, repita los
procedimientos aplicables para el
arranque de un motor frío o un motor
caliente.
5.
Ponga la máquina en el suelo. Sujete el
motor por la cubierta con la mano
izquierda y con la mano derecha,
empuñe el mango del arrancador.
Consulte Figura 8.
6.
Jale el mango del arrancador
lentamente hacia afuera hasta que
sienta el mecanismo de arranque
engranar.
7.
Jale el mango del arrancador
rápidamente hacia afuera para arrancar
el motor.
Arranque del motor
Figura 8
1.
Deslice el botón del interruptor hacia la
posición I (encendido).
Consulte Figura 4.
¡IMPORTANTE!
La bombilla de cebado solamente empuja
combustible a travz del carburador.
Presionando repetidamente la bombilla
de cebado no ahogará el motor con
combustible.
Operación
■Al instante que el operario oprime el
gatillo de aceleracion, la marcha del
motor se acelera. La aceleración de la
marcha del motor causa que el
embrague acople con la caja de
engranajes, la cual acciona el
movimiento de las cuchillas.
■La desaceleración de la marcha del
motor es inmediata al instante que el
operario libera el gatillo de aceleración.
La marcha del motor vuelve a caer en
marcha mínima y causa que el
embrague se desacople de la caja de
engranajes, la cual detiene el
movimiento de las cuchillas.
■
Los cortes se deben de llevar a cabo con
movimientos de lado a lado (cortes
laterales) o de arriba abajo (cortes
verticales) variando la marcha del
motor de acuerdo a la clase de seto que
corta.
■
Siempre se debe de evitar cortar setos
que tienen más de 1,3cm (1/2 pulg.) de
diámetro.
7
ESPAÑOL
Gatillo de
aceleración
4.
(Motor frío)
Mueva la leva del estrangulador hacia
adelante ("closed") para cebar el motor.
Consulte Figura 7.