Push stick and push block, Auxiliary fence – Skil 3310 User Manual
Page 56
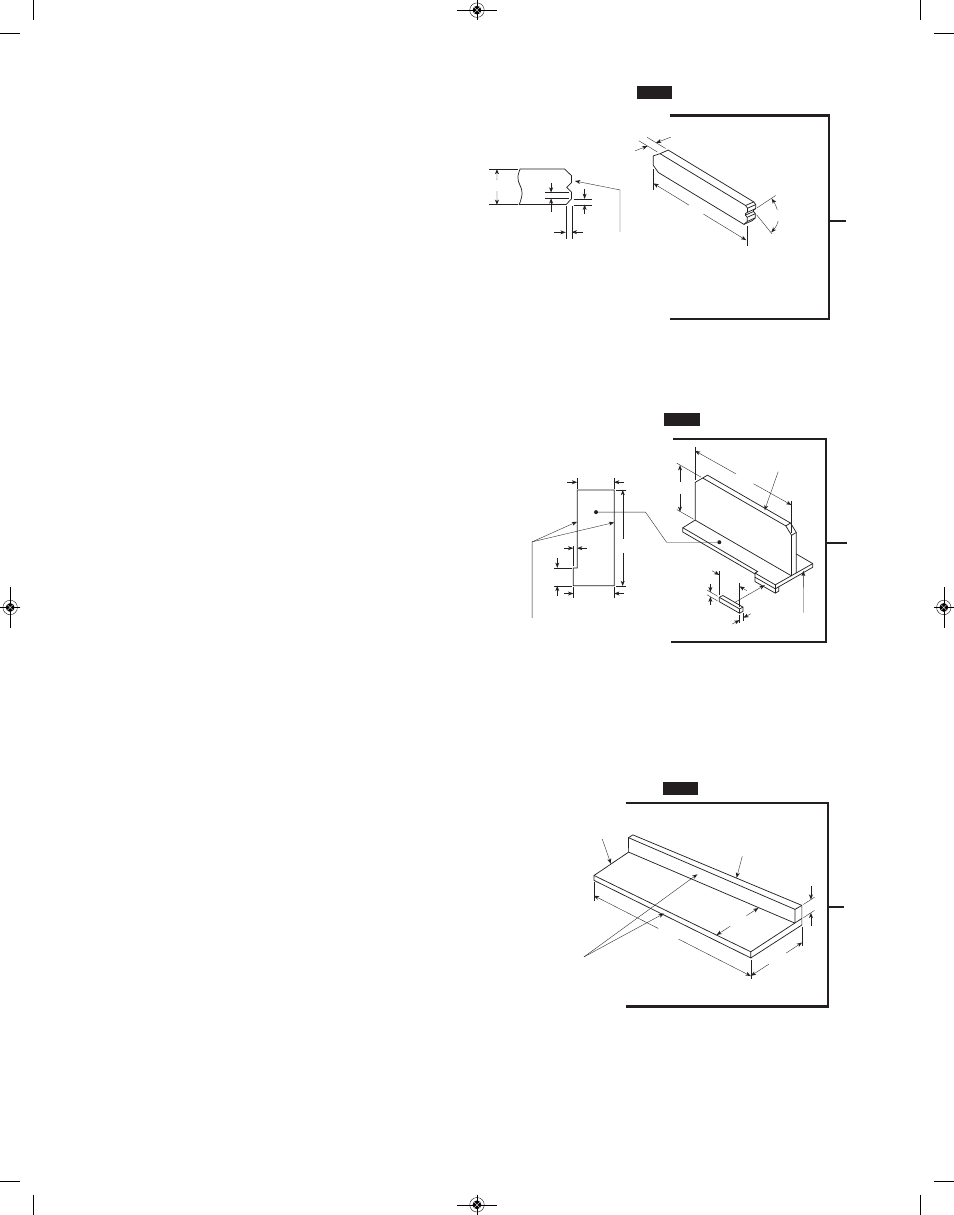
Push Stick and Push Block
Make the Push Stick 1 using a piece of 1 x 2 as shown (Fig. 35).
Make the Push Block 2 using pieces of 3/8" plywood 3 and 3/4"
hardwood 4 (Fig. 36).
The small piece of wood, 3/8" x 3/8" x 2-1/2", should be GLUED to
the plywood … DO NOT USE NAILS. This is to prevent dulling the
sawblade in the event you mistakenly cut into the Push Block.
Position the handle in the center of the plywood and fasten
together with glue and woodscrews.
Auxiliary Fence
Make one using pieces of 3/8" plywood 3 and 3/4" hardwood 4.
Fasten together with glue and woodscrews (Fig. 37).
NOTE: Since the Push Block 2 is used with the Auxiliary Fence 5,
the 4-3/4" dimensions must be held identical on both the pieces.
56.
3
4
THESE EDGES
MUST BE PARALLEL
CES BORDS DOIVENT
ÊTRE PARALLÈLES
ESTOS BORDES DEBEN
SER PARALELOS
NOTE: All dimensions in inches.
REMARQUE : Toutes les dimensions sont en pouces.
NOTA: Todas las dimensiones están en pulgadas.
THIS FACE AND
THIS EDGE MUST
BE PARALLEL
CETTE FACE ET CE
BORD DOIVENT ÊTRE
PARALLÈLES
ESTA CARA Y ESTE
BORDE DEBEN SER
PARALELOS
4
3
45° NOTCH
ENCOCHE À
45°
MUESCA DE
45°
FIG. 37
1
2
WORKPIECE
END
EXTRÉMITÉ
CONTACT AVEC
L’OUVRAGE
EXTREMO DE
LA PIEZA DE
TRABAJO
FIG. 35
FIG. 36
1/4"
1/4"
1/4"
1-1/2"
3/4"
15"
4-3/4"
5"
12"
12"
2-1/2"
3/8"
3/8"
3/8"
5-1/8"
2-1/2"
1-3/4"
5-1/2"
4-3/4"
19"
5
SM 2610008289 02-10:3310 Table Saw 2/2/10 8:38 AM Page 56