Basic and common operations, How to set the time and use the alarm, Playing back from other equipment – JVC RA-P10 User Manual
Page 2: Playing back from ipod, Listening to fm broadcasts
Basic and Common Operations
Press
Functions
• Light the display screen for 5 seconds when the power is
turned off.
• Temporarily stop the alarm sound when the alarm is ringing
(SNOOZE).
(see “Stopping alarm sound”)
See “How to set the
time and use the alarm”
Turn on or off the power
Press
Functions
Turns on or off the power
When the power is turned off at volume level “15”
or higher, the unit automatically sets the volume
level to “14” the next time it is turned on.
Adjust the volume
Press
Functions
Adjust the volume level from 00 to a
maximum of 20.
–: Turn down the volume.
+: Turn up the volume.
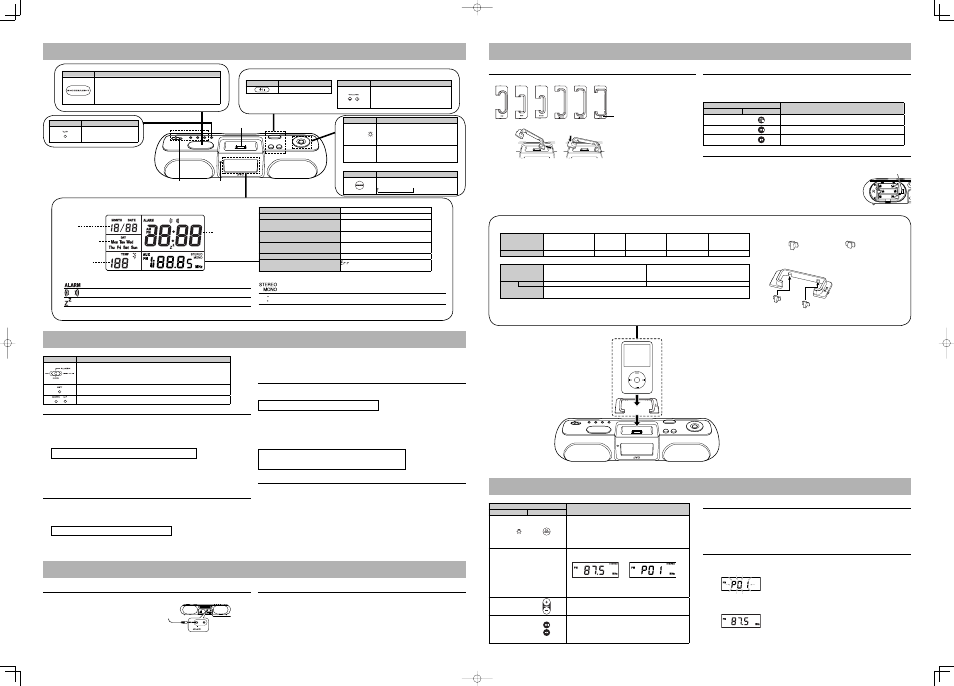
Display Information
Date
Day of the week
Temperature
Current time/
alarm time
Explanation of Icons
Off: current time / On: alarm time
Off: alarm off / On: alarm on / Blinking: alarm sounding (When “TIMER PLAY” is set)
Blinks while snoozing (the alarm is paused)
Sound source indicator
iPod/FM/AUX (blinks while muted)
When adjusting the volume
00 - 20
When FM radio is selected
P01 - P20 (channel) /
87.5 - 108.0 MHz (frequency)
When the source is set to iPod and the
alarm is set to TIMER PLAY
iPod (slow blinking)
When the source is set to FM radio and
the alarm is set to TIMER PLAY
87.5 - 108.0 MHz
↔ P01-P20
When battery power is low
- - -
When trying to set alarm to TIMER PLAY
while selecting AUX
How to set the time and use the alarm
Switch/Press
Functions
Switch the alarm on/off.
OFF: turn off the alarm (BUZZER/ TIMER PLAY).
BUZZER: alarm on (buzzer sound)
TIMER PLAY: alarm on (iPod/FM radio)
• Switch between current time and alarm time.
• Press and hold this button to select the current time/alarm time setting mode.
Change the values for the time setting.
Setting the Clock
1 Switch to current time display with the “SET” button.
2 Press and hold the “SET” button.
→ The year display starts fl ashing.
3 While
fl ashing, set each item with the “DOWN”/“UP” buttons.
4 Press the SET button.
• When the “SET” button is pressed, the fl ashing items will change in the following order.
• The time is set when switching to time display from Minutes.
NOTES
• The time can be set both when the power is on and off.
• To modify the setting, start again from step 1.
Setting the alarm (ALARM-BUZZER)
1 Switch to alarm time display with the “SET” button.
→ “ALARM” icon appears on the display.
2 Press and hold the “SET” button.
→ The hour display starts fl ashing.
3 While
fl ashing, set each item with the “DOWN”/“UP” buttons.
• When the “SET” button is pressed, the fl ashing items will change in the following order.
• It is not necessary to set the “TIMER PLAY” time at this point.
4 Switch the “ALARM” switch to “BUZZER”.
• To check the set time, switch the display to alarm time by pressing the “SET” button.
• The buzzer sounds for three minutes.
Selecting iPod or FM radio for the alarm sound (ALARM-TIMER PLAY)
1 Set the alarm time.
(See steps 1 to 3 of “To set the alarm (ALARM-BUZZER)”)
• You can set the duration of time between timer-on and timer-off from 10 minutes to 30 minutes in TIMER
PLAY time.
2 If the power is off, turn the unit power on.
3 Confi rm that you can hear the iPod or FM radio.
• Set to an appropriate volume.
4 Switch the “ALARM” switch to “TIMER PLAY”. The selected source is blinking on the display.
Stopping alarm sound
To pause the alarm (snooze)
Press the “SNOOZE/LIGHT” button while the alarm in sounding, when the alarm is set with either
“ALARM-BUZZER” or “ALARM-TIMER PLAY”.
The alarm sound is temporarily stopped, and started again 5 minutes later. You can repeat this up to 10
times.
To stop the alarm (BUZZER/ TIMER PLAY)
• Switch the “ALARM” switch to “OFF”.
Playing back from other equipment
Connecting other equipment
Connect an external device to the AUX jack on the rear of the unit using a stereo mini plug cord (not
supplied) .
NOTE
• Always set volume to the minimum level when connecting or disconnecting the other equipment.
Listening to external devices
1 Turn the unit power on.
2 Select “AUX” with the “SOURCE” button.
3 Start playback on the external device.
4 Adjust the volume.
To audio output such as CD/
MD/digital audio player, etc.
Playing back from iPod
Setting the iPod on the unit
1 Select the attachment compatible to your iPod (see “iPod Compatibility Chart”).
2 Match the attachment tab to the hole in the unit, and insert the attachment to the unit.
3 Connect the iPod to the connector plug of the unit.
• Always set volume to the minimum level when connecting or disconnecting iPod.
• When you connect your iPod to the unit, make sure you insert it all the way.
• When disconnecting the iPod, make sure that the System is turned off.
Listening to the iPod
1 Connect the iPod to the unit.
2 Turn the unit power on.
3 Select “iPod” with the “SOURCE” button.
When iPod is selected as sound source, it automatically starts playback.
Press
Functions
Unit
Remote control
6
Playback/Pause
Press and hold this button to switch the iPod to sleep mode.
¢
Next song / fast forward (press and hold)
4
Previous song (Press this button during playback to jump back
to the beginning of the track.) / fast rewind (press and hold)
Charging the iPod
The iPod is charged while it is set on the unit when the Unit power is on.
• Connect the AC adaptor to the Unit. The iPod battery is not charged while
the Unit is operated on the battery power supply.
• The iPod is charged regardless of the sound source selected on the Unit.
• See the iPod instruction manual about charging times.
• The “CHARGING SWITCH” is located inside of battery compartment on
the rear of the Unit.
Set the “CHARGING SWITCH” to “FIREWIRE” for 10GB/15GB/20GB/
30GB/40GB iPod 3rd Generation. For all other models, you can set the
switch to either “FIREWIRE” or “USB” to charge the iPod.
iPod Compatibility Chart
iPod model
4 GB mini 1st Generation
4 GB mini 2nd Generation
6 GB mini 2nd Generation
iPod nano
1GB/2GB/4GB
iPod nano 2nd Generation
2GB/4GB/8GB
iPod video 5th Generation
30GB
iPod video 5th Generation
60GB/80GB
Attachment names
mini
nano
2G nano
VIDEO 30GB
VIDEO 60GB
iPod model
iPod 3rd Generation 10GB/15GB/20GB
iPod 4th Generation 20GB
iPod photo 4th Generation 20GB/30GB
iPod 3rd Generation 30GB/40GB
iPod 4th Generation 40GB
iPod photo 4th Generation 40GB/60GB
Rubber pad
A type (Large)
B type(Small)
Attachment name
iPod
Combine this attachment with the rubber pads.
Select the rubber pad size which matches your iPod model.
• Select the appropriate attachment for your iPod model.
Listening to FM Broadcasts
Press
Functions
Unit
Remote control
FM MODE/
Switch FM stereo/monaural.
When there is too much static in an FM stereo broadcast, you
can reduce the static by switching to monaural reception.
Press again to switch back to stereo reception.
If the broadcast is not FM stereo, the sound becomes
monaural, even if FM stereo is selected.
6
—
• Switch channel display / frequency display. Channel display is
automatically switched to frequency display after approx. 3 seconds.
• To register a channel, press and hold this button. (see
“Presetting Stations”)
¢
4
Select a channel from P01 to P20.
(The unit button can be used when channel display is selected.)
¢
4
Change frequencies to tune in to FM radio station. (The unit
button can be used when frequency display is selected.)
• Press and hold to search broadcast stations automatically.
The search is fi nished when the signal is received. Press
again while searching to quit search.
Listening to FM radio
Stretch out the wire antenna located on the rear of the unit before using.
1 Turn the Unit power on.
2 Select “FM” with the “SOURCE” button.
3 Select a station with the “
4”/“¢” button.
Presetting Stations
1 Select “FM” with the “SOURCE” button, and switch to channel display with “
6” button.
2 Use
the
“
4”/“¢” button to select the channel number (P01 to P20) to be registered.
3 Press and hold the “
6” button. → The channel number starts fl ashing.
4 Use
the
“
4”/“¢” button to select the frequency (87.5 MHz to 108.0 MHz) of the station that you wish
to register.
5 Press the “
6” button → The selected frequency will be registered.
• To confi rm registration, select the registered channel number (P01 to P20), and press “
6” button to
display frequency.
Channel display
Frequency display
Year
→ Month → Day → 12/24-hour time → Hour → Min. → time display
NOTES
• The connector plug is protected with a cover when it is fi rst purchased. Please remove the
cover before operating the unit.
• Do not carry the System with iPod connected. You might drop it down or it might cause
damages to the connector part.
• Do not touch or hit the iPod terminal pins or the connector pins directly. It might cause
damages to the connector part.
• If the iPod does not play correctly, please update your iPod software to the latest version. -
For details about updating your iPod, check on the Apple web site
• iPod is a trademark of Apple Computer, Inc., registered in the U.S. and other countries.
• JVC is not responsible for any loss of or damage to iPod that might result from the use of
this product.
• Sound distortion may occur when playing back audio sources with high recording levels.
When distortion occurs, it is recommended to turn off the equalizer of the iPod. For
information on operating the iPod, see the iPod instruction manual.
How to combine the rubber pads with the attachment
There are two types of rubber pad : “A type (Large)” and “B type (Small)”.
Select the appropriate rubber pads for your iPod model.
Insert the rubber pads narrow-end fi rst.
A type (Large)
B type(Small)
Attachment name
CHARGING SWITCH
Press
Functions
FM MODE/
• Switch on/off the backlight when the
button is held down.
• Switch FM stereo/monaural when FM is
selected.
¢
4
6
(see “Playing back from iPod” and
“Listening to FM Broadcasts”)
Select a source
Press
Functions
Select a source
iPod
→ FM → AUX
“STEREO” is displayed when an FM stereo broadcast is received.
“MONO” is displayed when the monaural is selected. (see “Listening to FM Broadcasts ”)
Current time: Blinking / Other Clock Display: Lighting
Hour
→ Min. →
TIMER PLAY time (10 to 30)
→ time display
Hour
→ Min. → TIMER PLAY time (10 to 30) → time display
Press
Functions
Switch the temperature
display between Celsius/
Fahrenheit.
Remote control
sensor
iPod connector plug
CAUTION:
• “AUX” cannot be selected as a source. Select another source.
• The “TIMER PLAY” does not work when the Unit power is turned off.