Page 9 optimising paramétrage optimización, Page 08, Page 11 wearing style ergonomie forma de sujeción – Jabra GN9120 User Manual
Page 5: Page 10
Page 9
Optimising
Paramétrage
Optimización
4
Low power mode (Europe only) optional
Mode Faible Puissance (en option)
Modo de potencia baja (opcional)
Clear dial tone
Réglage de la tonalité
Tono de señal nítido
5 sec.
4.1
4.5
5 sec.
4.3
on off
4.2
4.4
Page 08
|
Low power
mode (Europe only). By
default, your GN9120
operates in standard
power mode. If you
experience interference
(such as a humming
sound during calls) you
can activate the low
power mode to prevent
it. The range of your
headset can decrease
in low power mode to
50 m (minimum).
|
Mode Faible
Puissance (Europe
uniquement). Par
défaut, votre GN9120
fonctionne en mode
Standard. En cas
d'interférences pendant
les appels (grésille-
ments, bourdonne-
ments), activez le mode
Faible Puissance. La
portée du micro-casque
peut alors n'atteindre
que 50 m.
|
Modo de poten-
cia baja (sólo Europa). Por
defecto, la unidad GN9120
funciona en modo de
potencia estándar. Si sufre
interferencias (como
zumbidos durante las
llamadas) puede activar
el modo de potencia baja
para solucionarlo. La
cobertura del microcasco
puede disminuir hasta los
50 metros (mínimo) en el
modo de potencia baja.
|
English
|
Français
|
Español
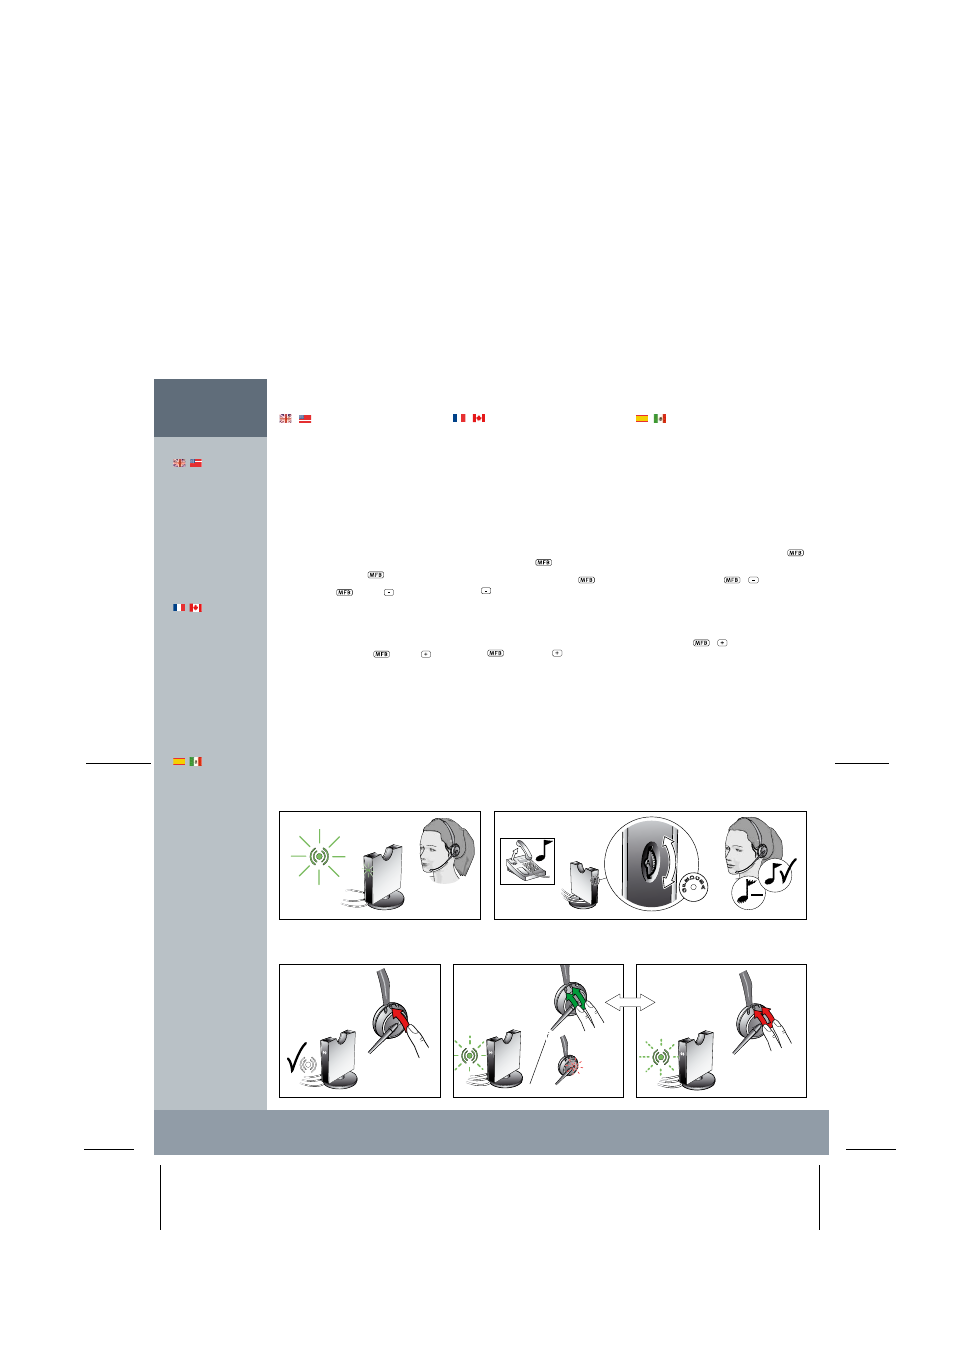
Clear dial tone
[4.1]
Put on your headset and lift the
telephone’s handset.
[4.2]
If you do not hear a dial tone in the
head set, move the telephone termination
switch along the A-G range until the dial tone
is clear.
Low power mode (Europe only)
optional
If you experience interference, proceed to (4.3).
[4.3]
Make sure there is no link by pressing
the multifunction button
momentarily.
[4.4]
Press the
and the
button
simultaneously for 5 sec. A red indicator on
the headset will flash a few times to indicate
that the power mode has been changed.
[4.5]
To return to standard power, perform
step (4.4), and then press
and the
button simultaneously for 5 sec. A red indicator
on the headset will flash to indicate the power
mode has been changed.
Note: When the headset is removed from the
base, it’s link-up indicator flashes in 10 sec. cycles
when in low power mode, but stays lit (without
flashing) when in standard power mode.
Réglage de la tonalité
[4.1]
Mettez votre casque et soulevez le
combiné du téléphone.
[4.2]
Si vous n'entendez pas de tonalité,
sélectionner un des réglages de la molette de
A à G jusqu'à entendre clairement la tonalité.
Mode Faible Puissance (en option)
En cas d' interférences, passez à (4.3).
[4.3]
Veillez à ne pas être en liaison en
appuyant pendant momentanément sur le
bouton multifonctions
.
[4.4]
Appuyez simultanément sur
et le
bouton
pendant 5 s. Un voyant rouge sur le
casque clignote plusieurs fois pour indiquer
que le mode d'alimentation a été modifié.
[4.5]
Pour repasser en mode Standard, effec-
tuez l'opération (4.4), puis appuyez simultané-
ment sur
et le bouton
pendant 5 s. Un
voyant rouge sur le micro-casque clignote pour
indiquer que le mode d'alimentation a été
modifié.
Nota: Lorsque le micro-casque est enlevé de la
base, son voyant “connexion casque” clignote
en cycles de 10 s. en mode Faible Puissance
puissance, mais reste allumé en mode Standard.
Tono de señal nítido
[4.1]
Colóquese el microcasco y levante el
microteléfono.
[4.2]
Si no oye el tono de llamada en el micro-
casco, coloque el interruptor de la base en los
distintos valores entre A y G hasta que el tono
de señal sea nítido.
Modo de potencia baja (opcional)
Si sufre interferencias, vaya al punto (4.3).
[4.3]
Asegúrese de que no hay conexión
momentáneamente
[4.4]
Pulse los botones
y
simultánea-
mente durante 5 segundos. En el microcasco
parpadeará un indicador rojo para indicar que
el modo de potencia ha cambiado.
[4.5]
Modo de
estándar, realice el paso (4.4),
a continuación,
y
durante 5 segundos.
En el microcasco parpadeará un indicador rojo
para indicar que el modo de potencia ha
cambiado.
Observación: Al retirar el microcasco de la base,
el indicador de conexión parpadea en ciclos de
10 segundos si se encuentra en modo de poten-
cia baja, y permanece encendido (sin parpadear)
cuando se halla en modo de potencia estándar.
Page 11
Wearing style
Ergonomie
Forma de sujeción
5
Change wearing ear (L or R)
Porter le casque à gauche ou à droite
Cambio de oreja (izquierda o derecha)
Change wearing style from headband to earhook
Passer du serre-tête au contour d'oreille
Cambio entre la diadema y el gancho
5.5
5.4
180º
5.3
5.1
5.2
180º
Page 10
|
English
|
Français
|
Español
Change wearing style from
headband to earhook
[5.1]
Remove the ear cushion if you have
it on.
[5.2]
Hold the headband as illustrated and
press the headset receiver’s speaker with
your thumb.
[5.3]
Match the “L” or “R” inside the ear
plate with the square hole on the headset.
Click the earhook on to the headset receiver.
Change wearing ear (L or R)
The buttons on the headset must be facing
upwards. Then rotate the boomarm 180
degrees, before changing “L” and “R”
wearing.
[5.4]
For wearing headband over your left
ear turn the boomarm 180 degrees.
[5.5]
For wearing the earhook over your
left ear, align the “L” inside the earhook
with the square hole on the headset, and
press the earhook onto the headset re ceiver.
Attach the earhook to the earhook ring’s
clutch. For wearing over your right ear, do
the opposite.
Cambio entre la diadema y el gancho
[5.1]
Retire la almohadilla de la oreja si la
tiene colocada.
[5.2]
Sujete la diadema según muestra la
ilustración y presione el altavoz del receptor
del microcasco con el pulgar.
[5.3]
Haga coincidir las letras “L” o “R” del
interior de la placa auricular con el orificio
cuadrado del microcasco. Presione el gancho
sobre el receptor hasta oír un clic.
Cambio de oreja
(izquierda o derecha)
Los botones del microcasco deben estar
colocados hacia arriba. Gire el brazo del
micrófono 180 grados antes de cambiar la
colocación a izquierda “L” o derecha “R”.
[5.4]
Para llevar la diadema sobre la oreja
izquierda, gire el brazo 180 grados.
[5.5]
Para llevar el gancho sobre la oreja
izquierda, alinee la “L” que se encuentra
dentro del gancho con el orificio cuadrado del
microcasco y presione el gancho hasta enca-
jarlo en el receptor del microcasco. Acople el
gancho en su aro. Para llevarlo sobre la oreja
derecha, realice el procedimiento contrario.
Passer du serre-tête au contour
d'oreille.
[5.1]
Otez le coussinet.
[5.2]
Tenez le serre-tête comme illustré et
appuyez avec votre pouce sur l'écouteur.
[5.3]
Faites correspondre le “L” ou le “R”
à l'intérieur de la plaque auriculaire avec
le trou carré sur le casque avant de fixer le
contour d'oreille au casque (vous devez
entendre un clic).
Porter le casque à gauche ou à
droite
Les boutons du casque doivent d'abord être
tournés vers le haut puis faites tourner la
perche micro à 180 degrés.
[5.4]
Pour porter le casque à gauche avec le
serre-tête, faites tourner la perche micro à
180 degrés.
[5.5]
Pour porter le casque à gauche avec le
contour d'oreille, alignez le “L” à l'intérieur
du contour sur le trou carré du casque puis
appuyez pour le fixer. Pour porter le casque sur
votre oreille droite, faites l'inverse.