Installation, How to connect cables to the dvd-r drive, How to attach the scsi cable – JVC MC-R421U User Manual
Page 5
5
ENGLISH
INSTALLATION
6. How to Connect Cables to the DVD-R Drive
Ⅵ Also refer to the corresponding sections in your Library Instructions Manual.
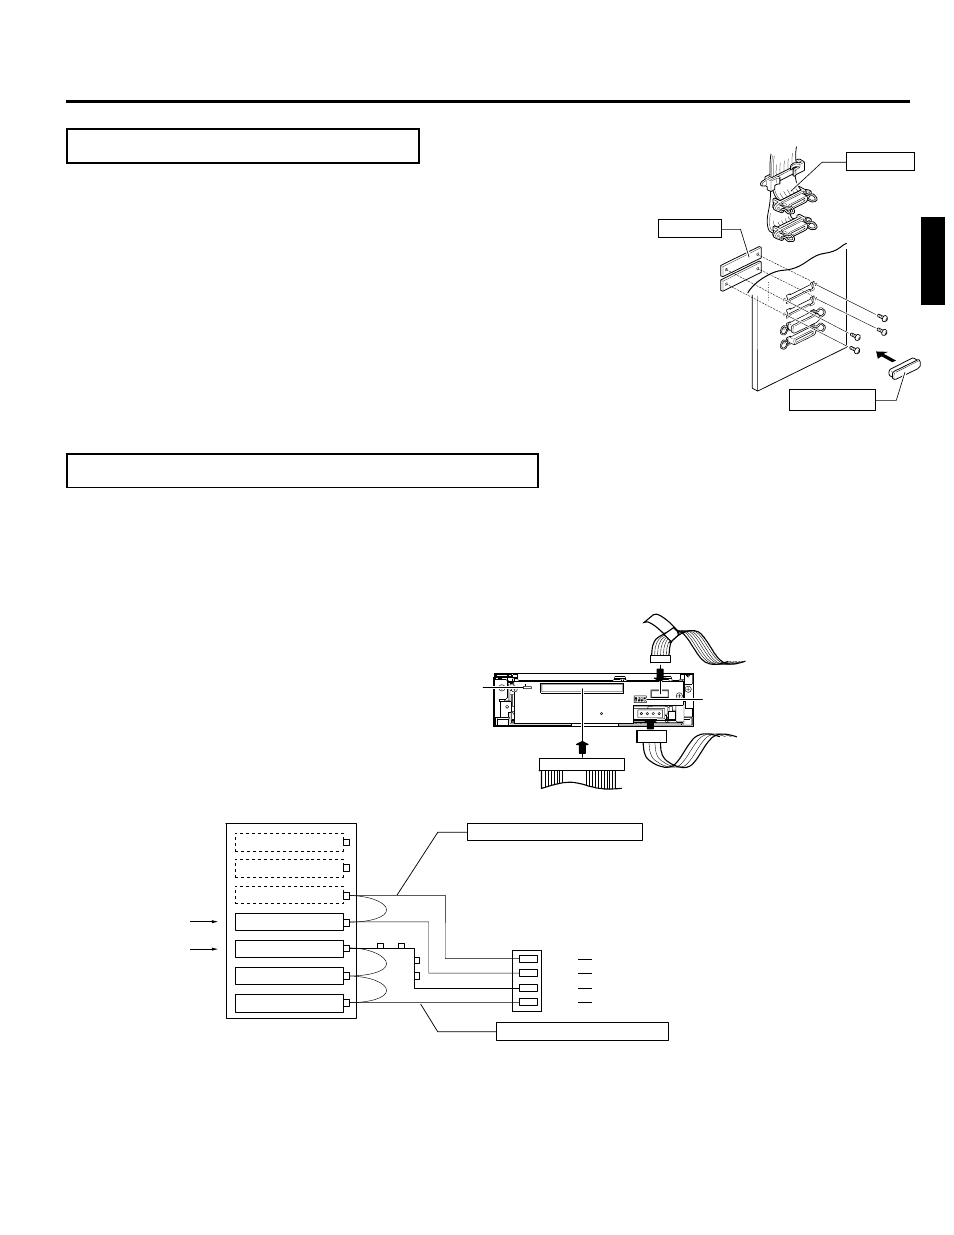
1.
Connect the power supply cable, control cable and SCSI cable to the connectors at the rear of the DVD-R Drive.
Ⅵ When using the MC-8100U, the No. of the cable must always correspond to the No. of the drive bay to which it is being
connected. If the cable with the wrong number is connedted, it will lead to the equipment malfunctioning.
Ⅵ When using the MC-8200U/8600U, connect power supply and control cables, which lead from the side of the DVD-R
drive bay to the drive.
Ⅵ Insert all connectors firmly.
Ⅵ SCSI cables should be connected as a daisy chain connection. Each connector may be connected to the drive posi-
tions as illustrated in the diagram.
Ⅵ Terminate the physical end of the SCSI bus. For information on how to set the built-in terminator, refer to the item 1
“TERM” of “7. How to Set the DIP and Slide Switches”.
For an external terminator we recommend that an active SCSI terminator is used with the JVC CD/DVD Library.
Power cable
Control cable
SCSI cable
N
W
Slide switch
DIP switch
14p
3
4p
2
3
1
Rear section of the DVD-R Drive
5. How to Attach the SCSI Cable
Ⅵ If required two SCSI bus channels may be used by adding the provided SCSI cable.
If the DVD-R is recorded intermittently due to an insufficiency in the recording transfer
rate on the SCSI bus, the recording quality may deteriorate and playback malfunc-
tions may occur.
1. While holding the two blind plates, remove the four screws on the SCSI connector installa-
tion section at the rear of the JVC CD/DVD Library in order to remove the two blind plates.
2. Insert the provided SCSI cable through the installation hole from the back side of the
rear panel and secure it with the four screws.
Ⅵ Remove the connector cap of the SCSI cable for installation.
Ⅵ Be sure that the SCSI connector is inserted in the correct direction. (It should be the
same as the direction of the SCSI connector “SCSI-A”.)
3. If you are not connecting the SCSI cable to the OUT side of the SCSI connector
“SCSI-D”, place the connector cap over it.
SCSI-D
SCSI-C
SCSI-B
SCSI-A
Blind plate
Connector cap
SCSI cable
Connection example of a SCSI cable
DVD-R Drive
(Terminate here )
DVD-R Drive
(Terminate here )
DVD-R Drive
Library SCSI board
SCSI connector
OUT 2
SCSI-D(F)
SCSI-C(E)
SCSI-B
SCSI-A
IN 2
OUT 1
IN 1
Internal SCSI cable (additional)
• Up to two DVD-R drives can be connected
• Up to 6 drives can be connected
(• Up to 4 drives in the case of MC-8100U)
Internal SCSI cable (Standard)
To be connected with host computer's SCSI host adapter No.2
To be connected with host computer's SCSI host adapter No.1
Connect an active terminator.
Connect an active terminator.