Digital audio dubbing, A pg. 64, 70, A pg. 64) – JVC SR-DVM70EU User Manual
Page 64: F-1 input setting, Editing, F-1 input, Video
Filename [DVM70S_12Editing.fm]
Masterpage:Left+
64
EN
EDITING
Page 64
Friday, 4 March 2005 15:40
DECODER
:
To use a decoder connected to the [L-2 IN/DECODER]
connector.
NOTES:
●
If you have a satellite receiver or a decoder connected to the [L-2
IN/DECODER] connector, be sure to set
AL-2 SELECTB back to
appropriate mode after editing.
●
If you are not connecting a satellite receiver or a decoder to the
[L-2 IN/DECODER] connector, leave
AL-2 SELECTB set to
AVIDEOB.
●
When
AL-2 SELECTB is set to ASAT VIDEOB and ASAT S-VIDEOB,
ASATB appears on the TV screen or front display panel instead of
AL-2B.
●
If
AL-1 OUTPUTB is set to ASCART S-VIDEOB, it is not possible to
set
AL-2 SELECTB to ADECODERB or ASAT VIDEOB.
●
If
AL-1 OUTPUTB is set to ASCART RGBB, it is not possible to set
AL-2 SELECTB to ADECODERB or ASAT S-VIDEOB.
●
If
AL-1 OUTPUTB is set to ACOMPONENTB and AL-2 SELECTB to
ASAT VIDEOB, ASAT S-VIDEOB or ADECODERB, be sure to
connect the [L-1 IN/OUT] connector with a TV.
●
If
AL-2 SELECTB is set to ASAT S-VIDEOB, be sure to set AL-1
OUTPUT
B to ASCART S-VIDEOB.
●
The BNC and S-Video output do not support the satellite receiver
function. Make use of the L-1 output when viewing images from
the satellite receiver.
F-1 Input Setting
Set
AF-1 INPUTB to the appropriate mode depending on the
connector (VIDEO or S-VIDEO) being used on the front panel.
1
AL-1 Output And L-1 Input SettingB
2
Press
F G to select AF-1 INPUTB, then press ENTER.
3
Press
F G to select the
appropriate setting, then press
ENTER.
4
Press SET UP to complete the
setting.
* The boldface settings below indicate the settings at your purchase.
8
F-1 INPUT
^
VIDEO
/ S-VIDEO
VIDEO
:
When connecting an appliance to the [VIDEO] input connector,
set to
AVIDEOB.
S-VIDEO:
When connecting an appliance to the [S-VIDEO] input
connector, set to
AS-VIDEOB
.
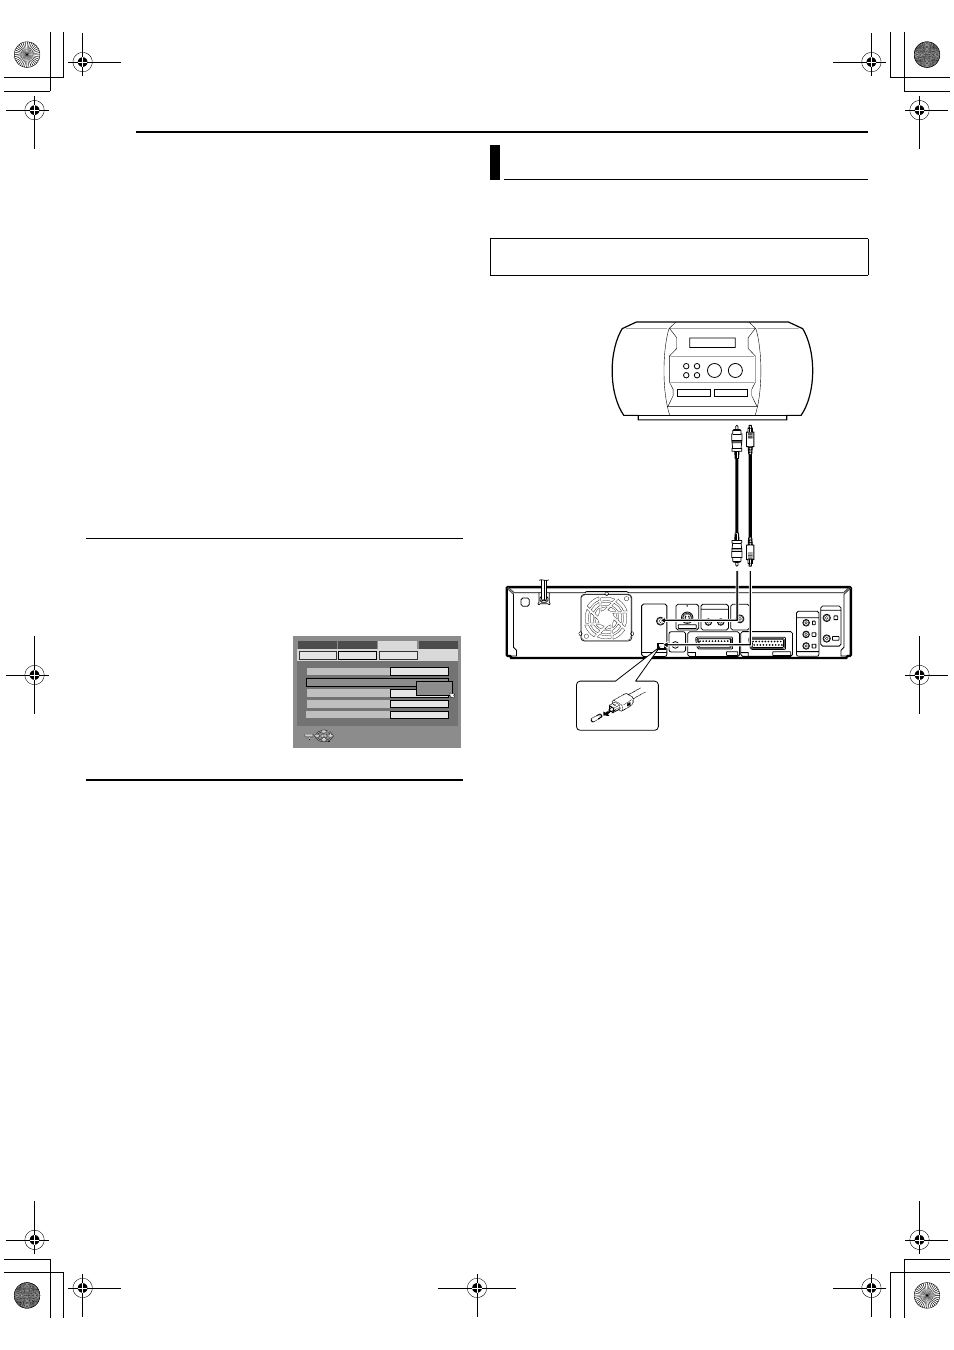
You can dub selected audio from a DVD or Audio CD disc to a
digital audio device.
However, it is not possible to dub copy-protected discs.
Example: Dubbing to an MD
1
Connect the unit and a digital audio device using either an
optional optical cable or an optional coaxial cable.
2
Place a disc on the unit and load an MD on the connected
digital audio device.
3
Select the audio to be dubbed.
4
Start playback slightly before the actual point from where you
wish to start dubbing.
5
Press
W to pause playback.
6
Select the input mode on the connected digital audio device.
7
Press
I to start playback on the unit.
8
Start recording on the digital audio device.
9
Stop recording on the digital audio device. Then press
o to stop
playback on the unit.
NOTE:
There may be a discrepancy of several seconds between where
you intend editing to start, and where it actually starts.
ENTER
SELECT
SET UP
EXIT
DVD VIDEO SET UP
MONITOR TYPE
HDD/DVD/DV SET UP
FUNCTION SET UP
INITIAL SET UP
REC/PLAY SET UP
DISPLAY SET
F-1 INPUT
L-1 INPUT
L-1 OUTPUT
L-2 SELECT
VIDEO IN/OUT
4:3LB
VIDEO
VIDEO
SCART VIDEO
VIDEO
VIDEO
VIDEO
S-VIDEO
SELECT WITH @ THEN PRESS [ENTER]
PRESS [SET UP] TO EXIT
Digital Audio Dubbing
●
Turn on the TV and select the AV mode.
●
Slide the TV/CABLE/SAT/DVD switch to DVD.
Rear of unit
Note for connection:
Remove the protection cap from the optical cable.
Digital audio device
(MD deck, etc.)
Coaxial cable
(not supplied)
Player
Recorder
To [DIGITAL
AUDIO OUT
(COAXIAL)]
To [DIGITAL AUDIO
OUT (OPTICAL)]
Optical cable
(not supplied)
DVM70S_00.book Page 64 Friday, March 4, 2005 3:40 PM