Ikelite DSC-H7 User Manual
Page 2
6
CClloossiinngg tthhee H
Hoouussiinngg
1. Place housing face down in your lap.
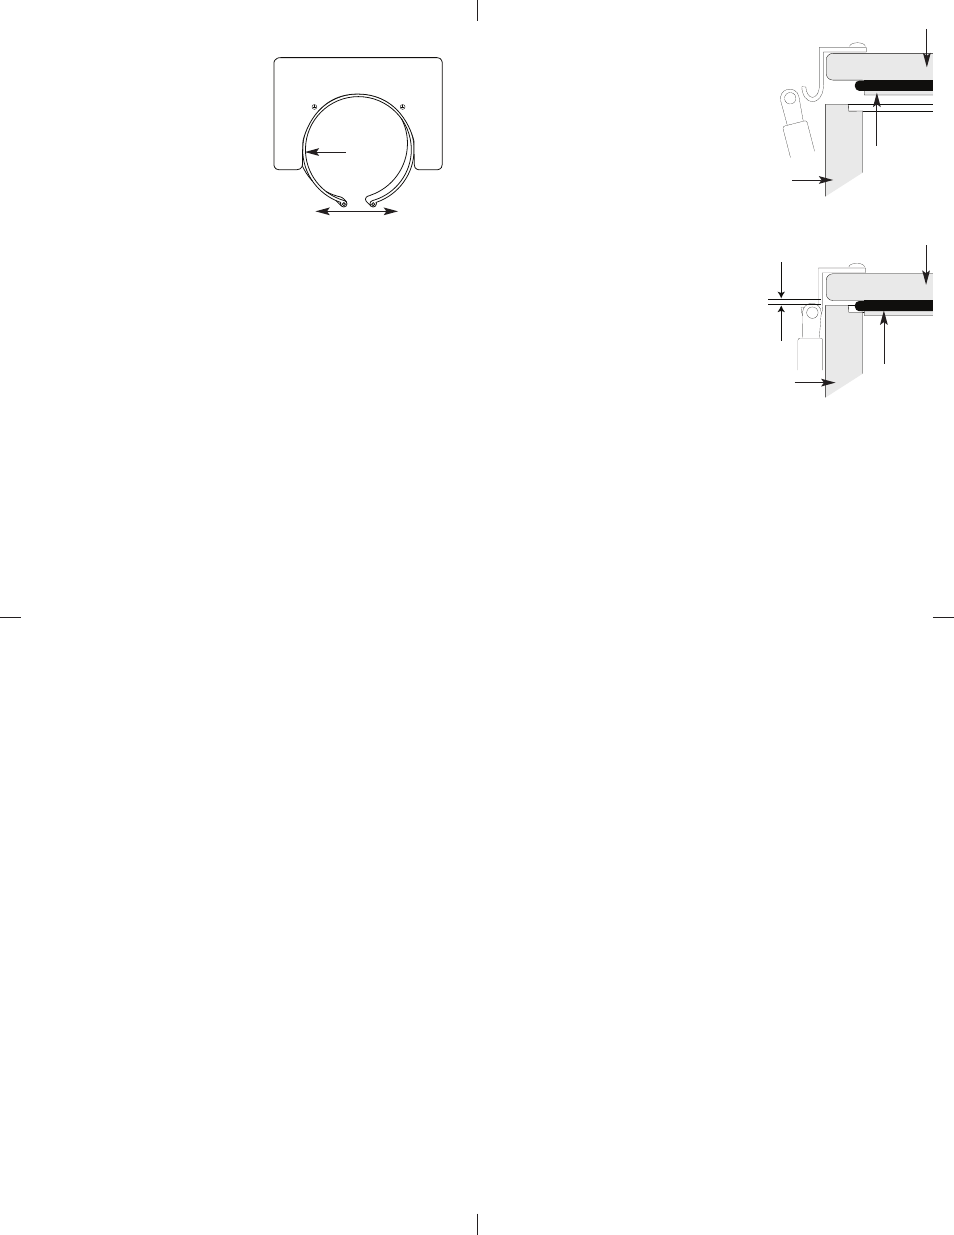
2. Check to see that there is an o’ring
on the housing back and that it is
clean and in its proper location.
3. Guide the back onto the housing.
The o’ring should touch the housing
all the way around. There should be
an even gap all the way around
between the housing and the
housing back.
4. Lift the lid snaps so they are
extended and place the lid snap
into the hook on the housing back.
5. To close the housing push
down on the lid snaps until
they snap into place . Lid
snaps on opposite sides of
the housing should be closed
at the same time. Be sure they
are down far enough to engage
the lock.
D
Doouubbllee cchheecckk - Once the housing is
closed, check the o’ring seal. Check the gap between the
housing back and the housing, it should be even all the
way around.
Look through the clear plastic back at the o’ring. You should see
a darkened area where the o’ring is compressed against the
housing back. If you do not see an even black compression seal
all the way around the back, open the lid snaps, reseat the
housing back and close the lid snaps. Visually check the seal again.
o’ring
housing back
housing back
housing
housing
o’ring
even gap
all 4 sides
5
D
Diiffffuusseerr aanndd D
Deefflleeccttoorr CCoonnttiinnuueedd
D
Diiffffuusseerr
If you do not have an external
flash it is recommended that the
flash diffuser be installed on the
camera each time the camera is
installed in the housing. The camera’s
flash can be turned ON and OFF by
the camera’s flash control. If the
camera’s flash is set to ON, the flash
will pop-up when the shutter release is
depressed. If the camera’s flash is popped
up, the flash can still be turned OFF by setting the camera’s flash
control to OFF.
(See camera instructions for flash control.)
Due to the location of the camera’s built-in flash the housing’s port
blocks a portion of the flash. The diffuser will aid in distributing the
light but the bottom portion of the picture may receive less light
(shadow) when the camera lens is set at it’s widest angle, the
amount of shadow will depend on the camera to subject distance.
To eliminate the shadow, zoom the lens toward telephoto. The
amount of zooming required to eliminate the shadow will depend
on camera to subject distance.
(You can test this above water)
D
Deefflleeccttoorr
The deflector should be installed on the camera when using an
external strobe such as the DS51 or DS125 Substrobe and EV
Controller. The deflector material is non-transparent, it will block
any light from going forward which will help to eliminate backscatter
and it will redirect the camera’s flash to the EV Controller which
controls the external strobe(s) output.
(See page 9)
Diffuser/Deflector
material
Lens Clamp
Spread to Install
7
LLeennss PPoorrtt
The Lens Port is factory sealed, do not remove.
Treat the glass in the lens port as a camera lens. After use, rinse
and gently dry the lens port to avoid water spotting. To clean
use a mild soap solution or lens cleaner.
Do not use alcohol or window cleaner on the Lens Port.
CChheecckkiinngg CCoonnttrroollss
Once the housing has been closed, push the controls back into
place. Make sure they line up with the camera’s controls.
TTuurrnn CCaam
meerraa O
Onn
Turn the camera on and operate each of the housing controls to
get a feel for using the camera in the housing. Take a few pictures
above water with the camera in the housing.
Due to the location of the camera’s built-in flash the housing’s port
blocks a portion of the flash. The diffuser will aid in distributing the
light but the bottom portion of the picture may receive less light
(shadow) when the camera lens is set at it’s widest angle, the
amount of shadow will depend on the camera to subject distance.
To eliminate the shadow, zoom the lens toward telephoto. The
amount of zooming required to eliminate the shadow will depend
on camera to subject distance. (You can test this above water)
8
O
Oppttiioonnaall AAcccceessssoorriieess
BBaacckk O
O''rriinngg
#
#00113322..5599
O'rings last for several years if properly maintained.
(See maintenance) Always carry a spare.
U
Ussiinngg aa D
DSS SSuubbssttrroobbee &
& EEVV--CCoonnttrroolllleerr
To use a external DS Substrobe requires the EV-Controller.
The EV-Controller has a built-in slave sensor that is triggered by
the camera’s built-in flash which fires the external DS Substrobe.
The EV-Controller provides 10 manual power settings in 1/2 stop
increments for precision lighting.
SSuubbssttrroobbee PPaacckkaaggeess aavvaaiillaabbllee
Ikelite Ball Arm Systems are provided with these packages
#3944.47 SubStrobe DS51 with EV Controller
#3944.54 SubStrobe DS51 with EV Controller
#3944.77 SubStrobe DS125 with EV Controller
N
Noo ccoolloorr ffiilltteerrss oorr w
wiiddee--aannggllee lleennsseess aarree aavvaaiillaabbllee ffoorr tthhee
S
Soonnyy DDSSCC--H
H77 oorr tthhee DDSSCC--H
H99 hhoouussiinngg..