Connecting your player to a television, 1 slide the av in/out switch to the out position, Connecting your player to a video camera – Insignia NS-PDVD9 User Manual
Page 8: 1 slide the av in/out switch to the in position, Using the setup screens, 2 press the or button to select a menu, 5 repeat steps 2-4 for other menus, 6 press setup again to exit the setup menu
8
Insignia NS-PDVD9 Portable DVD Player
www.insignia-products.com
Connecting your player to a television
You can connect your player to a television to
enjoy high quality stereo sound and picture on a
larger screen.
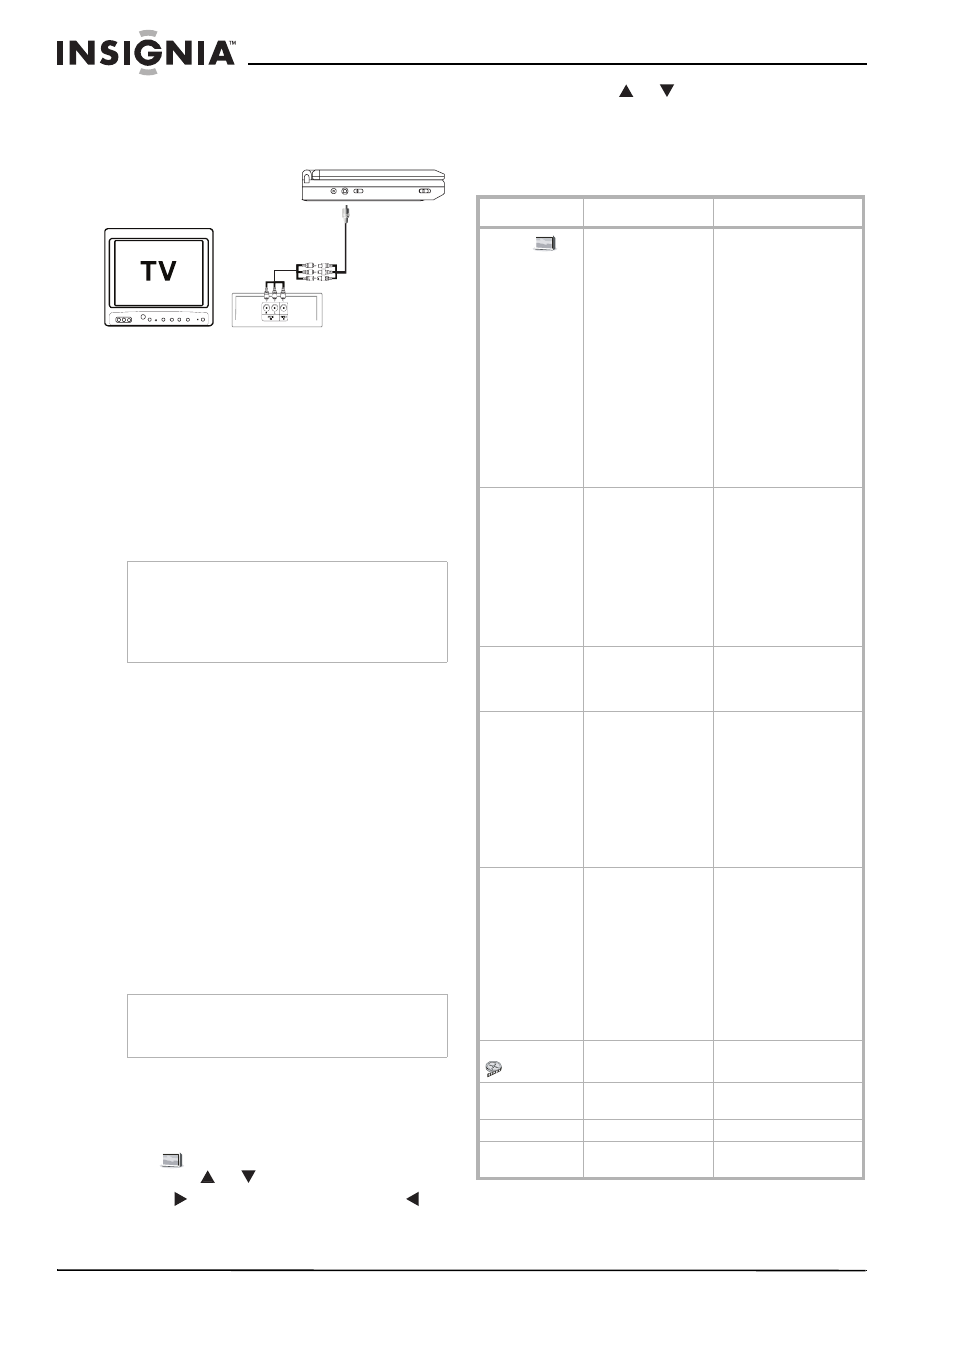
To connect your player to a television:
1 Slide the AV In/Out switch to the Out
position.
2 Plug the audio/video cable’s black plug into
the player’s DVD AV jack.
3 Plug the other end to the AUDIO and VIDEO
INPUT jacks on your television or monitor as
follows:
•
white = left audio
•
red = right audio
•
yellow =video
Connecting your player to a video camera
You can connect your player to a video camera
or other external video source to enjoy high
quality stereo sound and picture on your player’s
LCD screen.
To connect your player to an external video
source:
1 Slide the AV In/Out switch to the In position.
2 Plug the audio/video cable’s black plug into
the player’s DVD AV jack.
3 Plug the other end to the AUDIO and VIDEO
OUTPUT jacks on your video camera or
other external video source as follows:
•
white = left audio
•
red = right audio
•
yellow =video.
Using the setup screens
To use the setup screens:
1 Press the SETUP button with no disc inside
the player. The General Setup Page appears
and
is highlighted.
2 Press the
or
button to select a menu.
3 Press
to enter a sub menu or press
to
return to the previous menu.
4 Press the
or
button to select the sub
menu, then press ENTER to confirm your
selection.
5 Repeat steps 2-4 for other menus.
6 Press SETUP again to exit the Setup Menu.
Note
An optional wired headphone may be used with
the player. Plug in the headphone to either the
Headphone 1 or Headphone 2 jack on the right
side of the player. Plugging the headphone into
the Headphone 1 jack turns off the internal
speakers.
Note
Do not connect an external video source using the
AV jack when the AV In/Out switch is in the Out
position.
Menu
Submenu
Options
General
TV Display
Normal/PS: When the
player outputs a signal
to a normal TV, a normal
picture is shown on the
full screen.
Normal/LB: When the
player outputs a signal
to a normal TV, a normal
picture is shown on the
screen with a black strip
at both the top and
bottom of the screen.
Wide: When the player
outputs a signal to a
wide screen TV, a wide
picture is shown on the
full screen.
Angle Mark
On: The screen shows
the angle mark icon. (If
an angle option is
available).
Off: The screen will not
display the Angle Mark.
NOTE: Not all discs
contain this feature. This
feature is disc
dependent.
OSD Lang
You can choose English,
French, or Spanish as
the language for the
setup menus.
Screen Saver
On: Turns on the screen
saver. The DVD player
enters the Screen Saver
mode after
approximately five
minutes if the same
image remains on the
screen.
Off: Turns off the screen
saver.
Last Memory
On: The player returns to
the last played position
on the disc after you
press STOP once.
Off: The player does not
return to the last played
position on the disc.
NOTE: The last played
position memory
function is only effective
for OPEN operation.
Video Quality
Brightness
Adjust the screen
brightness.
Contrast
Adjust the screen
contrast.
Hue
Adjust the screen hue.
Saturation
Adjust the screen
saturation.