Milwaukee worklight User Manual
Page 2
2
3
1. Know your work light. Read this
manual carefully to learn your work
light's applications and limitations as
well as potential hazards associated
with this type of tool.
2. Batteries must be recharged only
with the specified charger for
the battery. A charger that may be
suitable for one type of battery may
create a risk of fire when used with
another battery.
3. Use work light only with specifi cally
designated battery pack. Use of any
other batteries may create a risk of
fi re.
4. When battery pack is not in use, keep
it away from metal objects like: paper
clips, coins, keys, nails, screws, or
other small metal objects that can
make a connection from one termi-
nal to another. Shorting the battery
terminals together may cause sparks,
burns, or a fi re.
WARNING
READ AND UNDERSTAND ALL INSTRUCTIONS.
Failure to follow all instructions listed below, may result in electric
shock, fi re and/or serious personal injury.
SAVE THESE INSTRUCTIONS
GENERAL SAFETY RULES
5. Never insert bulbs other than
MILWAUKEE bulbs in the bulb sock-
et. Bulbs other than MILWAUKEE bulbs
may cause short circuit of battery and
personal injury.
6. Store idle work light out of reach
of children. Warm work lights can
become hazardous in the hands of
children.
7. Maintain labels and nameplates.
These carry important information.
If unreadable or missing, contact a
MILWAUKEE service facility for a free
replacement.
Volts Direct Current
Symbology
Underwriters
Laboratories, Inc.
Catalog
Number
49-24-0185
Volts
DC
28
Specifi cations
Before using the work light, read this operator's manual, your battery pack and charger
operator's manual, and all labels on the battery pack, charger and work light.
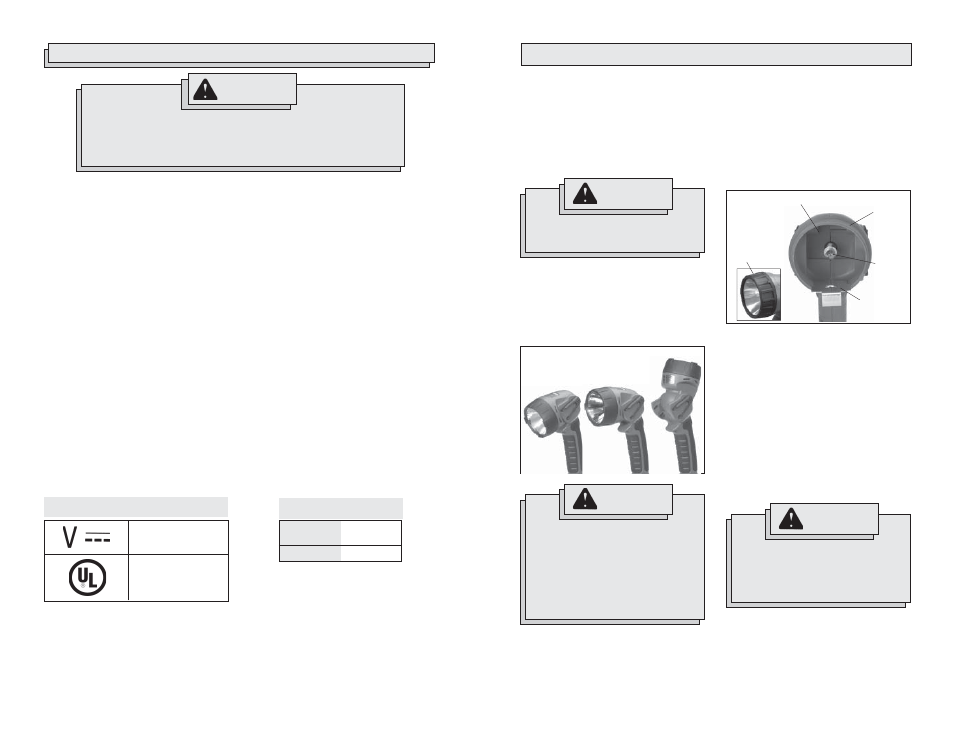
ASSEMBLY
Replacing the Bulb
1. Remove battery pack before changing
bulb.
2. Unscrew the bezel assembly on pivot
head by turning counterclockwise.
3. Remove the bezel assembly.
4. Pull forward the aluminum heat sink.
5. G e n t l y r o t a t e t h e b u l b c o u n t e r
clockwise and pull out.
WARNING
To reduce the risk of injury, DO
NOT operate work light without
bezel assembly in place. Bulb does
get hot. Always remove battery
pack before changing or removing
bulbs. Always allow the work light
to cool for at least 10 minutes
before replacing the bulb.
Fig. 2
Bezel
assembly
Spare bulb storage
Bulb
Aluminum
heat sink
Pivot
head
To i n s t a l l n e w b u l b , f o l l o w a b o v e
directions in reverse.
NOTE: Use a soft cloth when installing bulbs.
Direct contact with oils or other contamina-
tion can shorten the life of bulbs.
F o r w o r k l i g h t 4 9 - 2 4 - 0 1 8 5 , u s e
replacement bulb 49-81-0040.
A spare bulb is provided with the work
light. The bulb is located behind the
aluminum heat sink.
See your nearest MILWAUKEE Retailer
or Service Center to obtain replacement
bulbs.
WARNING
To reduce the risk of injury, do not
look directly into the light when the
work light is on.
Adjusting the Pivot Head
The pivot head can pivot to a range of 140°;
110° up and 30° down with detents every
10°. Pivot head to desired position (Fig. 1).
Allow the detent to snap into place. Do not
forcibly pivot the head.
Fig. 1
Removing Battery Pack from Tool
Push in the release buttons and pull the
battery pack away from the tool.
Inserting Battery Pack into Tool
To insert the battery pack onto the tool, slide
the pack onto the body of the tool. Make sure
it latches securely into place.
WARNING
To reduce the risk of injury and
damage, never insert bulbs other
than MILWAUKEE 28V bulbs in the
bulb socket. Other bulbs will over
heat!
Intelligent Circuit
This work light is equipped with an
intelligent circuit. If an improper voltage
bulb is installed, the light will flash
repeatedly. If this occurs, remove the
improper bulb and install a MILWAUKEE
28V bulb.