Using y our oven – roasting and br oiling, Broiling, Page 13 – Magic Chef CWG3600AAB User Manual
Page 15
Using
Y
our
Oven – Roasting and Br
oiling
PAGE 13
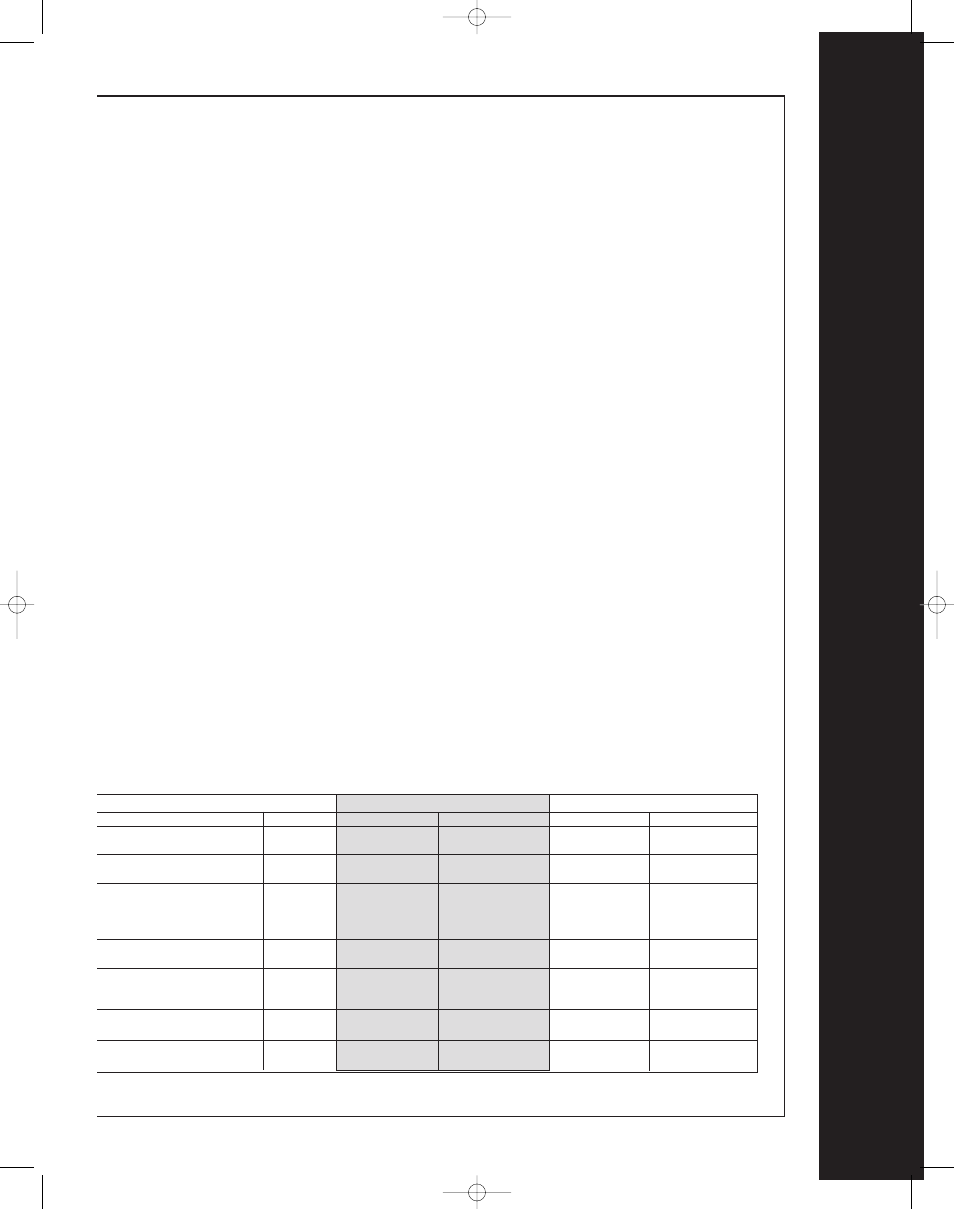
BROILING CHART
Until you become more familiar with your new oven, use the following chart as a guide when broiling foods.
6-INCH BROILER
12-INCH BROILER
FOOD
DONENESS
BROIL POSITION TOTAL BROIL TIME
BROIL POSITION TOTAL BROIL TIME
BACON
Well Done
Middle
Lo Broil
Middle
Hi Broil
6-9 minutes
8-12 minutes
BEEF PATTIES, 3/4-inch thick
Well Done
Middle
Hi Broil
Upper
Hi Broil
14-18 minutes
15-18 minutes
STEAKS, 1-inch thick
Hi Broil
Hi Broil
Rare
Middle
12-14 minutes
Upper
10-12 minutes
Medium
Middle
15-18 minutes
Upper
12-14 minutes
Well Done
Middle
18-21 minutes
Upper
13-16 minutes
CHICKEN,
Lo Broil
Hi Broil
Pieces
Well Done
Middle
30-40 minutes
Middle
30-35 minutes
FISH,
Lo Broil
Lo Broil
Fillet, 1/2-inch thick
Flaky
Middle
8-12 minutes
Upper
7-10 minutes
Steak, 1-inch thick
Flaky
Middle
13-16 minutes
Upper
12-15 minutes
HAM SLICE, 1/2-inch thick
Hi Broil
Hi Broil
(precooked)
Warm
Middle
8-10 minutes
Upper
9-12 minutes
PORK CHOPS, 1-inch thick
Hi Broil
Hi Broil
Well Done
Middle
24-28 minutes
Middle
22-27 minutes
*The bottom broil position for the 6-inch broiler is the broiler bottom. The bottom position for the 12-inch broiler is the bottom
rack position.
Broiling
Broiling is a method of cooking used for tender
steaks, chops, hamburgers, chicken, fish and
some fruits and vegetables. The food is placed
directly under the burner. The degree of
doneness is determined by the distance between
the meat and the burner, and the length of
broiling time.
General Tips
Broiling requires the use of the broiler pan and
insert supplied with your range. It is designed to
drain excess liquid and fat away from the cook-
ing surface to prevent spatters, smoke and fire.
For easier clean-up, line the broiler pan (bottom
piece) with aluminum foil and spray the insert
with a non-stick vegetable coating. Do not
cover the broiler insert with aluminum foil as
this prevents fat from draining into the pan
below.
To prevent excessive spattering and smoking,
trim excess fat from the meat. Increasing the
distance between the meat and the oven burner
will also help.
The rack position you select for broiling depends
on the thickness of the meat and the desired
doneness. Thin cuts (3/4 to 1 inch) should be
placed 2-3 inches from the heat; thicker cuts
should be placed 3-6 inches from the heat. Broil
until the top of the meat is browned. It should
be approximately half cooked by the time the
top is browned.
Generally for a brown exterior and rare interior,
meat should be close to the burner. Place the
pan further down if you want the meat well
done.
If you plan to season the meat, it is better to do
so after the surface has browned. Salt tends to
delay browning which can result in overcooking.
Salting before cooking also draws the juices out
of the meat, causing dryness.
Never leave a soiled broiler pan in the oven after
broiling. Drippings might become hot enough to
ignite if exposed directly to the oven burner.
Setting the Controls
1. Press the BROIL pad and press the ▲ or ▼
pad to select either Hi or Lo temperature as
indicated in the display. Hi is used for most
broiling operations. Lo should be selected
when broiling thicker meats to the well-done
stage (to prevent excessive browning) and
when cooking foods for very short periods of
time. Broiling times may increase if Lo is
selected.
2. Place the broiler pan on the recommended
rack position show in the broiling chart and
follow the suggested times.
3. Check the doneness by cutting a slit in the
meat near the center to check the color.
4. To cancel or end the broiling operation, press
the CANCEL pad.
8112P335-60 8/7/06 8:23 AM Page 15
Reviewed by Stewart, Steven | Released