Milwaukee 1676-6 User Manual
Page 6
10
11
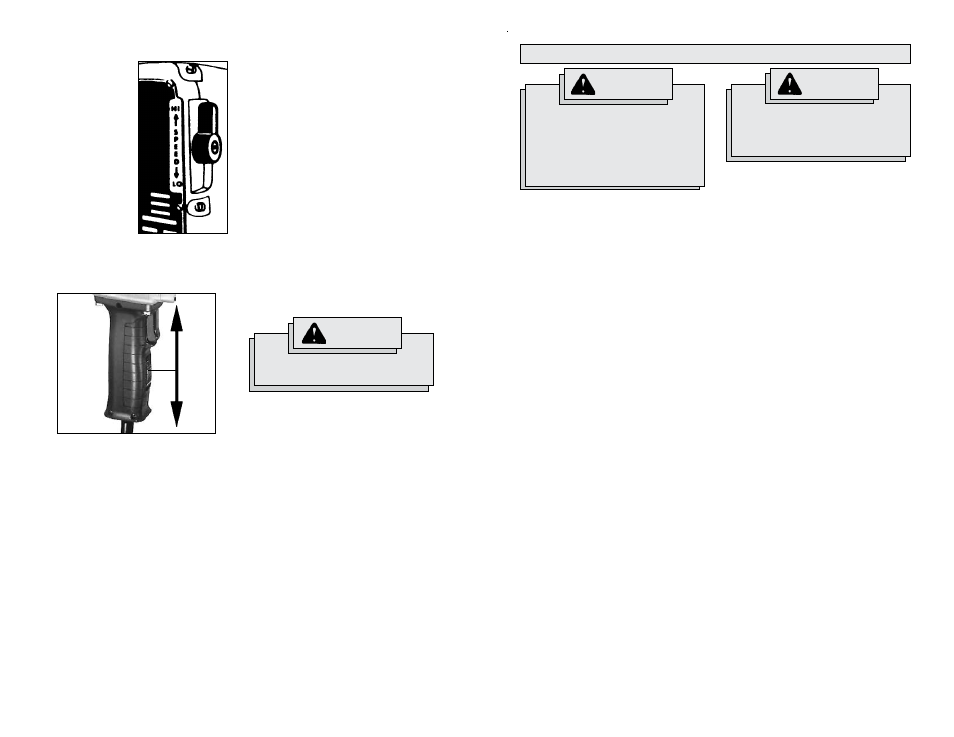
Shifting Speeds (Fig. 8)
Cat. No. 1675-1 has
a gear shift lever on
the right side of the
gear case.
The high setting
(1200 RPM HI) is
the low torque setting
and is designed for
driving Selfeed bits
1-3/8" in diameter
and smaller.
The low setting (300
RPM LO) is the high
torque setting and is
designed for driving
Selfeed bits 1-1/2" in
diameter and larger.
Reversing (Fig. 9)
A reversing switch is located below the trig-
ger switch for removal of bits from holes.
Permit the motor to come to a complete stop
before reversing. Reversing the tool with the
gears in motion may cause severe damage.
When removing selfeed bits from partially
drilled holes, a flick of the trigger switch
will free the threaded pilot screw. When the
threads are loose, lift the bit from the work-
piece with the motor stopped.
Fig. 9
Fig. 8
Chuck Removal
To remove the chuck from the drill:
1. Unplug tool.
2. Fully open the chuck jaws
3. Remove the left-handed thread screw
from inside the chuck by turning it clock-
wise.
4. Pull the chuck off of the spindle.
NOTE: If the chuck does not pull off of
the spindle easily, tap the side of the
chuck with a hammer to loosen it. If this
doesn't work, contact a MILWAUKEE
service center.
warning
To reduce the risk of injury, always
wear eye protection.
Drilling
Before drilling, clamp down the material
securely. A poorly secured piece of material
may result in personal injury or inaccurate
drilling. When drilling in light gauge metal or
wood, use a wooden block to back up the ma-
terial to prevent damage to the workpiece.
Mark the center of the hole to be drilled with
a center punch to give the bit a start and to
prevent it from "walking." Lubricate the drill
bit with cutting oil when drilling iron or steel.
Use a coolant when drilling nonferrous met-
als such as copper, brass or aluminum.
To start a selfeed bit, run the threaded feed
screw into the work by flicking the trigger
switch, permitting the bit to coast until the
teeth contact the work surface. Align the bit
properly before proceeding. This will reduce
cocking and jamming when starting. To re-
duce jamming on breakthrough, decrease
the drilling pressure when the feed screw
point breaks through the workpiece. Proceed
with steady, even pressure.
Maintaining Tools
Keep your tool in good repair by adopting a
regular maintenance program. Before use,
examine the general condition of your tool.
Inspect guards, switches, tool cord set and
extension cord for damage. Check for loose
screws, misalignment, binding of moving
parts, improper mounting, broken parts and
any other condition that may affect its safe
operation. If abnormal noise or vibration oc-
curs, turn the tool off immediately and have
the problem corrected before further use.
Do not use a damaged tool. Tag damaged
tools “DO NOT USE” until repaired (see
“Repairs”).
Under normal conditions, relubrication is not
necessary until the motor brushes need to
be replaced. After six months to one year,
depending on use, return your tool to the
nearest MILWAUKEE service facility for the
following:
•
Lubrication
•
Brush inspection and replacement
•
Mechanical inspection and cleaning
(gears, spindles, bearings, housing,
etc.)
•
Electrical inspection (switch, cord,
armature, etc.)
•
Testing to assure proper mechanical and
electrical operation
warning
To reduce the risk of injury, always un-
plug your tool before performing any
maintenance. Never disassemble the
tool or try to do any rewiring on the
tool's electrical system. Contact a
milwaukee service facility for ALL
repairs.
warning
To reduce the risk of injury, electric
shock and damage to the tool, never
immerse your tool in liquid or allow a
liquid to flow inside the tool.
mainTenance
Cleaning
Clean dust and debris from vents. Keep
the tool handles clean, dry and free of oil
or grease. Use only mild soap and a damp
cloth to clean your tool since certain cleaning
agents and solvents are harmful to plastics
and other insulated parts. Some of these
include: gasoline, turpentine, lacquer thinner,
paint thinner, chlorinated cleaning solvents,
ammonia and household detergents con-
taining ammonia. Never use flammable or
combustible solvents around tools.
Repairs
If your tool is damaged, return the entire tool
to the nearest service center.