Components of your iron, Before use, Filling – Morphy Richards Semi-electronic iron User Manual
Page 4: Temperature control, Features of your iron
4
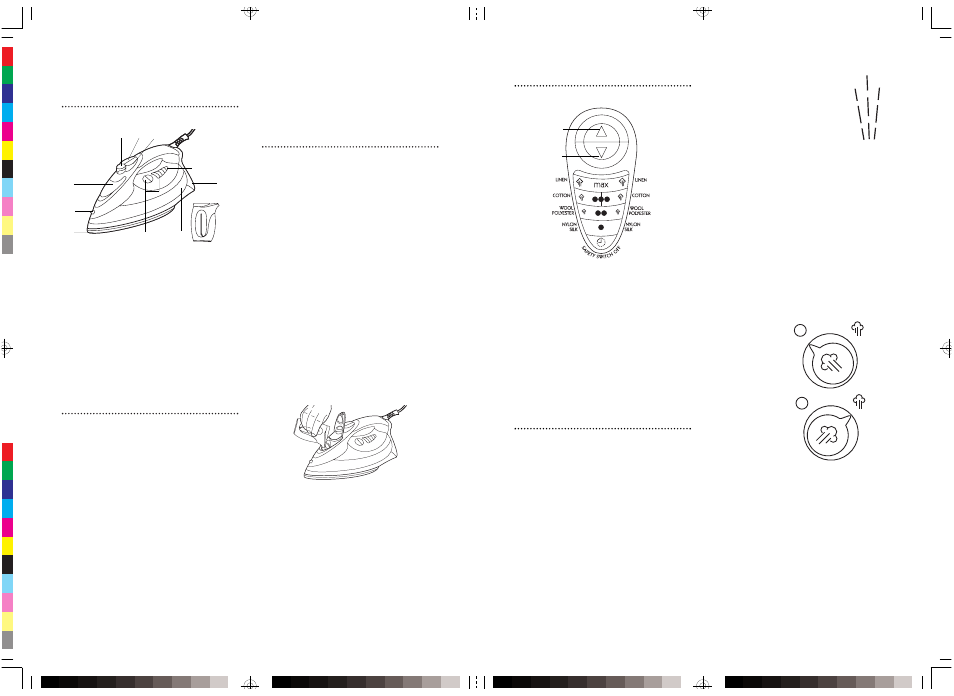
Components of your
iron
⁄ Variable steam button
¤ Shot of steam button
‹ Spray button
› Filling hole with cap
fi Spray nozzle
fl Soleplate
‡ Temperature console
· Water tank
‚ Life long anti-scale (certain models only)
„ Filling beaker
‰ Auto shut-off indicator
Before use
Note: The steam facility should only be
used on garments which are suitable for
ironing at the 2, 3 dot settings.
When ironing with the steam facility at
the 2 dot setting, the steam output should
be set at the lower end of the steam range
(see variable steam section).
Textiles and clothes are supposed to
carry ironing instructions. If they don’t you
should follow the fabric guide on page 3,
but be sure to test the temperature by
ironing the hem of the garment or similar
area first.
If you adjust the temperature from a hot
setting to a cooler setting, wait until the iron
temperature has stabilised before you
continue ironing.
It is always a good idea to begin with
cool fabrics and work up to higher settings.
An iron heats up quicker than it cools
down so you’ll save time and electricity.
Filling
1 Make sure that the iron is not plugged in
and then set the variable steam control
⁄ to the ‘0’ position before filling the
iron with water.
2 Lift up the fill cap and fill the water
through the filling hole
› into the water
tank
·, using the beaker provided. A
1 beaker fills the tank (400ml). After
filling replace the fill cap. In hard water
areas the use of distilled or
demineralised water is recommended.
WARNING: Never use battery
topping up fluid or water containing
any substances like starch, or sugar,
or defrosted water from a
refridgerator.
3 Always pour out the remaining water
after use.
WARNING: When filling your iron
with tap water always use the beaker
provided. Never fill directly under the
tap.
⁄
¤ ‹
›
fi
fl
‡
·
‚
„
A
‰
Temperature control
• Default setting + 3 dot (cotton)
• To increase temperature press the top
button.
• To decrease temperature press the
bottom button.
• The light panel will flash to indicate that
the iron has not yet reached the correct
temperature.
• Once the correct temperature has been
reached , the light will stop flashing and
there will be one ‘beep’ to signal that the
iron is now ready for use.
Features of your iron
Dry ironing
You can use your iron as a dry iron only.
Make sure the variable steam control
⁄ is
set to the ‘0’ symbol.
Any temperature setting may be used
depending on the garment. The spray
feature may be used provided there is water
in the tank (see filling section). You do not
need to put any water in the tank when dry
ironing only.
Spray
Press the spray button
‹
and aim the spray of water at
stubborn creases. You can do
this whilst dry ironing providing
there is water in the tank. When
using the water spray it may be
necessary to push the button a
few times to get the spray pump primed.
Variable steam
Fill the iron with water as described in
‘Filling’, page 4 and insert the plug into the
electrical socket.
The steam output can be varied from
low to high by turning the variable steam
control
C. When using the iron at the
bottom of the steam range, the steam
output should be adjusted to the low
setting.
The steam facility should only be used
on garments which are suitable for ironing
at 2, 3 dot and MAX setting.
5
B
Steam off
C
‘MAX’ steam
Increase
temperature
Decrease
temperature
Job: 40715 Rev 1 -- Color: Composite -- Signature 2, Sheet 1, Back -- Plate 4