Function overview, Setup, Vcr mode – Philips Magnavox GDV228MG9 User Manual
Page 9: Dvd mode, Rear panel front panel, L1 l2, You must first select either dvd or vcr operation
SETUP
EN
– 9 –
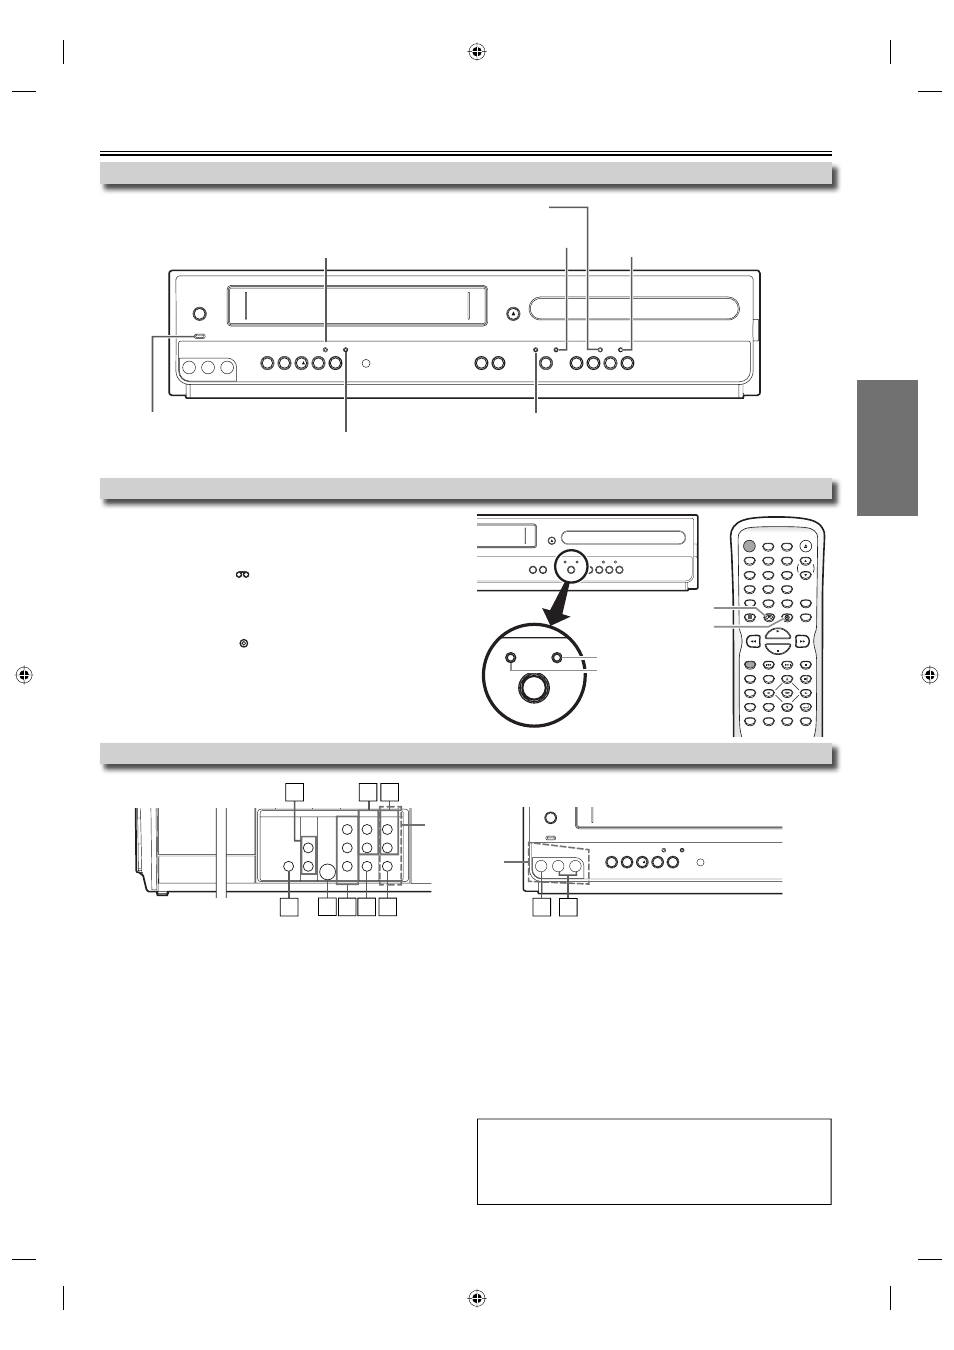
Function Overview
You must first select either DVD or VCR operation.
VCR MODE
Press [VCR
] on the remote control.
(The VCR SOURCE light will illuminate.)
DVD MODE
Press [DVD ] on the remote control.
(The DVD SOURCE light will illuminate.)
Selecting DVD or VCR Operation
Front Panel Indicator Lights
Front & Rear Terminals
1: DVD AUDIO OUT* (analog) jacks
Connect an audio cable from here to the audio input jack of your
television or audio device.
2: DVD/VCR AUDIO OUT jacks
Connect an audio cable from here to the audio input jack of your television
or audio device. Standard connection for DVD/VCR use.
3: VCR AUDIO IN jacks
Connect a stereo audio cable from the audio output jacks of your
camcorder, VCR, etc. to here. After making the connection, press [INPUT]
on the remote control. Select “L1” to activate the rear AUDIO IN jacks, or
“L2” to activate the front.
4: VCR VIDEO IN jack
Connect a video cable from the video output jack of your camcorder, VCR,
etc. to here. After making the connection, press [INPUT] on the remote
control. Select “L1” to activate the rear VIDEO IN jack, or “L2” to activate the
front.
5: DVD/VCR VIDEO OUT jack
Connect a video cable from here to the VIDEO input jack of your televi-
sion or audio device. Standard connection for DVD/VCR use.
6: COMPONENT VIDEO OUT* jacks
Connect a component video cable from here to the component video
input jacks of your television.
7: S-VIDEO OUT* jack
Connect an S-video cable from here to the S-video input jack of your
television.
8: DIGITAL AUDIO OUT COAXIAL* jack
Connect a digital audio coaxial cable from here to the digital audio input
jack of your digital audio receiver.
* For enhanced DVD viewing. DVD/VCR video and audio connections
required to view cassette tapes.
Note:
• Audio and video cables are included for both VCR and DVD viewing.
You can enhance your DVD picture and sound quality with an S-video
cable, a component video cable, or a digital audio coaxial cable. Please
purchase the necessary cables at your local store. (Refer to pages
6-7.)
STANDBY-ON
POWER ON
VIDEO
- AUDIO -
L
R
REW
F.FWD STOP/EJECT PLAY RECORD
REC
TIMER REC
IR
TRACKING
SOURCE
VCR
DVD
P-SCAN
PLAY
PREV
STOP
PLAY
NEXT
OPEN/CLOSE
G
B
C
H
B
B
B
C
h
D
I
y
TRACKING
SOURCE
VCR
DVD
P-SCAN
PLAY
PREV
STOP
PLAY
NEXT
OPEN/CLOSE
G
B
C
H
B
B
y
SOURCE
VCR
DVD
STANDBY-ON
OPEN/CLOSE
DISPLAY
VCR
DVD
MODE
TRACKING
PLAY
STOP
RECORD
NEXT
PREV
PAUSE
DISC MENU
TITLE
SEARCH
AUDIO
SETUP
ZOOM
ANGLE
SUBTITLE
OK
REPEAT
A-B
SPEED
TIMER SET
1
2
3
4
5
6
7
8
9
0
+10
RETURN
CLEAR
INPUT
DVD button
VCR button
DVD SOURCE light
VCR SOURCE light
DIGITAL
AUDIO OUT
COAXIAL
AUDIO
OUT
DVD
VCR
DVD/VCR
S-VIDEO
OUT
COMPONENT
VIDEO OUT
AUDIO IN
VIDEO IN
AUDIO OUT
VIDEO OUT
L
L
Y
R
L
R
R
C
B
/
P
B
C
R
/
P
R
STANDBY-ON
POWER ON
VIDEO
- AUDIO -
L
R
REW
F.FWD STOP/EJECT PLAY RECORD
REC
TIMER REC
IR
B
C
h
D
I
y
rear panel
front panel
3
2
7 6 5
3
4
4
1
8
Lights up when the inserted disc
is being played back.
Blinks when an unplayable disc
is inserted.
Lights up when the timer recording or
one-touch timer recording (OTR) has been set.
Lights up during a recording or one-touch timer
recording (OTR). Blinks when a recording is paused.
Lights up when the unit is turned on.
Lights up when this unit
is in the DVD mode.
Lights up when this unit is in the VCR mode.
Lights up when the progressive scan system is activated.
L1
L2
E8E63UD_GDV228MG9_EN_v1.indd 9
E8E63UD_GDV228MG9_EN_v1.indd 9
2008/08/19 10:04:48
2008/08/19 10:04:48