Installation, 3how to reverse the doors, Cont. how to install and remove handles – Maytag MCS 16021937 User Manual
Page 4: Caution, Fresh food handles
3
How to reverse the
doors
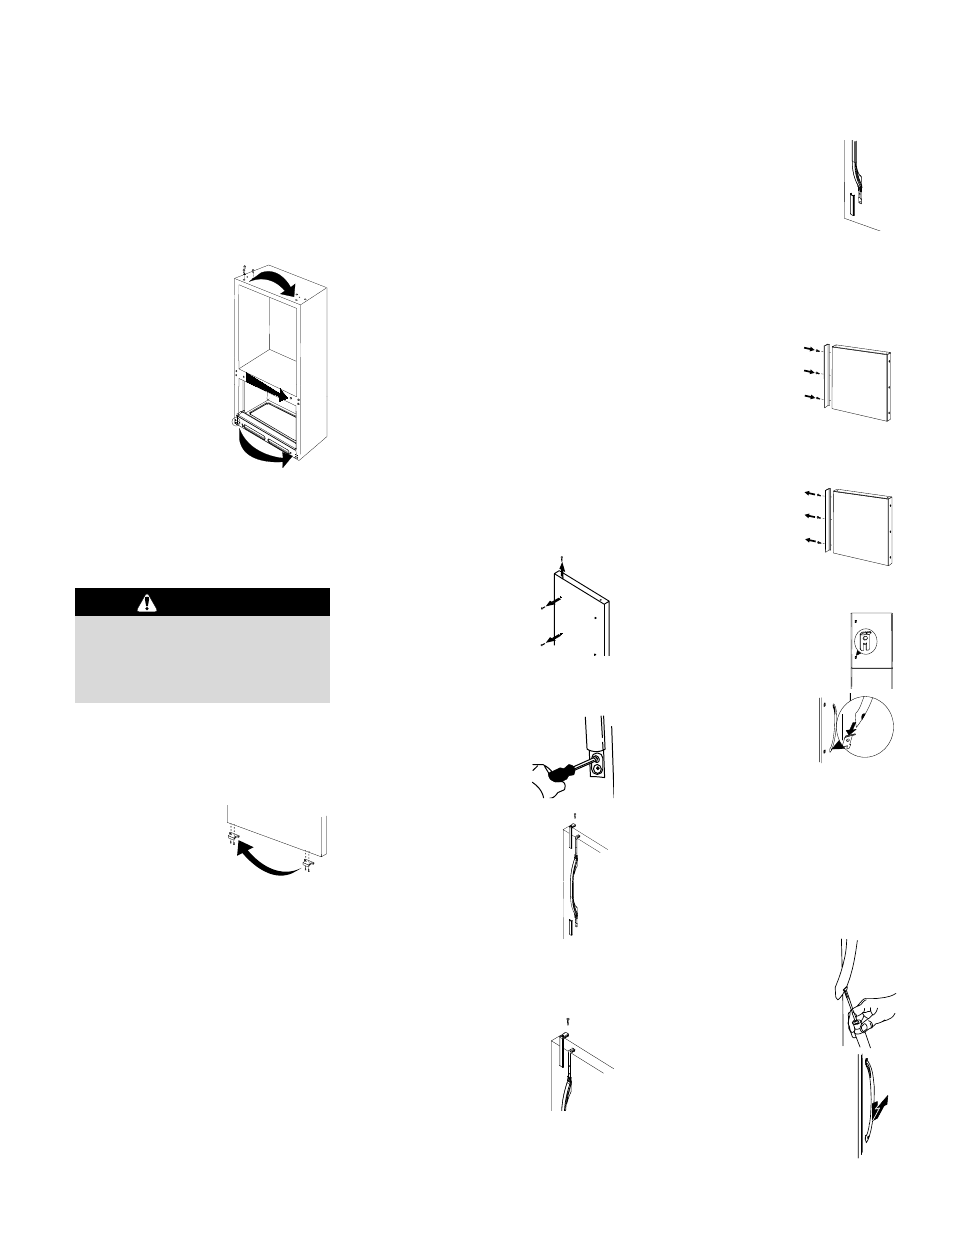
1. Perform all steps listed in How to
Remove the Doors and Hinges
(page 2).
2. Transfer cabinet
plugs and cabinet
screws to opposite
side of cabinet.
• Remove cabinet
plugs with flat
blade of screw-
driver tip wrapped
in masking tape.
• Remove center mullion screws with
5
⁄
16
" hex head screwdriver.
• For swing doors only: Remove
bottom mullion screws with
3
⁄
8
" hex
head driver.
3. Transfer door stops from bottom edge
of fresh food door and freezer door
(select models) to opposite side of
door edge.
• Use a Phillips
screwdriver for
removal and
installation.
4. See How to Install and Remove
Handles (page 3) to remove and
reinstall handles.
5. Proceed to How to Replace the
Doors and Hinges to mount doors
(page 4).
To avoid possible injury and damage
to property, place doors on a nonabra-
sive surface protected by towels or
rugs while working directly on doors.
CAUTION
* Fasteners may require either a T-15 Torx
®
driver or a Phillips screwdriver.
Torx
®
is a registered trademark of Textron Inc.
Installation,
cont.
How to install and
remove handles
For easier installation, some refrigerators
may have been delivered with the han-
dles off. Please see the interior of the
fresh food section, or the back of your
refrigerator, to locate the handle assem-
bly. In case future transport of the refrig-
erator is necessary, or panels need to be
removed and replaced, the removal
instructions have been included here for
your convenience.
Handle design may vary from refrigerator
to refrigerator. Please reference the
instructions for the appropriate handle
design below.
FRESH FOOD HANDLES
Installing Front-Mounted Handles
1. Remove
1
⁄
4
" hex head
screws from door face
with hex head driver,
and Phillips screw from
top of door.
• If reversing door, remove door plugs
from opposite side of door and insert
in screw holes.
2. Align handle holes with screw
holes on door face and secure
with 2 door face
screws from step 1.
3. Locate handle trim in
literature pack and install
over top and bottom of
handle, as illustrated.
• Secure top handle trim
with remaining screw
removed in step 1.
• Snap bottom trim over
bottom portion of handle.
Removing Front-Mounted Handles
1. Remove top handle trim by
removing top handle
screw.
• Retain trim and screw for
later replacement.
2. Pry bottom handle trim
from handle with screw-
driver flat blade wrapped
in masking tape.
• Retain trim for later
replacement.
3. Remove two
1
⁄
4
" hex head screws.
• Retain screws for later replacement.
Installing Side-Mounted Handles
➢
Install handle by
fastening with
screws* removed
from edge of door.
NOTE: If reversing
door, remove door plugs from opposite
side of door and insert in screw holes.
Removing Side-Mounted Handles
➢
Remove handle by
removing three
screws* from side of
door.
• Retain screws for
later replacement.
Installing Stainless Steel
Front-Mounted Handles
1. Loosen one door clip on
door with
1
⁄
4
" hex head driver.
2. Locate predrilled hole
at base of handle, and
fit hollow end of handle
over door clip.
3. Fit other end of handle over other door
clip and slide up as far as possible.
NOTE: If top of handle does not fit
over top clip, loosen lower clip further
until fit can be accomplished.
4. Insert
1
⁄
4
" hex head driver into predrilled
hole at base of handle to tighten screw.
Insert screw plug(s) into hole(s).
Removing Stainless Steel
Front-Mounted Handles
1. Remove screw plug at
base of handle with a
very small flat-blade
screwdriver.
• Insert
1
⁄
4
" hex head driver
into predrilled hole to
remove screw.
2. Slide handle to remove from
door clip.