Mustek DV 5500 User Manual
Page 2
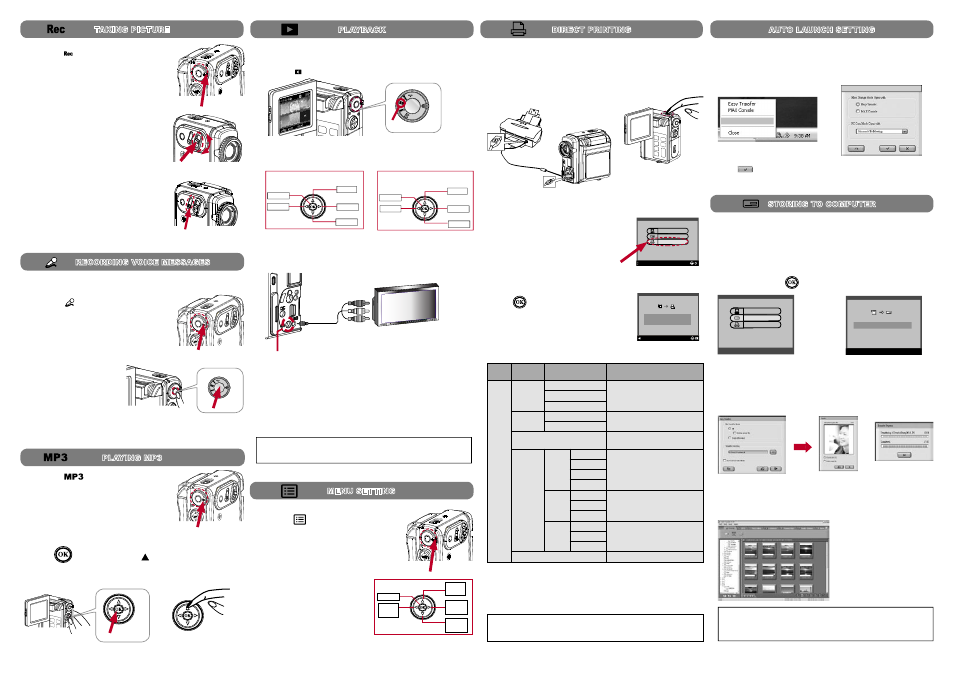
1. Switch to
(Menu) on the
Mode dial.
Use the
Direction Control
buttons to navigate through the
functions and settings.
2.
DON'T CONNECT TO PC !
DIRECT TO PRINTER !
Ok
Return
Press
on the
Direction Control to
confirm the device is connected to a printer.
4.
Select
Print from the menu to print the selected picture.
6.
5.Select your preferred settings from the
menu.
Note: When the device is connected to a computer under Direct Print
mode, Windows OS will ask for a device driver. We
do not provide
such driver.
Main
menu
Item
Setting
Description
Direct
Select
PIC
Select
Mark still images for direct
printing.
All
Cancel
Optimal
On
Optimize image processing.
Off
Copies
Select number of copies to be
printed for each marked image.
Paper Set
Size
4” X 6”
Select paper size.
5” X 7”
8.5” x 11”
Default
Paper
Photo
Select paper quality.
• Availability varies according to
your paper size selection.
Fast Photo
Default
Border
Off
Apply borders to printing images.
On
Default
Print marked images.
MENU SETTING
10
Scroll
Up
Select
Up
Level
Down
Level
Scroll
Down
Switch to (video/picture) on the
Mode
dial.
1.
TAKING PICTURE
6
Press
Shutter halfway to focus picture and
completely down to take a picture.
Glide to
T (zoom-in) / W (zoom-out) to
frame your picture.
Switch to
(Voice) on the
Mode dial.
Press
Record to start re-
cording and press again to
stop.
Switch to
on the
Mode dial.
PLAYING MP3
8
2.
3.
RECORDING VOICE MESSAGES
7
1.
2.
PLAYBACK
9
1. Switch to (Playback) on the
Mode dial.
2. Recorded files list on the LCD screen.
3. Use the
Direction Control buttons to navigate through the media.
For Picture
Zoom
Restore
Prev.
Next
Display
Stop
Play
Prev.
Next
For Audio and Video
Display
Connect the device to a
printer via an USB cable.
1.
Power
ON the device.
Select
Direct Print from the OSD
Menu of the device.
Direct Print
PC Cam
Mass Storage
Select
OK
3.
2.
Direct Print provides a direct connection for the device to communicate
with printers. If you connect the device to a
PictBridge™ compatible
printer, then the pictures stored in the device can be printed directly
without attaching to any computer or third party device. It’s just that
easy!
DIRECT PRINTING
11
Playback on LCD
Press
to start playing. Press to stop playing.
Connect
yellow end of the cable to the Video input (yellow) jack on
your TV set.
Connect the
red and white ends of the cable to the Audio input
(red, white) jacks on your TV set.
Note: This device can also connect to other devices that are equipped
with
Audio and Video input jacks. (ex. VCR, DVD Recorder and etc..)
2.
3.
AV Jack
AV Cable
Connect the device to a TV set with the
AV cable.
1.
Playback on TV
Select
Auto Launch Setting from
the menu and choose either
Easy
Transfer or MAX Console as your
default file transfer application.
2.
Press
to confirm and exit.
3.
After install the driver, a DV
device icon will appear on
your Windows OS taskbar.
Right click on the icon to
open the selection menu.
1.
Note: We strongly recommend
users to use
Easy Transfer as
your default transfer application.
AUTO LAUNCH SETTING
12
Auto Launch Setting
Auto Launch Setting
STORING TO COMPUTER
13
Connect the device to your computer with the USB cable. (Please refer
to Section 3 to connect your USB cable.)
1.
2. Power
ON the device.
3.
4.
5.
Select
Mass Storage from
the OSD menu press
to
enter.
������ �����
�� ���
���� �������
������
�
������ �����
�� ���
���� �������
Mode
Mass Storage
Easy Transfer or MAX Console will launch automatically according to
Auto Launch Setting.
The following screen will appear
for 2 seconds before entering
Mass Storage mode.
or
Single Transfer
Transfer All
For
MAX Console, select the device’s drive and go to the DCIM/
100MEDIA folder for audio clips, pictures, videos and go to the MP3
folder for MP3 files.
(Use the
Drag and Drop
method to copy files to your
computer and vice versa.)
7.
Important: In order for MP3 files to be playable on your device be sure
to store those files in the MP3 folder. If the MP3 folder does not exist,
you may create the folder manually and name it as MP3.
For
Easy Transfer single file transfer dialogue or transfer all progress
bar will appear depending on your
Easy Transfer setting.
6.
1.
2.