Mustek DV 5500 User Manual
Dv5500, Us b, Getting started
Website:
http://www.mustek.com
Customer Service:
(General Info)
Email: [email protected]
Fax: (949) 788-3670
Technical Support:
Email: [email protected]
Phone: (949) 788-3600
Address:
15271 Barranca Parkway,
Irvine, CA 92618
(Dock station not included)
• Installation CD
• Video Studio CD
• Photo Express CD
• User Guide
• Getting Started
• Strap for Lens Cover
• Strap for Hand
• DV Bag
• Tripod
• Lens Cover
• Li-ion Battery
• Power Adapter
• 32MB MMC Card
• USB Cable
• AV Cable
• Earphone
DV5500
GETTING STARTED
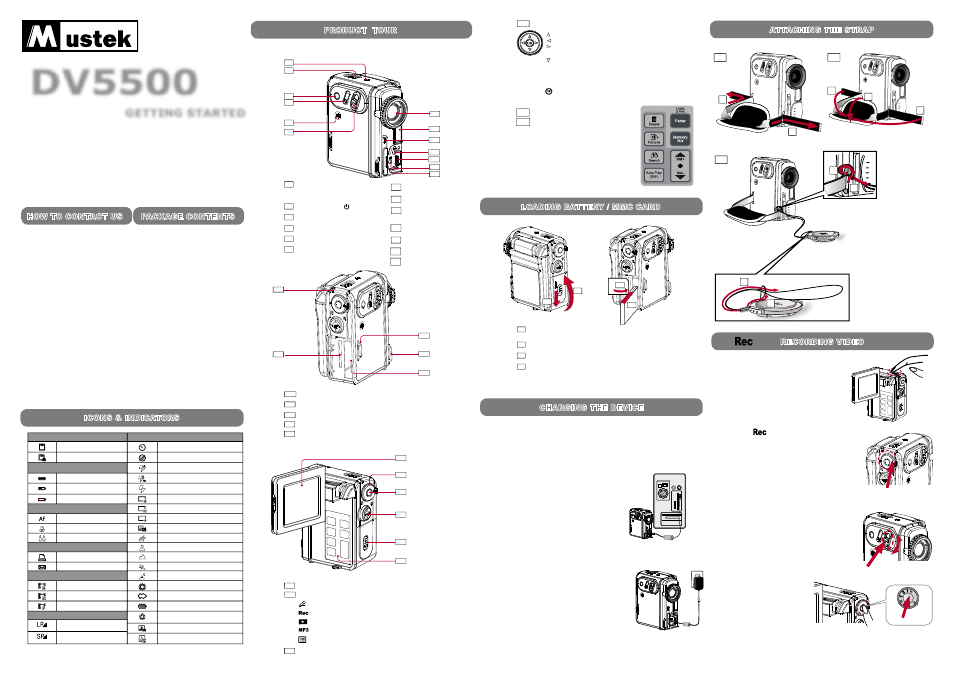
SD/MMC card slot
Battery slot
Hook for strap
Back View
22
23
24
LCD screen
Mode dial
Record button
Direction Control button
Battery/SD/MMC slot cover
Operation panel
Take Picture/Record Video
Record Voice
Playback
MP3
Menu
Side View
15
18
16
17
19
20
21
22
23
24
A
B
C
Slide the Battery/SD/MMC cover in the direction of the arrow
(down).
Lift the Battery/SD/MMC slots cover up.
Insert the Battery into the battery slot.
D Insert the MMC memory card into the SD/MMC card slot.
D
C
A
B
LOADING BATTERY / MMC CARD
2
CHARGING THE DEVICE
3
There are three ways to charge this device. First, charge it via USB
cable. Second, charge it via AC adapter. Third, charge it via the Dock
Station (optional).
1. Connect the device to a computer with the USB cable provided in
the package.
The
Charge Indicator illuminates in red
and starts charging. If the battery is fully
charged, the
Charge Indicator will be
turned off automatically. (It takes about 3
hours to have it fully charged.)
2.
Charging the device via AC Adapter
1. Connect the AC adapter to the DC IN jack on the device and the
power plug to a power outlet.
The
Charge Indicator illuminates in red and
starts charging. Turning on the device during
the charging stage will lengthen the charge
time.
2.
Charging the device via USB cable
Charging the device via Dock Station (Optional)
Please refer to the Dock Station Getting Started for more detail.
US
B
ATTACHING THE STRAP
4
A
B
1
A
B
C
2
��
��
A
B
C
D
3
RECORDING VIDEO
5
Power
ON the device.
(Power indicator will light up in
Green color.)
Switch to
(video/picture) on the
Mode dial.
Glide to
T (zoom-in) / W (zoom-out) to frame your video.
Press
Record to start recording.
Press
Record again to stop recording.
2.
5.
3.
1.
4.
82-149-00050
Back Light [On/Off]/Playback Zoom/ Stop
Self-Timer [On/Off]/F.Bwd/Previous
Flash [Off/On/Auto/Red Eye]/F.Fwd/Next
Display
Record: OSD off / LCD off / LCD on & OSD on
Playback: Single / OSD off / LCD off / LCD on &
Thumbnail
OK / Play / Pause / Exit (Playback Zoom)
We have included this convenient Getting Started to help with the basic
operations. For more details on the different functions and operations,
please refer to the User Guide.
Thank you for purchasing the Mustek DV5500 Multi-functional Digital
Video.
Card Status
Picture Taking
With Card
Self-Timer
Card Lock
Flash Strobe OFF
Battery Status
Auto Flash Strobe
Battery Full
Red Eye Reduction
Battery Low
Flash Strobe ON
Out of Battery
Economic Resolution
Auto Focus
Normal Resolution
Auto Focus
Fine Resolution
Macro
Attach Voice
Normal
Backlight Compensation
Mark for DPOF
Portrait
Print mark
Landscape
E-mail mark
Sports
Movie Recording
Night Portrait
Economic Resolution
Daylight
Normal Resolution
Cloudy
Fine Resolution
Fluorescent
Audio Set
Tungsten
Long Play Record
Quick Review
Standard Play Record
Date Display
ICONS & INDICATORS
PACKAGE CONTENTS
HOW TO CONTACT US
1
6
5
4
3
2
10
7
11
12
13
8
AE-Lock button
AF/Shutter
Zoom
Speaker
Power button
Built-in Microphone
Lens
Earphone jack
USB port
AV OUT jack
1
6
5
4
3
2
10
9
7
11
12
Do not touch while recording.
Flash strobe
8
PRODUCT TOUR
1
Front View
Note1: When the MMC memory card is correctly inserted a “click” sound will be heard.
14
15
16
17
20
19
21
9
14
DC IN jack
13
Hook for strap
18
Power/Charge LED indicator
Status LED
indicator
Note2: The device can only work with a MMC card inserted.