Photography b c d – Meade Instruments LXD 75 User Manual
Page 36
3 6
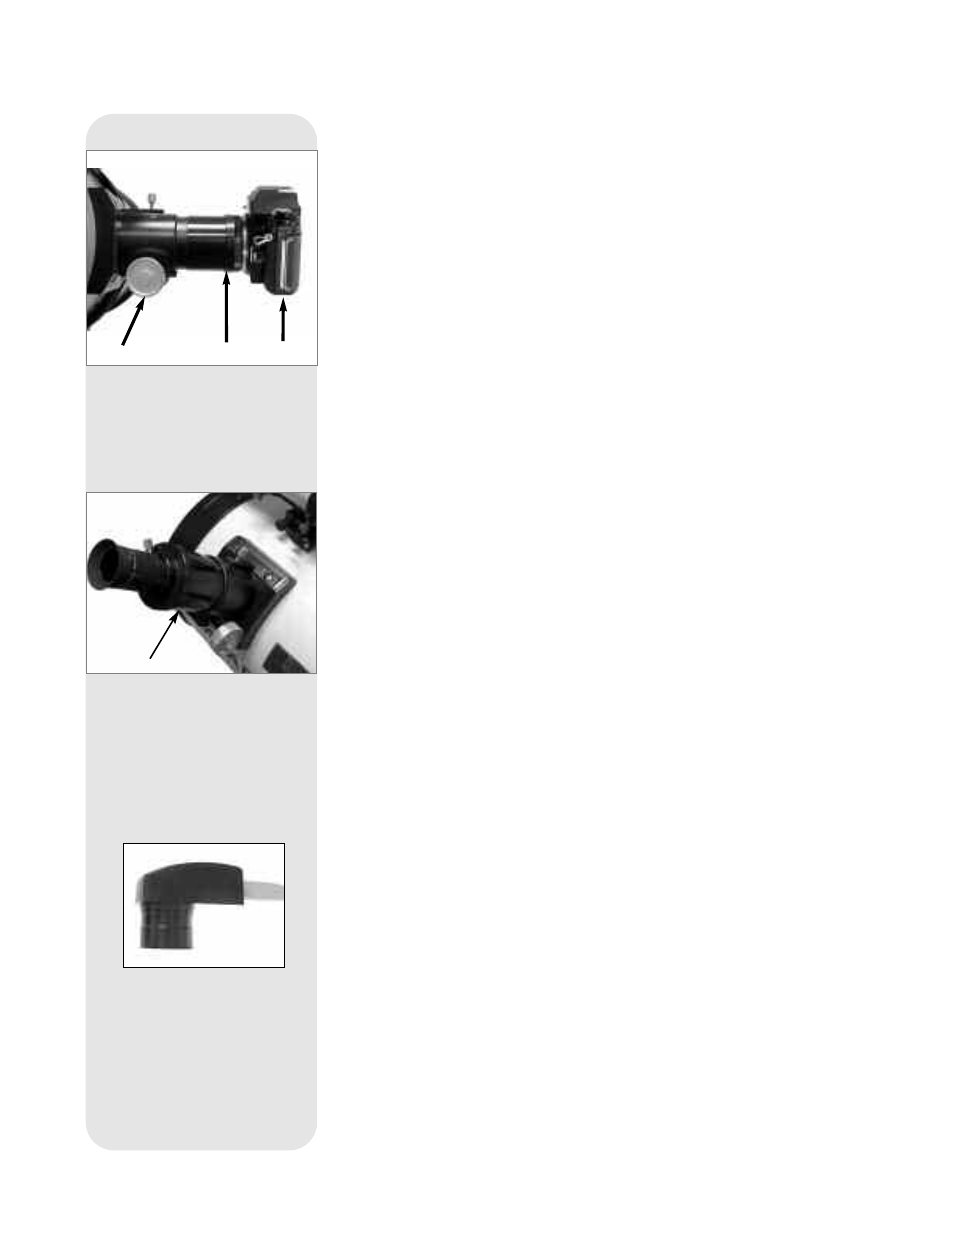
Photography through an
LXD75 Schmidt-Newtonian
and Newtonian Reflector telescope
requires an LXD75-Series T-Adapter (supplied) attached to the telescope (
Fig. 22a).
Through-the-telescope photography is possible with any 35mm camera body with a
removable lens. In this way, the telescope effectively becomes the lens of the camera.
Unthread the focuser extension tube (
Fig. 22b) from the focuser drawtube to remove
from the focuser assembly. The T-Adapter (
2, Fig. 22a) threads onto the focuser, fol-
lowed by the camera body (
1, Fig. 22a).
To orient an object in the viewfinder of the 35mm camera body, use a small jeweler’s
screwdriver to slightly loosen three adjustment screws around the outer knurled ring
of the T-Adapter. Rotate the camera body to achieve proper orientation of the object;
then re-tighten the adjustment screws.
Photography through a long lens such as the
LXD75-Series
requires special technique
for good results, and the photographer should probably expect to waste a roll or two
of film in acquiring this technique. Long-lens photography has its own rewards, how-
ever, rewards that short-focus lenses cannot duplicate.
A few tips on photography with the
LXD75-Series
telescopes:
1.
Use a cable-operated shutter release. Touching the camera body to initiate shut-
ter operation almost certainly introduces undesirable vibrations.
2.
Focus the image with extreme care. While observing the subject through the cam-
era’s reflex viewfinder, turn the telescope’s focus knob (
3, Fig. 22a) to achieve the
sharpest possible focus. Note that some 35mm cameras may have an optional
focusing screen (available from the manufacturer) for use with a long telephoto
lens. This screen provides a brighter and clearer image to focus, and is highly rec-
ommended.
3.
Correct shutter speeds vary widely, depending on lighting conditions and film
used. Trial-and-error is the best way to determine proper shutter speed in any
given application.
Note: The camera used with your telescope may have an exposure meter
that is still active when the standard lens is removed and the body is con-
nected to the telescope with the T–Adapter. If used for terrestrial photog-
raphy, the camera meter should be acceptable. If used for astrophotogra-
phy, the meter probably will not provide good results since camera meters
are not made to compensate for a dark sky.
4.
Terrestrial photography through the
LXD75-Series
is sensitive to heat waves rising
from the Earth’s surface. Long distance photography is best accomplished in the
early morning hours before the earth has had time to build up heat.
5.
Photography of the Moon and planets through the
LXD75-Series
can be especial-
ly gratifying, but points 1 through 4 should be particularly noted in this case.
Photography with Meade’s Autostar Suite™
The Autostar Suite with Meade LPI™ (Lunar Planetary Imager) and Planetarium soft-
ware turns your Meade LXD75 telescope, Autostar and PC into even more powerful
astronomical instrument. LPI (Lunar Planetary Imager,
Fig. 23) combines the power of
an electronic astronomical imager with the simplicity of a web cam.
• Achieve great results the first time out on the Moon, planets, brighter deep-sky
objects and terrestrial targets.
• Easy to use with real-time display of object on your PC screen. Just center, focus
and shoot.
• Magic Eye software-assisted focusing.
The Autostar Suite Software includes powerful tools to help you get the most from your
Meade LXD telescope:
• Sophisticated planetarium program with over 19 million objects.
• Select objects from the 19 million objects in the planetarium display and the
telescope slews to those objects.
• Create your own Guided Tours.
Fig. 22a: LXD75-Series T-Adapter
attached to focuser assembly and
camera.
(1) Camera Body, (2) T-Adapter,
(3) Focus Knob.
PHOTOGRAPHY
B
C
d
Fig. 22b: Focuser Extension
Drawtube with eyepiece holder and
eyepiece attached.
Focuser
Extension
Tube
Fig. 23: The Lunar
Planetary Imager.