Minuteman UPS CPE 2000 User Manual
Page 12
20
• CAUTION – Replace batteries with the same number and type as
originally installed in the UPS. These batteries have pressure-operated
vents. These UPSs contain sealed non-spillable lead acid batteries.
Model Number
CPE 1000
CPE 2000
CPE 3000
Battery
QTY/Rating
3-12V7.2Ah 6-12V7.2Ah 8-12V7.2Ah
CSB
Part Number
GP1272 F2
GP1272 F2
GP1272 F2
Panasonic
Part Number
LC-R127R2CH1 LC-R127R2CH1 LC-R127R2CH1
Yuasa
Part Number
NP7-12 NP7-12 NP7-12
5.5. Battery Replacement Procedure
PLEASE READ THE CAUTIONS AND WARNINGS BEFORE
ATTEMPTING TO REPLACE THE BATTERIES
• CAUTION - DO NOT short-circuit any of the battery wires to the chassis
or to any component.
NOTE: Do not pinch the battery wires with the battery-retaining brackets.
NOTE: It is recommended that you draw a diagram of battery position and
the battery connections before disconnecting any of the battery wires.
1. Turn off the equipment that is plugged into the output receptacles of the
UPS.
2. Press the On/Off switch on the front panel to turn the UPS OFF.
3. Unplug the UPS's Input power cord from the wall outlet.
4. Unplug the equipment from the output receptacles of the UPS.
5. Unplug the computer interface cable from the rear panel of the UPS.
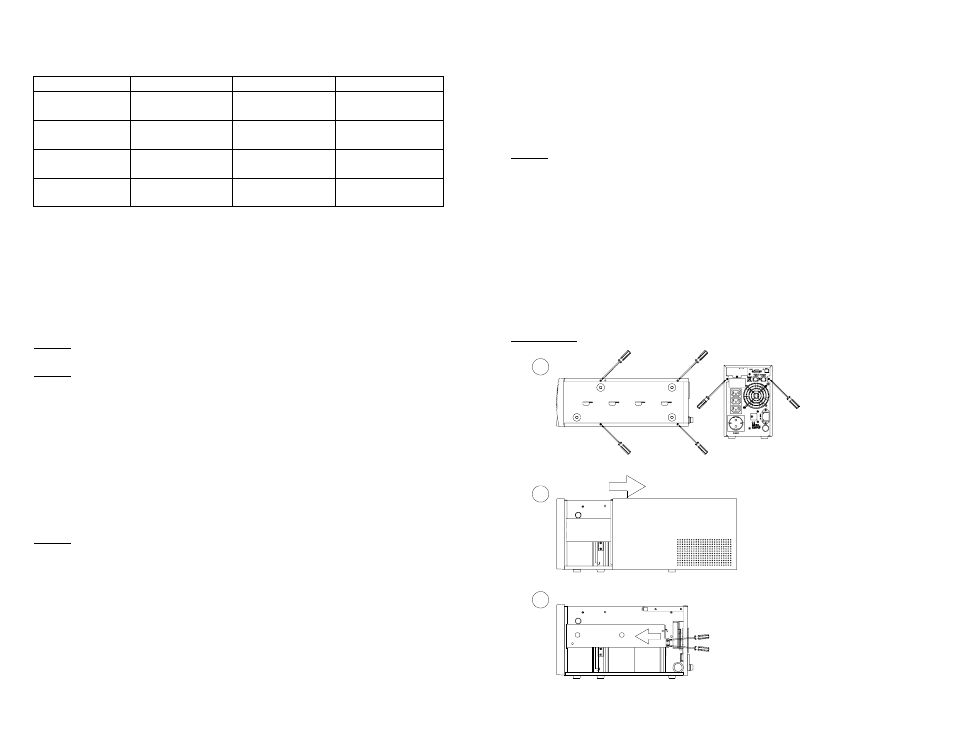
6. Remove the cover screws.
7. Remove the cover.
8. Disconnect the battery positive (red) wire.
NOTE: Use CAUTION, do not touch the battery positive (red) wire to the
battery negative (black) wire or the chassis.
9. Put a piece of electrical tape over the end of the battery positive (red)
wire.
10. Press the On/Off switch on the front panel this will discharge the board.
11. Disconnect the battery negative (black) wire.
12. Disconnect the battery jumper wires.
13. Remove the battery-retaining bracket retaining screws.
14. Remove the battery-retaining bracket (s).
15. Remove the old batteries.
16. Install the new batteries.
21
1
3
2
AC FUSE
17. Re-install the battery-retaining bracket (s).
18. Re-install the battery-retaining bracket retaining screws.
19. Reconnect the battery jumper wires.
20. Reconnect the battery negative (black) wire to the battery negative
terminal. Verify proper polarity.
21. Remove the piece of electrical tape from the end of the battery positive
(red) wire.
22. Reconnect the battery positive (red) wire. Verify proper polarity.
NOTE: Some sparking may occur, this is normal.
23. Re-install the cover.
24. Re-install the cover screws.
25. Reconnect the computer interface cable to the rear panel of the UPS.
26. Plug the equipment into the output receptacles of the UPS.
27. Plug the UPS's Input power cord into the wall outlet.
28. Press the On/Off switch on the front panel to turn the UPS ON.
29. Turn on the equipment.
30. The UPS is now ready for normal operation.
31. Dispose of the old batteries properly at an appropriate recycling facility
or return them to the supplier in the packing material for the new
batteries.
CPE 1000