American metal ware, Brewers – Grindmaster RAPS-430 User Manual
Page 3
AMERICAN METAL WARE
®
BREWERS
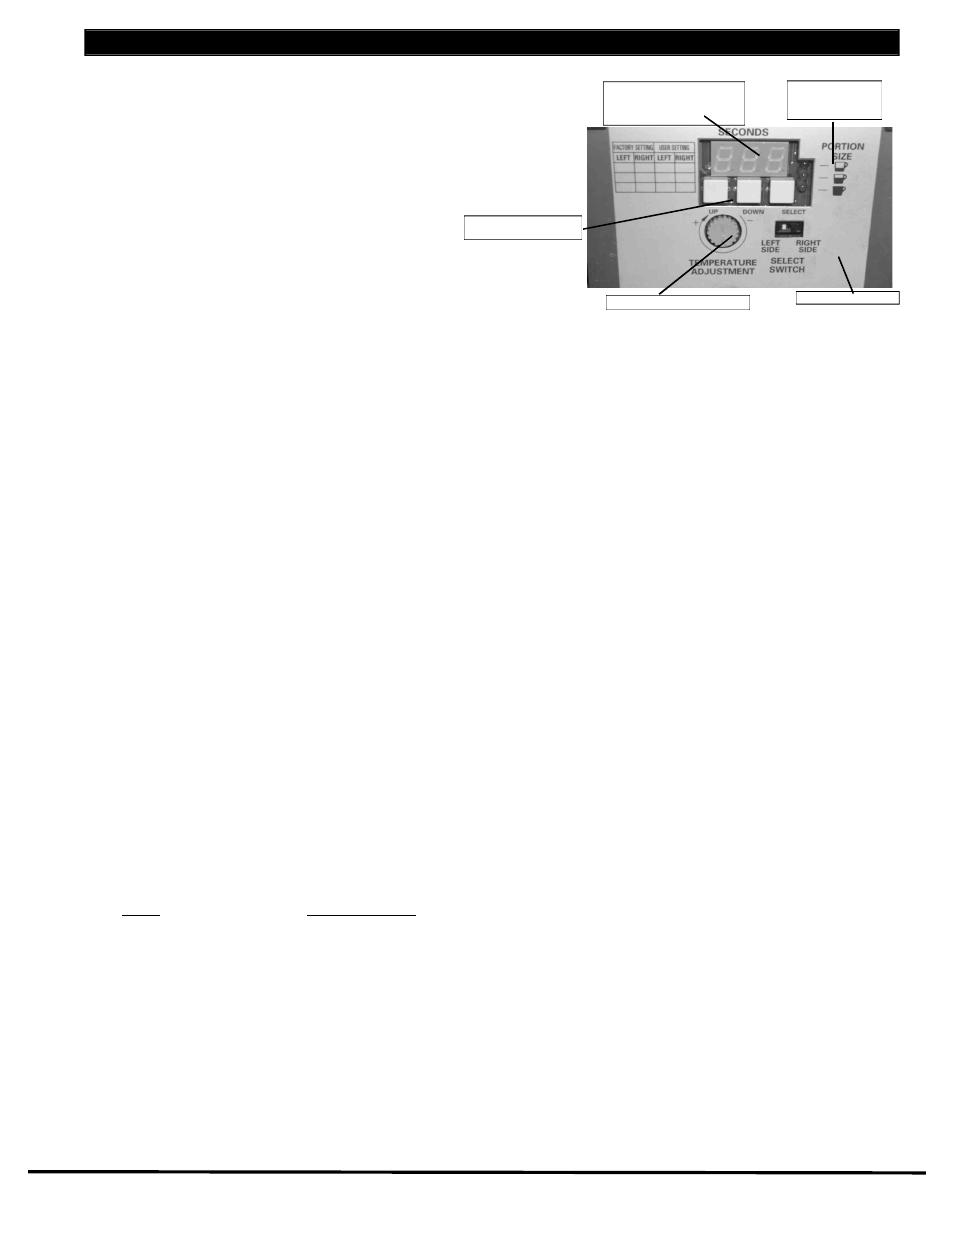
TEMPERATURE AND BREW TIMING CONTROLS (Refer to Figure C)
Temperature and brew timing are set by the dial and keypad located on the main controller.
This controller is positioned inside the brewer housing and is accessed by removing the
screws which fasten the access panel to the brewer.
The controller stores 6 independent brew timer values. On dual brewer models, 3 timers
are used for the left brewer, and 3 are used for the right brewer. On single brewer models,
the timers for the left side brewer are utilized for the unit and the right brewer timers are
not utilized.
BREWER SELECTOR SWITCH
The brewer selector switch is a 2-position slide switch located on the main controller. On
dual brewer models it is used to select the left or right side timers for programming. On
single brewer models, the switch should always be in the left position when programming
the brew timers. To switch from side to side, slide switch to the desired position.
PUSHBUTTON KEYPAD
The pushbuttons serve 4 functions:
1) Selecting the appropriate timer
2) Adjusting the stored timing value
3) Instructing the controller to store a displayed value
4) Resetting the controller after an error has been registered
The pushbutton to the right on the controller is used for 1, 3 and 4. The pushbutton to the left on the controller is used to increase the displayed
value. The middle pushbutton is used to decrease the displayed value.
To select the appropriate timer once the correct brew side has been selected, press the SELECT pushbutton until the correct brew size LED is lit.
To adjust the stored timing value, press the left pushbutton to increase the displayed value or press the middle pushbutton to decrease the displayed
value.
To store a displayed value, press the select button once.
To reset the controller after an error has been registered, press the right pushbutton and hold for 10 sec. After resetting, the alphanumerical LEDs
will return to displaying timer values.
TEMPERATURE ADJUSTMENT KNOB
Temperature adjustment is accomplished by rotating the small knob to the left of the brewer selector switch. Clockwise rotation will increase the
temperature setpoint while counterclockwise rotation will decrease the setpoint. The standard factory setting is 195
o
F.
OPERATION
WARNING: WATER USED FOR BREWING COFFEE IS VERY HOT. USE CAUTION WHEN BREWING, POURING OR TRANSPORTING
COFFEE. NEVER ATTEMPT TO MOVE THE BREWER WITHOUT FIRST DRAINING THE WATER TANK. ACCIDENTAL SPILLS MAY RESULT
IN SEVERE BURNS.
ICB brewers will perform the brew function only when a container is properly located under the brew basket; the pushbutton switch must be
engaged to allow brewing. Removal of the container during a brew cycle will suspend the brewing cycle, however brew timing will continue to
elapse and the brew basket will continue to drip.
• Place an empty shuttle, airpot or insulated container on the shelf, counter, or accessory base (depending on model) under the brew basket.
A cold container will significantly lower the temperature of the brewed coffee. Turn on the warmer if a shuttle is used. If the shuttle is not
warm, allow the warmer to heat the shuttle. A short brew of water will quickly warm the container.
• Remove the filter basket and line with a filter paper. Paper size for each basket is shown below:
Basket
Paper Size (inches)
BB1.5
13 x 5
BB2.0
14 x 6
• Place ground coffee in the brew basket. Your coffee supplier can help you select the right amount of coffee and grind. Coffee brewing
experts recommend 6.5-8 oz. of coffee per gallon of water for most applications. A full shuttle contains 1.4 gal., a full airpot contains 0.8 gal.
and a full insulated container contains 1.75 gal.
• Slide the brew basket into the brewer, making sure that the basket spout is properly aligned with the container opening. Rotate the basket
locks into the locked or downward pointing position so that the basket can not be inadvertently removed.
• Select batch size through the touchpads. Check the WATER HOT light. If it is lit, press the START switch on the touchpad. If the WATER
HOT light is not lit, wait and press START when it has become illuminated.
• Brew time is about 4 min. for full shuttles and insulated containers, less for half batches and airpots. After the brew, allow the coffee to drip for
1-2 min.
CAUTION:HOT LIQUID HAZARD!: COFFEE BASKET CONTAINS VERY HOT LIQUID UNTIL THE DRIP-THROUGH IS COMPLETED. EARLY
REMOVAL OF THE BASKET COULD RESULT IN BURNS.
• Remove the brew basket, dump grounds from the basket and rinse for the next brew. Coffee is ready to serve.
• The shuttle may be moved to a remote warming station and the insulated container can be moved to a remote dispensing site.
Brewer selector switch
Water temperature adjustment
Pushbuttons to adjust timer
values and to select timers
Figure C
Red LEDs to indicate
which timer is being
programmed
Alphanumeric LEDs to indicate
timer settings and to display
error codes
Page 3