Optional locking features – First Alert SA720 User Manual
Page 3
3
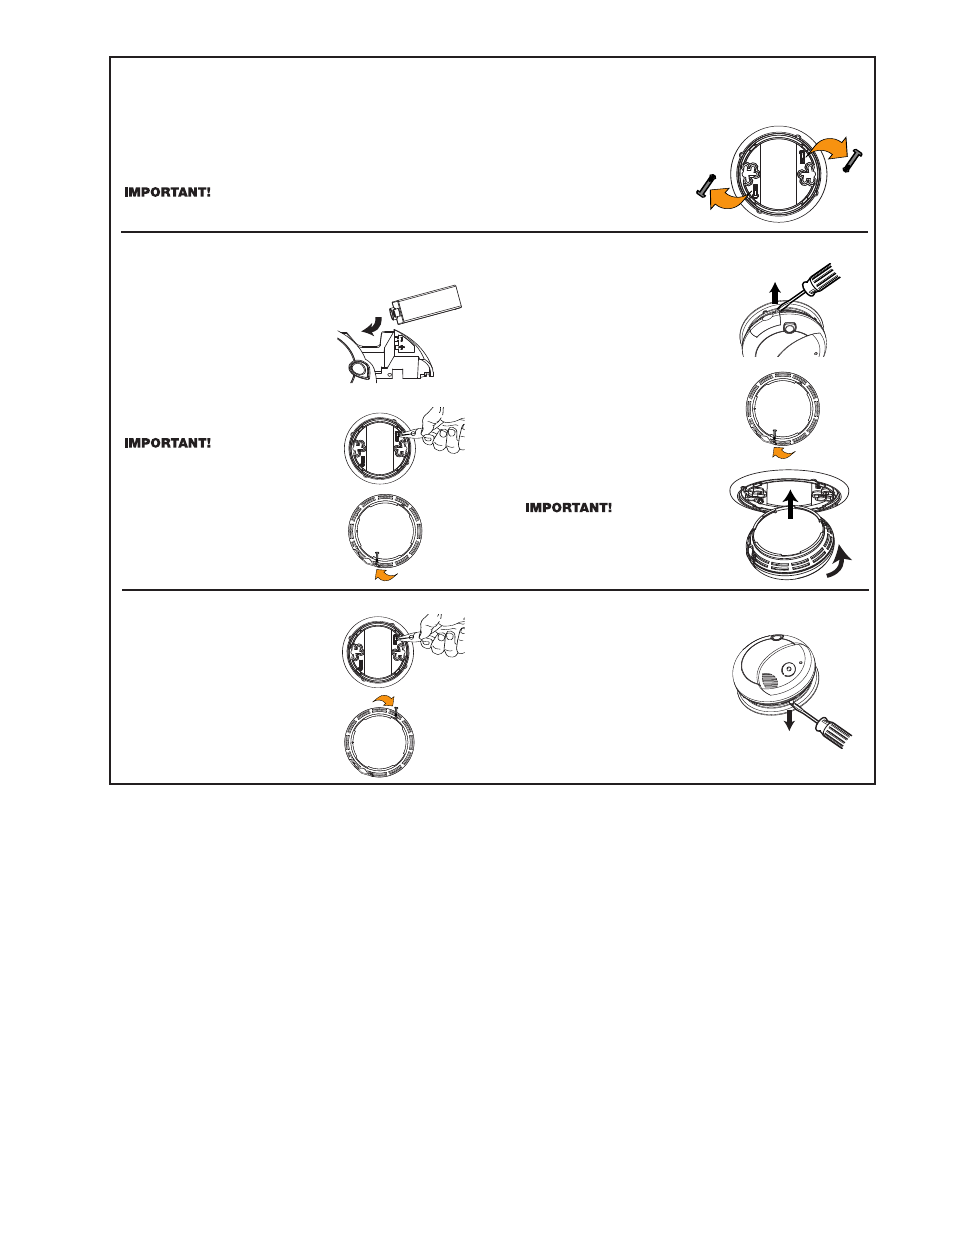
TO LOCK THE BATTERY COMPARTMENT
Do not lock the battery compartment until you have installed the
battery and tested the unit.
1. Install the battery so the terminals
on the battery match the terminals
on the Smoke Alarm. Match “+” to
“+” and “-” to “-.” Push the battery in
until it snaps in securely and cannot
be shaken loose. If the battery is
not snapped in completely, the unit
cannot receive battery power.
2. Push and hold Test/Silence button
until the alarm sounds: 3 beeps,
pause, 3 beeps, pause.
The Escape Light
®
will turn on.
LED flashes once every second.
If the unit does not alarm during
testing, DO NOT lock the battery
compartment! Install a new battery
and test again. If the Smoke Alarm still
does not alarm, replace it immediately.
3. Using needle-nose pliers, detach
one locking pin from the mounting
bracket.
4. Push the locking pin through the
hole near the battery door latch on
the back of the Smoke Alarm.
OPTIONAL LOCKING FEATURES
TO LOCK THE MOUNTING BRACKET
1. Using needle-nose pliers,
detach one locking pin from
the mounting bracket.
2. Insert the locking pin through
the hole on the back of the
Smoke Alarm as shown in the
diagram.
3. When you attach the Smoke
Alarm to the mounting bracket,
the locking pin’s head will fit
into a notch on the bracket.
The optional locking features are designed to prevent unauthorized removal of the battery or alarm. It is not necessary to activate the locks in
single-family households where unauthorized battery or alarm removal is not a concern.
These Smoke Alarms have two separate locking features: one to lock the battery compartment, and the other to lock the Smoke Alarm to the mounting
bracket. You can choose to use either feature independently, or use them both.
Tools you will need: • Needle-nose pliers • Standard flathead screwdriver.
Both locking features use locking pins, which are molded into the mounting bracket. Depending on which locking
features you use, remove one or both pins from the mounting bracket using needle-nose pliers.
To permanently remove either locking pin, insert a flathead screwdriver between the locking pin and the
lock, and pry the pin out of the lock.
TO UNLOCK THE BATTERY COMPARTMENT
1. Remove the Smoke Alarm
from the mounting bracket.
If the unit is locked to the
bracket, see the section
“To Unlock the Mounting
Bracket.”
2. Insert a flathead screwdriver
under the head of the locking
pin, and gently pry it out of the
battery compartment lock.
(If you plan to relock the battery
compartment, save the locking
pin.)
3. To relock the battery compart-
ment, close the battery door
and reinsert locking pin in lock.
4. Reattach the Smoke Alarm
to the mounting bracket.
When replacing the battery, always
test the Smoke Alarm before
relocking the battery compartment.
TO UNLOCK THE MOUNTING BRACKET
1. Insert a flathead screwdriver into
the rectangular cut-out on the
mounting bracket nearest to the
locking pin.
2. Pry the Smoke Alarm away from
the bracket by pushing up on
the screwdriver and turning the
Smoke Alarm counterclockwise
(left) at the same time.