How to install this smoke alarm – First Alert SA340 User Manual
Page 2
HOW TO INSTALL THIS SMOKE ALARM
THE PARTS OF THIS SMOKE ALARM
FOLLOW THESE SIMPLE STEPS!
INSTALL THE MOUNTING BRACKET:
1. To remove the mounting bracket from the
Smoke Alarm base, hold the Smoke Alarm
base firmly and twist the mounting bracket
counterclockwise.
2. Place the bracket on the wall or ceiling where
you want to mount the alarm.
3. Hold the mounting bracket against the ceiling
(or wall) and trace around the inside of the two
keyhole slots.
4. Make a mark inside each outline for the drill holes.
5. Put the unit where it won’t get covered with dust when you drill
the mounting holes.
6. Using a 3/16-inch (5 mm) drill bit, drill a hole through each
pencil mark.
7. Insert the plastic screw anchors (in the plastic bag with screws)
into the holes. Tap the screw anchors gently with a hammer, if
necessary, until they are flush with the ceiling or wall.
8. Line the mounting bracket up over the plastic screw anchors.
9. Screw the mounting bracket to the ceiling or wall through the
mounting slots using the two screws provided.
10. Tighten both screws all the way.
2
1
2
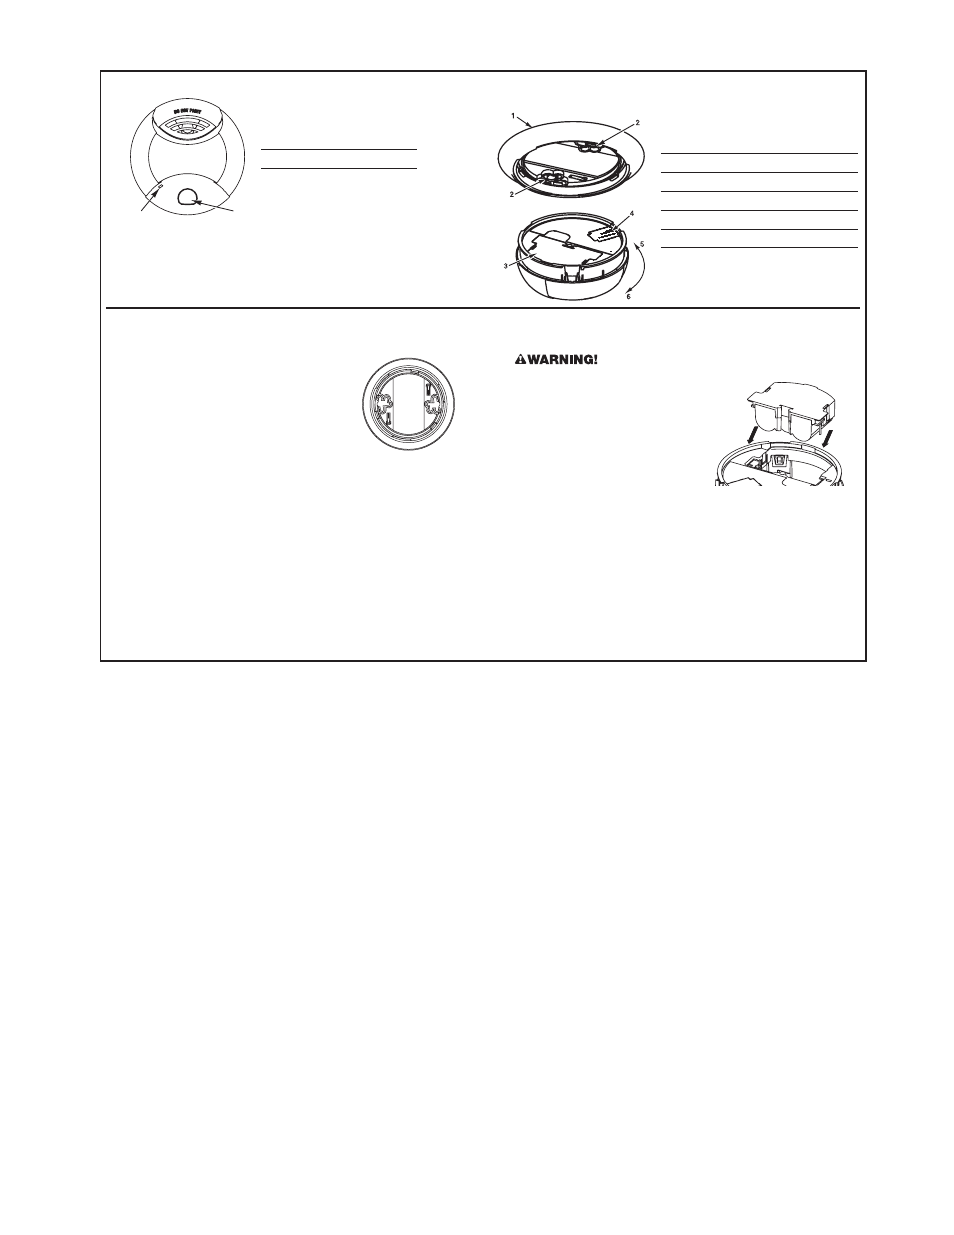
1. Test/Silence button
2. Power/alarm indicator LED
1. Mounting bracket
2. Mounting slots
3. Powercell
4. Deactivation Tab (located under label)
5. Turn to attach to bracket
6. Turn this way to remove from bracket
INSERTING THE POWERCELL:
You must activate the powercell before attaching the Smoke
Alarm to the bracket.
1. Turn Alarm upside down. Line up
the pins and snap the powercell
into the Alarm.
2. The powercell cannot be removed
after it is locked into the Alarm.
If you have trouble activating the
unit, call Consumer Affairs at:
1-800-323-9005 for assistance.
3. Test the Smoke Alarm. Press and hold the test button on the
cover of the unit until the alarm sounds (the unit may continue
to alarm for a few seconds after you release the button).
During testing, you will hear a loud, repeating horn pattern:
3 beeps, pause, 3 beeps, pause. If the unit does not alarm
during testing, call Consumer Affairs for assistance.
ATTACH SMOKE ALARM TO MOUNTING BRACKET
1. Line up the alignment tab on the unit with the alignment tab on
the mounting bracket. Push the unit toward the bracket, and
turn it clockwise until you feel it snap into place.
2. Test the unit again. Press the test button until the horn begins
sounding. During testing, you will hear a loud, repeating
horn pattern: 3 beeps, pause, 3 beeps, pause.
TOOLS YOU WILL NEED:
This unit is designed to be mounted on the ceiling,
or on the wall if necessary.
• Pencil
• Drill with 3/16” (5 mm)
drill bit
• Standard flathead
screwdriver
• Hammer