Saving a wav file – Fostex VF-16 User Manual
Page 93
93
flashing
flashing
flashing
flashing
flashing
flashing
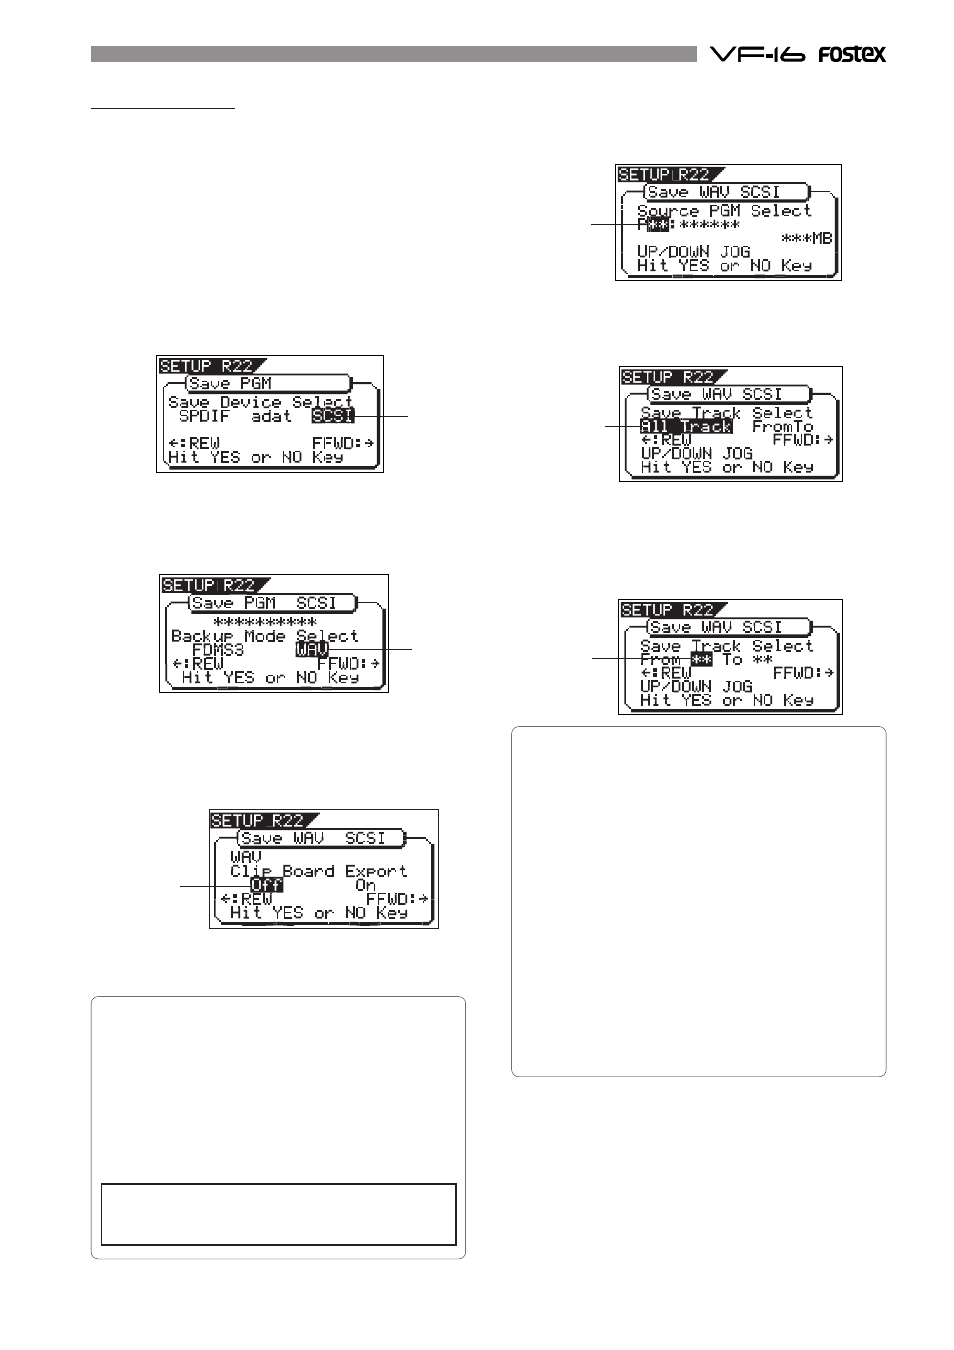
Saving a WAV file
You can save a WAV file.
Make sure that the DOS-formatted disk with FAT16
is set. The following procedure assumes that the
newly formatted "clean" disk is used for backup.
1. Press the [SETUP] key to enter the Setup mode.
The display shows the screen for selecting the Setup
menu.
2. Use the [JOG] dial to select "Save PGM" and press the
[ENTER/YES] key.
The display shows the screen for selecting the device to
which the data is saved. "SCSI" flashes.
3. While "SCSI" is flashing, press the [ENTER/YES] key.
The display shows the screen for selecting the backup
mode (FDMS 3 or WAV), where "WAV" flashes. (When a
DOS-formatted disk is set, "WAV" initially flashes.)
4. While "WAV" is flashing, press the [ENTER/YES] key.
The display shows the screen for selecting ON or OFF of
the Clipboard export function, where "OFF" flashes.
Pressing the [REWIND] or [F FWD] key switches between
ON and OFF.
If you save all data from "ABS 0" to "REC END" (in most
cases), you do not have to change the setting here.
The Clipboard export function allows you to save
the desired range of data.
If you save data with this function active, only
the data between the Clipboard IN and Clipboard
OUT points is saved. Therefore, if you want to save
only the specific range of data, you have to register
the Clipboard IN and Clipboard OUT points before
the save operation.
5. While "OFF" is flashing, press the [ENTER/YES] key.
The display shows the screen for selecting a program
to be saved. The program number currently selected
flashes, while the data size of the program is shown.
6. Use the [JOG] dial to select a program to be saved and
press the [ENTER/YES] key.
The display shows the screen for selecting a track to be
saved. Initially, "From All Track" flashes.
By rotating the [JOG] dial, you can select "From ** To
**" (where the left field flashes initially) instead of "From
All Track". If you save data for all tracks (1 through
24), select "From All Track". If you save data for any
specific track(s), select "From ** To **" and specify the
desired track numbers.
By rotating the [JOG] dial while the left ("From") field is
flashing, you can select the track number from 01
through 24. The number in the right ("To") field
automatically follows the number in the left field (i.e.
numbers in the left and right fields are always the same).
Therefore, if you want to save a single track, you just
have to set the right ("From") field and do not have to
set the right ("To") field. For example, "From 02 To 02"
will save only track 2.
To specify tracks 5 through 12:
• Enter "05" to the left field while the left field is
flashing.
• Press the [REWIND] or [F FWD] key to make the right
field flashing.
• Enter "12". (Note that the number for the right field
must be equal to or larger than the left field.)
Finally the screen shows "From 05 to 12" to save tracks
5 through 12.
7. After selecting the track(s), press the [ENTER/YES] key.
The display shows the screen for selecting a WAV file
on the disk.
If no file is recorded on the disk, "New File" flashes.
You can select "Eject" by rotating the [JOG] dial.
To remove the disk, select "Eject" and press the [ENTER/
YES] key.
If you save all data from "ABS 0" to "REC END", make
sure to set the Clipboard export function to OFF.