Warning, Caution, Battery charging – Fisher-Price F-150 User Manual
Page 9: Assembly
9
R1500pr-0920
In the unassembled state, this package contains
small parts. Adult assembly is required.
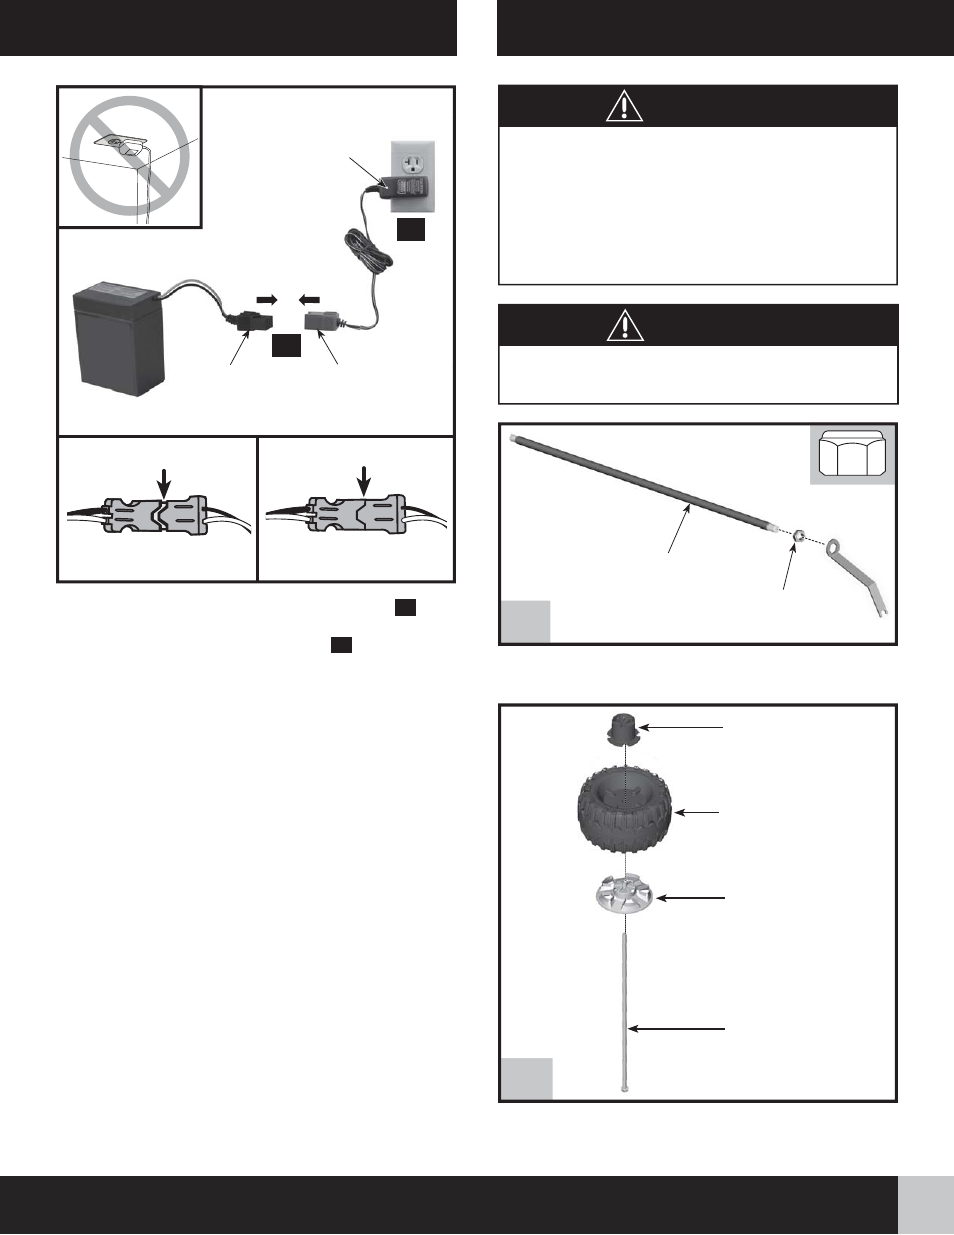
BATTERY CHARGING
Battery
Connector
Charger
Connector
A
B
• Plug the battery connector into the charger connector
A
.
Push firmly to make sure the connectors are completely joined.
• Plug the charger into a standard wall outlet
B
.
Notes:
- Use the charger only in a wall outlet. Do not plug into
a ceiling outlet.
- If power flow to the wall outlet is controlled by a switch,
make sure the switch is “ON”.
- The power indicator on the charger does not indicate the
charge status of your battery. The power indicator allows you
to see there is power from the wall outlet.
• Before first-time use, charge the battery for at least 18 hours.
Never charge the battery longer than 30 hours.
• Recharge the battery for at least 14 hours after each use of your
vehicle. Do not charge the battery longer than 30 hours.
• Once the battery is charged, disconnect the battery connector
from the charger connector. Unplug the charger from the wall
outlet. The battery is now ready to be installed in your vehicle.
Please see the Battery Installation section on page 19 for detailed
instructions on installing your battery. If your battery is already
installed in your vehicle, simply re-connect the motor harness
connector to the battery connector.
WARNING
Children can be harmed by small parts,
sharp edges and sharp points in the
vehicle's unassembled state, or by electrical
items. Care should be taken in unpacking
and assembly of the vehicle. Children should
not handle parts, including the battery,
or help in assembly of the vehicle.
ASSEMBLY
• Fit a
3
/
8
" -16 hex nut onto one end of the rear axle. Hand tighten
the hex nut to hold in place.
Rear Axle
1
INCORRECT
GAP
CORRECT
NO GAP
Power
Indicator
3
/
8
" -16 Hex Nut
2
• Slide a hubcap, peg side up, onto the rear axle.
• Slide a wheel, ribs up, onto the rear axle.
• Slide a rear wheel driver, ring side down, onto the rear axle.
Rear Wheel Driver
(Ring Side Down)
Wheel
(Ribs Up)
Hubcap
(Peg Side Up)
Rear Axle
CAUTION