Understanding the light and horn patterns, Weekly testing – First Alert SA302 User Manual
Page 3
3
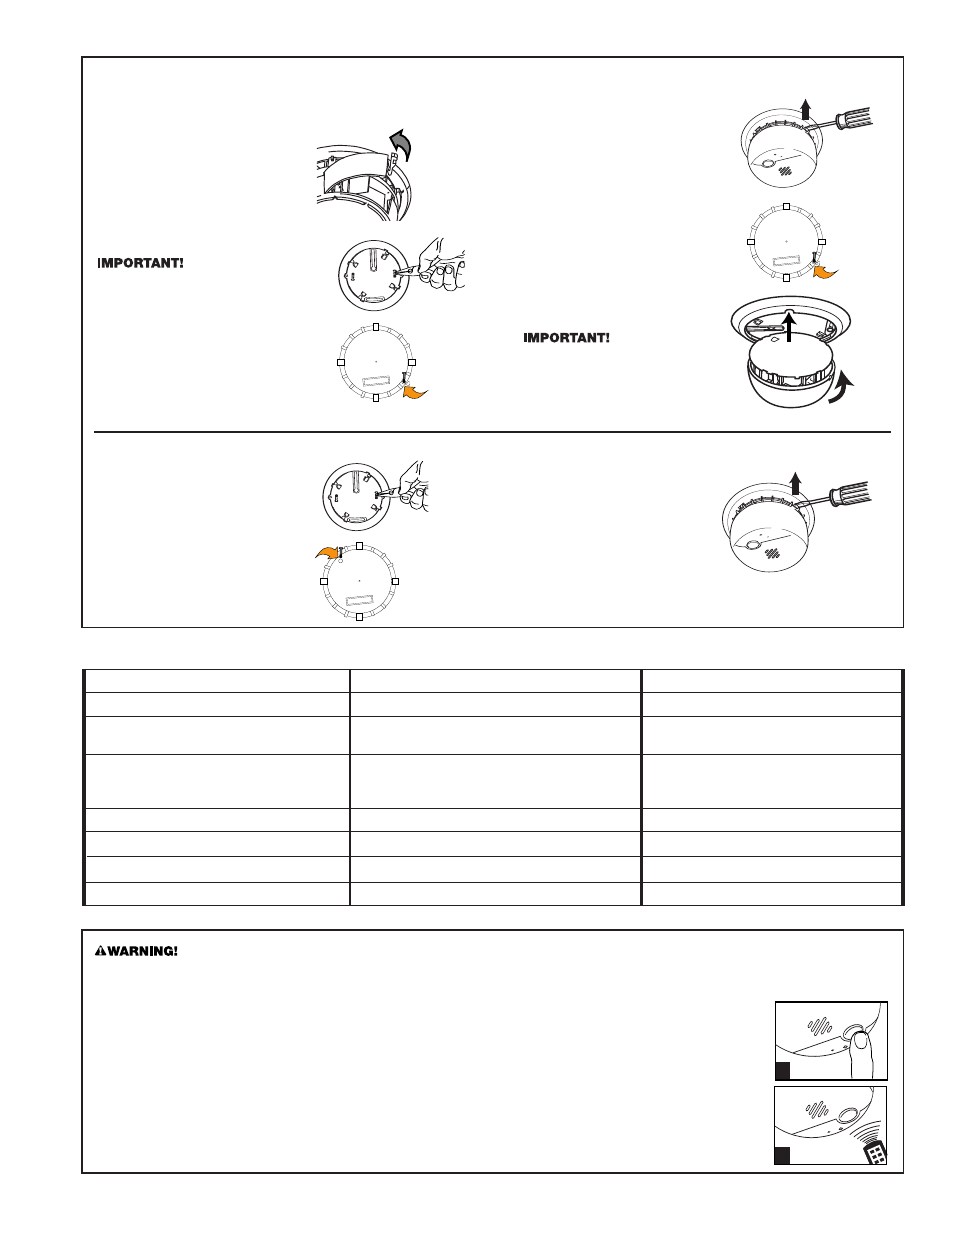
TO LOCK THE BATTERY COMPARTMENT
Do not lock the battery compartment until you activate the battery and
test the Smoke Alarm.
1. Install the battery so the termi-
nals on the battery match the
terminals on the Smoke Alarm.
Match “+” to “+” and “-” to “-.”
Push the battery in until it snaps
in securely and cannot be shak-
en loose. If the battery is not
snapped in completely, the unit
cannot receive battery power.
2. Push and hold test button until
the alarm sounds:
3 beeps, pause, 3 beeps, pause.
If the unit does not alarm during
testing, DO NOT lock the battery
compartment! Install a new battery
and test again. If the Smoke Alarm
still does not alarm, replace it
immediately.
3. Using needle-nose pliers or a
utility knife, detach one locking
pin from the mounting bracket.
4. Push the locking pin through the
hole near the battery door latch
on the back of the Smoke Alarm.
TO LOCK THE MOUNTING BRACKET
1. Using needle-nose pliers,
detach one locking pin from
the mounting bracket.
2. Insert the locking pin through
the hole on the back of the
Smoke Alarm as shown in the
diagram.
3. When you attach the Smoke
Alarm to the mounting bracket,
the locking pin’s head will fit
into a notch on the bracket.
TO UNLOCK THE BATTERY COMPARTMENT
1. Remove the Smoke Alarm
from the mounting bracket.
If the unit is locked to the
bracket, see the section
“To Unlock the Mounting
Bracket.”
2. Insert a flathead screwdriver
under the head of the locking
pin, and gently pry it out of the
battery compartment lock.
(If you plan to re-lock the battery
compartment, save the locking
pin.)
3. To relock the battery
compartment, close the battery
door and reinsert locking pin in
lock.
4. Reattach the Smoke Alarm
to the mounting bracket.
When replacing the battery, always
test the Smoke Alarm before re-
locking the battery compartment.
TO UNLOCK THE MOUNTING BRACKET
1. Insert a flathead screwdriver into
the rectangular cut-out on the
mounting bracket nearest to the
locking pin.
2. Pry the Smoke Alarm away from
the bracket by pushing up on
the screwdriver and turning the
Smoke Alarm counterclockwise
(left) at the same time.
When your smoke alarm is in this mode…
This is what you should hear…
This is what you should see…
Normal Operating Condition
Test
Alarm
Nothing. Horn is silent.
Red Light flashes every minute.
Alarm Horn sounds loudly. Repeating horn
pattern: 3 beeps, pause, 3 beeps, pause.
Repeats for as long as unit is in alarm.
Horn sounds loudly. Horn pattern repeats twice:
3 beeps, pause, 3 beeps, pause.
Red Light flashes rapidly.
Red Light flashes rapidly.
Requires Service
A series of three rapid chirps, once every minute.
Red Light flashes every minute.
Low Battery Warning (Silenced)
Nothing. Horn is silent for up to eight hours.
A series of two rapid flashes, once a minute.
Low Battery Warning
Horn chirps once a minute.
Red Light flashes every minute.
Alarm (Silenced)
Nothing. Horn is silent for up to 15 minutes.
Red Light flashes rapidly.
UNDERSTANDING THE LIGHT AND HORN PATTERNS
•
NEVER use an open flame of any kind to test this unit. You might
accidentally damage or set fire to the unit or to your home.
The built-in test switch accurately tests the unit’s operation as
required by Underwriters Laboratories, Inc. (UL).
•
If the Alarm ever fails to test properly, replace it immediately.
Products under warranty may be returned to the manufacturer for
replacement. See “Limited Warranty” at the end of this manual.
•
DO NOT stand close to the alarm when the horn is sounding.
Exposure at close range may be harmful to your hearing. When
testing, step away when horn starts sounding.
WEEKLY TESTING
It is important to test this unit every week to make sure it is working
properly. Using the test button is the recommended way to test this
Smoke Alarm. During testing, you will hear a loud, repeating horn pattern:
3 beeps, pause, 3 beeps, pause.
You can test this Smoke Alarm two ways:
Manually: Press the Test/Silence button on the
alarm cover until alarm sounds for 3-5 seconds.
Using Your Remote Control: Standing no further
than 20 feet away from the Smoke Alarm, aim
your IR remote at the Smoke Alarm and press the
CHANNEL or VOLUME button for at least 3-5
seconds.
If the alarm does not respond to your remote
control, there may be an obstruction between
you and the alarm, you may be standing too
far away, or your remote control may not be
compatible.
1
2