Fender Twin Amp User Manual
Page 4
w w w.
f e n d e r
. c o m
4
www.
mrgearhead
.net
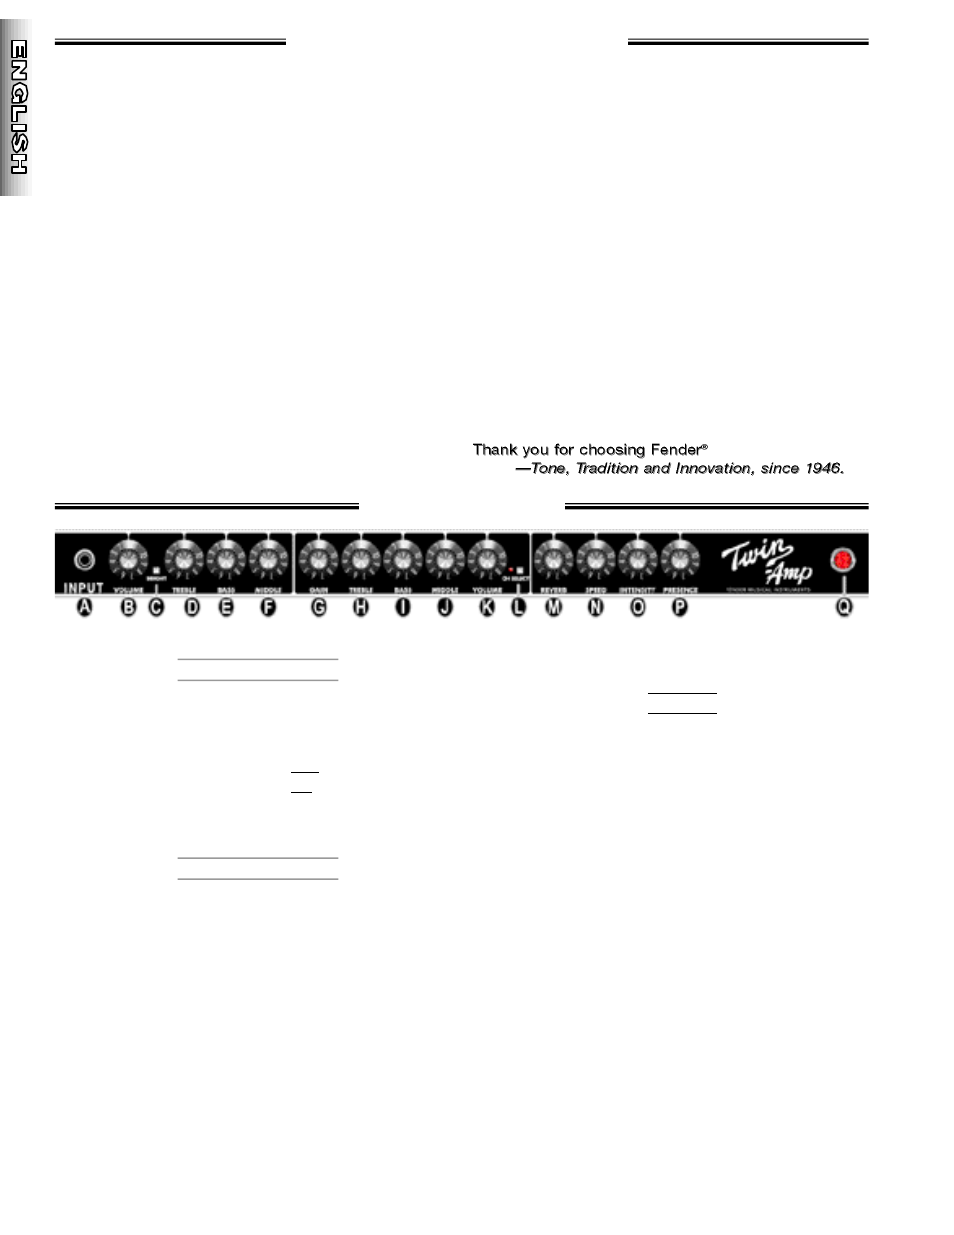
A.
INPUT - Input jack connection for your guitar.
1
•
Channel
•
1
B.
VOLUME - Controls the overall loudness output of the
amp when channel–
1 is active.
C.
BRIGHT - This two-position button gives channel–1 a
treble boost:
button OUT > for BRIGHT OFF
button IN > for BRIGHT ON
D.
T R E B L E - Controls the channel–1 h i g h - f requency level.
E.
BASS - Controls the channel–1 low-frequency level.
F.
MIDDLE - Controls the channel–1 mid-frequency level.
2
•
Channel
•
2
G.
GAIN - Controls the pre-amplifier distortion level when
channel–
2 is active. Higher GAIN levels produce more
distortion. Use GAIN in conjunction with channel–
2
VOLUME (K) to set the overall volume output of the amp.
H.
T R E B L E - Controls the channel–2 h i g h - f re q u e n c y
level. TREBLE has less effect as MIDDLE is turned
above “3.”
I.
BASS - Controls the channel–2 low-frequency level.
J.
MIDDLE - Controls the channel–2 mid-frequency level.
K.
VOLUME - Controls the overall loudness output of the
amp when channel–
2 is active in conjunction with
GAIN (G). Use this VOLUME control to set the output
level of channel–
2 relative to the channel–1 settings.
L.
CHANNEL SELECT - This two-position button
selects the active pre-amp channel:
button OUT > for Channel-
1 > LED OFF
button IN >
for Channel-
2 > LED ON
Note: When the Footswitch is plugged in to the
FOOTSWITCH jack, CHANNEL SELECTION is possible
only from the Footswitch.
M.
REVERB - Controls the Reverb level of both channels.
Note: Reverb can be toggled ON/OFF from the
Footswitch when it is plugged in.
N.
SPEED - Controls Tremolo modulation rate. Note: The
Footswitch must be plugged in (with TREMOLO toggled
ON) to enable the Tremolo effect. Turn up INTENSITY to
make SPEED settings more audible.
O.
INTENSITY - Controls the Tremolo sweep depth.
Note: The Footswitch must be plugged in (with
TREMOLO toggled ON) to enable the Tremolo effect.
Tremolo is less intense in the 1/4 power mode.
P.
PRESENCE - Controls the ultra-high frequency level of
both channel–
1 and channel–2.
Q.
POWER INDICATOR - Illuminates when the POWER
is switched ON and the Pro-Tube amp is receiving
power. Note: Unscrew the red jeweled cover to access
the bulb for replacement. Use bulb type T47.
Congratulations! Your Fender
®
Pro-Tube Series amplifier
delivers world-class tone and professional quality
construction for many years of enjoyable service. Read
through this manual to take advantage of the features built
into your Twin-Amp:
◊
◊
Two pre-amp channels:
•
Independent V O L U M E,
TREBLE, MIDDLE, a n d B A S S f o r
each channel,
•
Channel 1 BRIGHT switch for crisp tone emphasis,
•
Channel 2 GAIN control for warm Pro-Tube distortion.
◊
◊
Tools for tone:
•
Sweet sounding Fender spring REVERB,
•
Ultra-high frequency definition from the P R E S E N C E
control,
•
TREMOLO volume modulation with SPEED and
INTENSITY controls.
◊
◊
Effects loop options:
•
Engage/bypass external effects
devices with the L O O P button,
•
Normalize (or set
alternate) engage/bypass volume levels using the SEND
and RETURN controls.
◊
◊
Remote functions of the Four–button F o o t s w i t c h :
•
CHANNEL select,
•
EFFECTS LOOP bypass/ engage,
•
REVERB on/off,
•
TREMOLO on/off.
◊
◊
Expansion Options:
•
Output to a second Pro-Tube amp
using the PRE-AMP OUT and POWER-AMP IN jacks, and
c o n t rol both amps as one,
•
Output to sound
re i n f o rcement equipment,
•
Plug two 8 ohm speaker
cabinets into each of your Pro-Tube amp(s) at the MAIN
SPEAKER and EXTERNAL SPEAKER jacks.
◊
◊
Selectable output levels:
•
FULL POWER supplies 100
watts of output,
•
1/4 OUTPUT POWER supplies 25 watts
of output for smaller venues,
•
1/4 OUTPUT POWER
allows the drive tone created by high GAIN/ VOLUME
settings to be generated at lower volume levels.
◊
◊
Quality built:
•
The chassis is constructed from the finest,
most roadworthy components,
•
Cabinets are made from
s t u rdy 3/4 inch birch/maple plywood,
•
C o v e red in
genuine Tolex
®
for long lasting good looks.
◊
◊
Extras:
•
Tilt-back legs provide an alternate listening
angle,
•
Removable casters— ON for easy transportation
and OFF for secure cabinet placement.
◊
◊
This manual includes procedures for testing, balancing
and replacing the amplifier tubes at the core of your
Pro–Tube sound.
F
F
r
r
o
o
n
n
t
t
P
P
a
a
n
n
e
e
l
l
F
F
e
e
n
n
d
d
e
e
r
r
®
T
T
w
w
i
i
n
n
-
-
A
A
m
m
p
p