Five Star Sr200na User Manual
Page 13
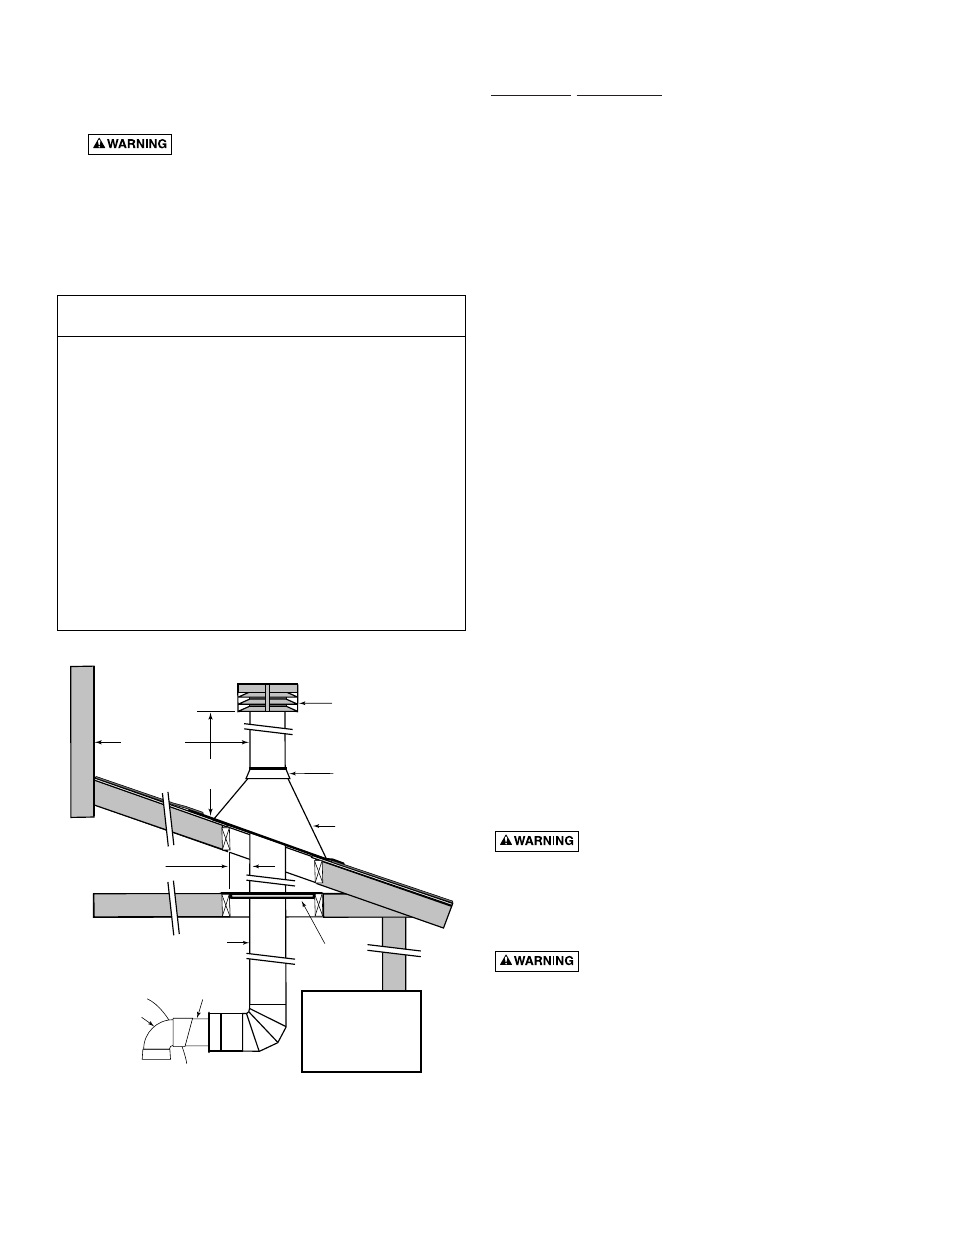
6. See Table 4 for height of vent termination above the
roof.
7. Do not run the heater vent into a common vent with
any other appliance.
8.
Fire Hazard. Do not vent the heater
directly into a masonry chimney. Installation into a
masonry chimney must use a chimney liner and must
meet National Fuel Gas Code requirements and all
local code requirements.
Table 4: Vent Termination Height vs.
Roof Pitch
FIGURE 12: Typical Metal Vent Pipe Installation
(Vertical – Negative Pressure)
HORIZONTAL OR VERTICAL VENTING -
POSITIVE PRESSURE (SPECIAL GAS VENTING)
(See Figures 13 and 14)
Vent the heater either horizontally or vertically using one
of the 4-inch Special Gas Vent Pipes listed on Page 14
(Table 5). Install the vent pipe in accordance with local
codes and the provisions of the National Fuel Gas Code,
ANSI Z223.1, and the vent manufacturer’s instructions.
Do not use a draft hood with this heater. Use one of the
special gas vents specified in Table 5 (Page 14) for positive-
pressure venting of this heater – do not use any other vent
with it. Install the vent according to the vent manufactur-
er’s detailed instructions.
Maintain clearance between the vent pipe and combustible
surfaces according to the vent manufacturer’s instructions
and code requirements. Do not place any insulating mate-
rials around the vent or inside the required clear air space
surrounding the vent. See Table 6 (Page 15) for maximum
permissable vent lengths. See Table 7 (Page 15) for Listed
vent components.
CONNECTING SPECIAL GAS
VENT TO THE HEATER
Metallic:
1. Order an Appliance Adapter kit:
Sta-Rite Part No. 77707-0086 for Saf-T Vent
®
or Saf-T Vent
®
CI.
Sta-Rite Part No. 77707-0087 for Z-Vent.
2. Remove the outside vent cover.
3. Install the Appliance Adapter in the Vent Body of the
heater (located under the outside Vent Cover). Before
connecting the Appliance Adapter to the Vent Body,
wet a clean cloth or paper towel with isopropyl alco-
hol (rubbing alcohol) and vigorously wipe the socket
of the Vent Body. Immediately wipe the cleaned sur-
faces dry with a clean cloth or paper towel. Repeat for
the exterior of the heater end of the Appliance Adapter.
Attach the Appliance Adapter to the vent body using
the adhesive specified by the vent manufacturer, fol-
lowing the vent manufacturer’s instructions.
Risk of carbon monoxide poisoning if adapter
is improperly attached. Mechanical connections (such as
screws) can cause cracking and leaks in the adapter. Do
not drill holes or use screws to connect the appliance
adapter to the heater vent body. Attach with manufacturer’s
specified adhesive.
Risk of fire or asphyxiation if vent is not
assembled according to manufacturer’s instructions or if
vent parts from different manufacturers are mixed. Vent
parts from different manufacturers ARE NOT interchange-
able. Mixing parts from more than one manufacturer may
cause leaks or damage to vent. When installing a vent,
pick one manufacturer and be sure that all vent parts come
from that manufacturer and are specified by the manufac-
turer for your system. Follow manufacturer’s instructions
and local and National Fuel Gas Code requirements care-
fully during assembly and installation.
13
Minimum Height
Roof Pitch
Above Roof*
Flat to 6/12
1 Ft.
6/12 to 7/12
1 Ft. 3 in.
>7/12 to 8/12
1 Ft. 6 in.
>8/12 to 9/12
2 Ft.
>9/12 to 10/12
2 Ft. 6 in.
>10/12 to 11/12
3 Ft. 4 in.
>11/12 to 12/12
4 Ft.
>12/12 to 14/12
5 Ft.
>14/12 to 16/12
6 Ft.
>16/12 to 18/12
7 Ft.
>18/12 to 20/12
7 Ft. 6 in.
>20/12 to 21/12
8 Ft.
* Vent must be at least eight (8) feet away from nearest vertical
surface. Vents extending five (5) feet or more above the roof must
be braced or guyed. Consult your local code officials for detailed
information.
6" Minimum
Clearance to
Combustible
Materials
Listed
Termination
Cap
Storm Collar
Flashing
Firestop
Vent
Body
Metal Flue
Collar
Class B Double Wall
Metal Vent Pipe
See Table 4
For Min. Hght.
Min. 8 Ft.
Support Vertical
Vent Pipe so
adapter does not
take weight of
pipe.