Multiroom operation, Multiroom operation 31, Multiroom setup – Harman-Kardon DPR 1001 User Manual
Page 31
MULTIROOM OPERATION 31
MULTIROOM OPERATION
To change the length of time that the semi-OSD dis-
plays remain on the screen, go to the ADVANCED
menu as outlined earlier, and press the
⁄
/
¤
Navigation Buttons
n as needed, until the
SEMI OSD TIME OUT line is highlighted
in reverse video. Next, press the
‹
/
›
Navigation
Buttons
n until the desired time in seconds is dis-
played. Unlike most of the other options in this menu,
this is a permanent setting change, and the time-out
entry will remain in effect until it is changed, even
when the unit is turned off.
If you wish to make other adjustments, press the
⁄
/
¤
Navigation Buttons
n until the desired set-
ting is highlighted in reverse video, or highlight the
RETURN TO MAIN MENU line and then
press the Set Button
p to select another menu for
adjustment. If no further adjustments are required,
press the OSD Button
to exit the menu system.
Full-OSD Time-Out Adjustment
The FULL OSD menu system is used to simplify
the setup and adjustment of the DPR 1001, using a
series of on-screen menus. The factory default setting
for these menus leaves them on the screen for 20
seconds after a period of inactivity before they disap-
pear from the screen (Time-Out). Time-Out is a safety
measure to prevent image retention of the menu text
in your monitor or projector, which might happen if it
were left on indefinitely. However, some viewers may
prefer a slightly longer or shorter period before the
Time Out display.
To change the Full-OSD Time-Out, you will need to
make an adjustment in the ADVANCED menu
(Figure 13). To start the adjustment, press the OSD
Button
to bring the MAIN menu to the
screen. Press the
¤
Navigation Button
n, until
the ADVANCED line is highlighted in reverse
video. Press the Set Button
p to enter the
ADVANCED menu (Figure 13).
At the ADVANCED menu (Figure 13) make
certain that the FULL OSD TIME OUT line
is highlighted in reverse video by pressing the
⁄
/
¤
Navigation Buttons
n as needed. Next, press the
‹
/
›
Navigation Buttons
n until the desired time
is displayed in seconds. Unlike most of the other
options in this menu, this is a permanent setting
change, and the Time-Out entry will remain in effect
until it is changed, even if the unit is turned off.
If you wish to make other adjustments, press the
⁄
/
¤
Navigation Buttons
n until the desired set-
ting is highlighted in reverse video, or highlight the
RETURN TO MAIN MENU line and then
press the Set Button
p to select another menu for
adjustment. If no further adjustments are required,
press the OSD Button
to exit the menu system.
Multiroom Operation
The DPR 1001 is fully equipped to operate as the
control center for a multiroom system with optional
remote external infrared (IR) sensors, speakers and
power amplifiers. Although some multiroom installations
will require the services of a specially trained installer, it is
possible for the average do-it-yourself hobbyist to install
a simple remote room system.
Installation
The key to remote room operation is to link the remote
room to the DPR 1001’s location with wire for an
infrared link and speakers or an amplifier. For installation
instructions for Multiroom use, see page 15.
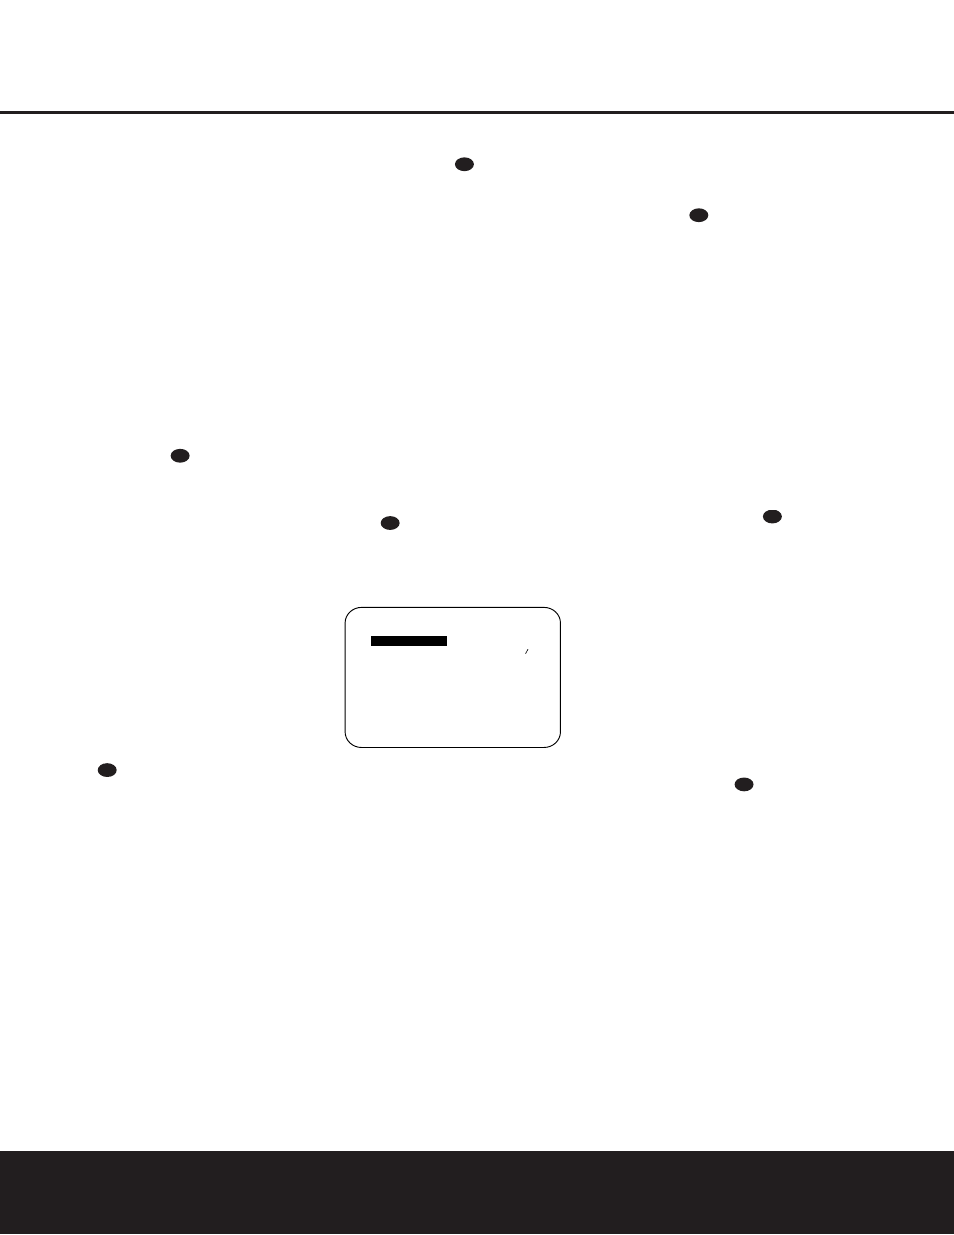
Multiroom Setup
Once the audio and IR link connections have been
made, the DPR 1001 needs to be configured for multi-
room operation using the steps below. Press the OSD
Button
to bring the MAIN menu (Figure 1)
to the screen. Press the
¤
Navigation Button
n
until the MULTI-ROOM line is highlighted. Press
the Set Button
p to enter the MULTI-ROOM
menu (Figure 14).
Figure 14
When the MULTI-ROOM menu appears, the
MULTI-ROOM line will be highlighted. Since this
line is used to turn the system on and off, do not make
an adjustment here unless you wish to turn the system
on at this time. To turn the system on, press the
›
Navigation Button
n so that ON appears. If you do
not wish to turn the system on at this time or to proceed
to the next step, press the
¤
Navigation Button
n
so that the MULTI IN line is highlighted.
At the MULTI IN line, press the
‹
/
›
Navigation
Buttons
n until the desired input to the multiroom
system appears. When the selection has been made,
press the
¤
Navigation Button
n once so that the
MULTI VOL line is highlighted.
At the MULTI VOL line, press the
‹
/
›
Navigation Buttons
n until the desired volume level
for the multiroom system is entered. DO NOT use the
regular volume control knobs for this setting. When all
settings for the multiroom setup have been made,
press the
⁄
/
¤
Navigation Buttons
n until the
RETURN TO MAIN MENU line is highlighted.
If you have no other adjustments to make, press the
OSD Button
to exit the menu system.
Multiroom Amplifier Configuration
Since the DPR 1001 is equipped with seven channels
of amplification, they may be allocated to either full 7.1
channel operation, or they may alternatively be used to
power speakers that are fed the output of the multiroom
system. Thus, when only 5.1 channels are required for
the main listening room, you may power speakers in a
second zone without the need for additional external
amplifiers. This is a major improvement over the use of
simple “Speaker A/B” switches, as it allows for a fully
separate source and independent volume levels at the
remote location.
To configure the DPR so that the amplifiers normally
used for the Surround Back channels are used for the
multiroom system, you must make an adjustment in the
ADVANCED menu (Figure 13). To start the adjust-
ment, press the OSD Button
to bring the
MAIN menu to the screen. Next, press the
¤
Navigation Button
n until the ADVANCED line
is highlighted in reverse video. Press the Set Button
p to enter the ADVANCED menu.
When the
ADVANCED menu is on the screen, the
SB AMPS item at the top of the menu list will be
highlighted in reverse video. Press the
‹
/
›
Navigation
Buttons
n so that the right side of the menu line
changes to
MULTI ROOM.
When this configuration adjustment is complete, press
the
⁄
/
¤
Navigation Buttons
n until RETURN
TO MAIN MENU is highlighted in reverse video
and press the Set Button
p to select another menu
for adjustment. If no further adjustments are required,
press the OSD Button
to exit the menu system.
IMPORTANT NOTE: Once the amplifiers are configured
as shown above so that the multiroom outputs are pow-
ered by the DPR’s internal amplifier, the speaker configu-
ration will automatically be reset for 5.1 channel opera-
tion in the main room. This means that 6.1/7.1-channel
operation will not be possible until the setting shown
above is returned to OFF. For that reason, use of the
internal amplifier for multiroom operation is recommended
only if your main listening room uses a 5.1 speaker
system. If the main room has a 6.1 or 7.1 speaker
setup, it will be necessary to use an optional, external
power amplifier to power the speakers used in the
multiroom system.
31
31
31
* M U L T I - R O O M *
M U L T I - R O O M
: O F F
M U L T I I N : F M P R E S E T 0 1
M U L T I V O L :
2 5 d B
R E T U R N T O M A I N M E N U
31
31
31
31