Trim removal instructions, Ordering spare parts, Trouble shooting – LowFlow Mark 708SH Series Short Pattern 1/4 User Manual
Page 5
limit switch, rotate the stem down until the plug is
in contact with the seat, and turn and additional ¼
- ½ turn to preload the seat.
Position motor to open position, and confirm that
5.
the motor is stopped by the limit switch prior to
the plug reaching the upper stop. Without rotating
the stem, thread the stem nuts up and lock them
against the actuator stem.
Note: limit switches and high/low set points are
factory-set. If command signal range will not fully
stroke the valve, refer to electrical connection dia-
gram for the motor actuator that was shipped with
the valve. With seat spring preload set, if plug hits
upper stop prior to limit switch, the limit switch will
require adjustment; consult factory for procedure.
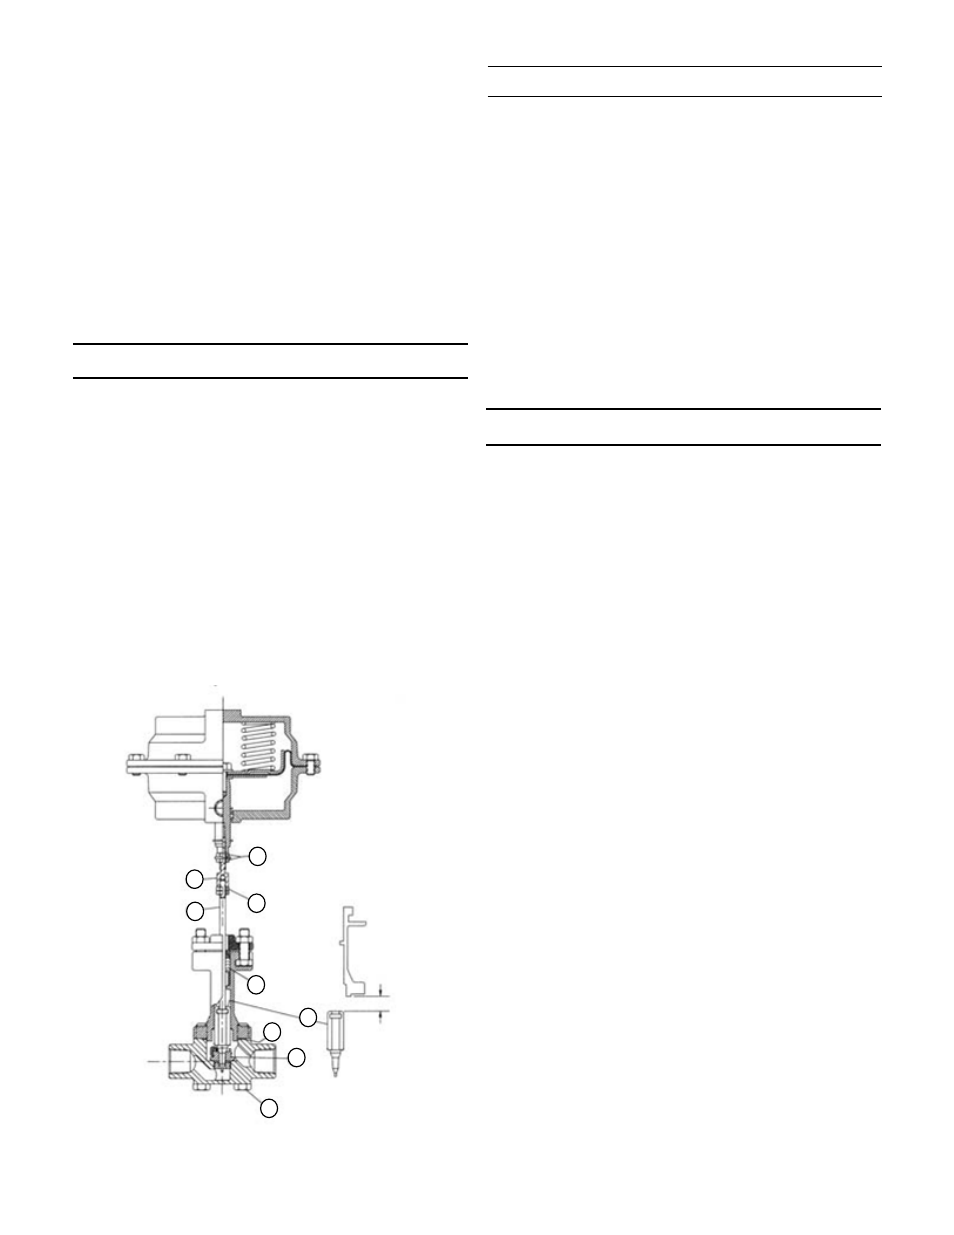
Trim Removal Instructions
Referring to drawing below:
Remove four bolts (1), and remove body.
1.
Loosen nut (3). Keep connector (2) from rotating.
2.
DO NOT loosen nuts (4) as this would change ac-
3.
tuator spring adjustment.
Unthread stem (5) from connector.
4.
Push stem (5) through body. (DO NOT push stem
5.
threads through packing unless stem is being re-
placed.)
Slide plug (6) off stem.
6.
Remove and install new seat (9) – optional.
7.
Install new gasket (7). Install new packing (8) if stem
8.
is removed.
Assemble in reverse order. Note: stem must be
9.
threaded into connector until bottomed out to
maintain stroke adjustment.
Ordering Spare Parts
Use only genuine Jordan Valve parts to keep your valve
in good working order. So that we can supply the parts,
which were designed for your valve, we must know ex-
actly which product you are using. The only guarantee to
getting the correct replacement parts is to provide your
Jordan Representative with the valve serial number. This
number is located on the valve identification tag. If the
serial number is not available, the parts needed for your
valve might be determined using the following informa-
tion: Model Number, Valve Body Size, Seat Material and
Cv Rating, Spring Range and Set Point, Trim Material, Part
Name - Number and Quantity.
NOTE: Any parts ordered without a valve serial number
that are found to be incorrect are subject to up to a mini-
mum 25% restock charge when returned.
Trouble Shooting
If You Experience Erratic Control:
Oversizing can cause cycling or hunting (recalcu-
late the size required).
Undersizing can cause the control point to drop off
under peak loads (increase the trim size).
Inlet pressure to the valve maybe varying signifi-
cantly and the controller may not be following it
(adjust the controller).
Control loop may require equal percentage trim if
high rangabilities are being utilized.
Steam traps may need reconditioning.
Safety relief valves may be leaking.
Valve stroke may be out of adjustment or there may
be foreign matter in the valve preventing full move-
ment.
If You Experience Insufficient Flow:
Check shutoff valves to be sure they are fully open.
Inlet pressure to valve may be insufficient to pro-
vide the needed flow (check the inlet pressure with
a pressure gauge).
Strainers should be checked for clogging and
blown down if needed.
Steam traps may need reconditioning.
Dirt in the trim may prevent the valve from passing
its full capacity.
Diaphragm failure or insufficient air pressure to re-
verse acting (air-to-open) actuators would prevent
the valve from properly stroking open. Incorrect ac-
tuator spring adjustment in reverse acting actuators
would prevent the valve properly stroking open.
If You Experience Overpressure (outlet):
Dirt in the trim may prevent valve from shutting off.
Diaphragm failure, incorrect actuator spring adjust-
ment, or insufficient air pressure to direct acting
(air-to-close) actuators would prevent the valve
from properly stroking closed.
-5-
Clearance
4
7
6
8
5
3
2
1
9