Advanced connections, Connecting to a digital audio component, Usb media/ipod connection – Marantz CD6003 User Manual
Page 14: Remote control connection, Timer play, English, Connecting the optical/coaxial output connectors, Timer play setting
8
BASIC
CONNECTIONS
BASIC
OPERA
TIONS
ADV
ANCED
CONNECTIONS
ADV
ANCED
OPERA
TIONS
TROUBLESHOOTING
NAMES AND
FUNCTIONS
OTHERS
ADV
ANCED
CONNECTIONS
ENGLISH
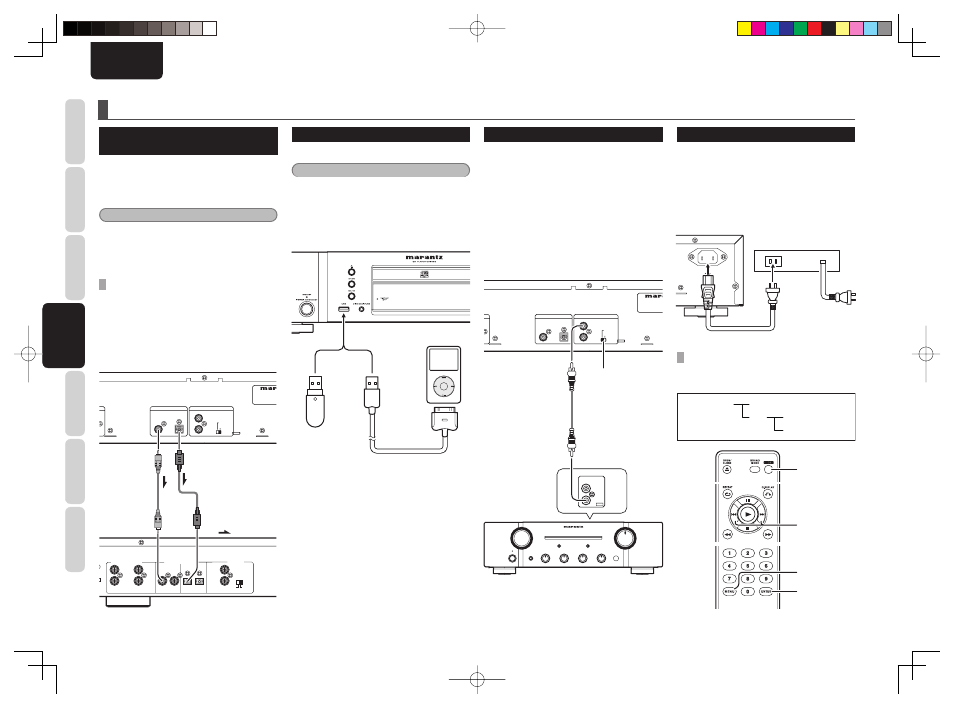
ADVANCED CONNECTIONS
CONNECTING TO A DIGITAL
AUDIO COMPONENT
The unit has one digital optical output connector and
one digital coaxial output connector.
You can enjoy digital recording when the unit
is connected to a CD recorder or other digital
recording component.
Caution
Signals are sent from the Digital Audio Output
(Optical and Coaxial) terminals only when playing
back audio CDs or CD-layers of super audio CDs.
There are no signals when other media are being
played back.
CONNECTING THE OPTICAL/COAXIAL
OUTPUT CONNECTORS
Use an optical/coaxial digital connecting cable
available on the market.
Insert the plug of the optical digital connecting cable
fi rmly in until it clicks into place.
Do not bend or bundle the optical digital connecting
cable.
REMOTE CONTROL
REMOTE CONTROL
DIGITAL AUDIO OUT
DIGITAL AUDIO OUT
EXTERNAL
EXTERNAL
INTERNAL
INTERNAL
OPTICAL
OPTICAL
COAXIAL
COAXIAL
IN
IN
OUT
OUT
INTERNAL
EXTERNAL
INPUT
ANALOG IN/OUT
OUTPUT
OUTPUT
R
L
DIGITAL IN/OUT
INPUT
OPTICAL
COAXIAL
CONTROL
REMOTE
INPUT
OUTPUT
IN
OUT
:
Coaxial digital
connecting
cable (available
on market)
or
Optical digital
connecting cable
(available on market)
Signal fl ow
CD recorder, MD deck, AV amplifi er,
etc.
USB MEDIA/iPod CONNECTION
Connect the unit to USB media/iPod.
Caution
• Connect the USB media/iPod while in power off
or when the input source is something other than
USB. Connecting/disconnecting USB memory
when the input source is USB and the power is on
may damage the USB memory.
• When using an USB device, do not use an USB
extension cable.
iPod cable
(supplied with iPod)
REMOTE CONTROL CONNECTION
Connecting this unit to additional Marantz audio
equipment using the supplied remote control
connecting cable enables remote control of the
connected equipment as a single audio system.
• When connecting equipment incorporating a
remote sensor, connect the “remote control
out” connector of the equipment to the “remote
control in” jack of the unit.
When doing this, set this unit’s switch to
“EXTERNAL.” This will stop its remote control
IR receiver from operating and the unit can now
be controlled via the remote control IR receiver of
the attached equipment.
REMOTE CONTROL
REMOTE CONTROL
DIGITAL AUDIO OUT
DIGITAL AUDIO OUT
EXTERNAL
EXTERNAL
INTERNAL
INTERNAL
OPTICAL
OPTICAL
COAXIAL
COAXIAL
IN
IN
OUT
OUT
OUT
OUT
IN
IN
REMOTE
REMOTE
CONTROL
CONTROL
Set to “EXTERNAL.”
Remote control
connecting cable
(supplied)
Amplifi er
TIMER PLAY
This unit can perform timer play by cooperating with
your audio timer.
Connect this unit’s power cord to the audio timer’s
power socket and the timer’s power cord to power
outlet.
• For connection to audio timer and it’s operation,
please refer to the instruction manual of your
audio timer.
AC IN
AC IN
Audio Timer
TIMER PLAY SETTING
Time Play is set in the following hierarchical logic.
TIMER Play=>
1 CD
2 USB/iPod
1 Off
2 On
3. 4.
5. 6.
1.
2. 7.
3. 4.
5. 6.
CD6003_N_01_Eng.indd 8
CD6003_N_01_Eng.indd 8
09.5.29 4:00:14 PM
09.5.29 4:00:14 PM