Day limited warranty, We’re here for you – Dynex DX-P9DVD User Manual
Page 2
DC 9V-12V
POWER
CHG
7 " A N D 9 " P O R TA B L E D V D P L AY E R S I Q U I C K S E T U P G U I D E I DX - P 7 D V D A N D DX - P 9 D V D
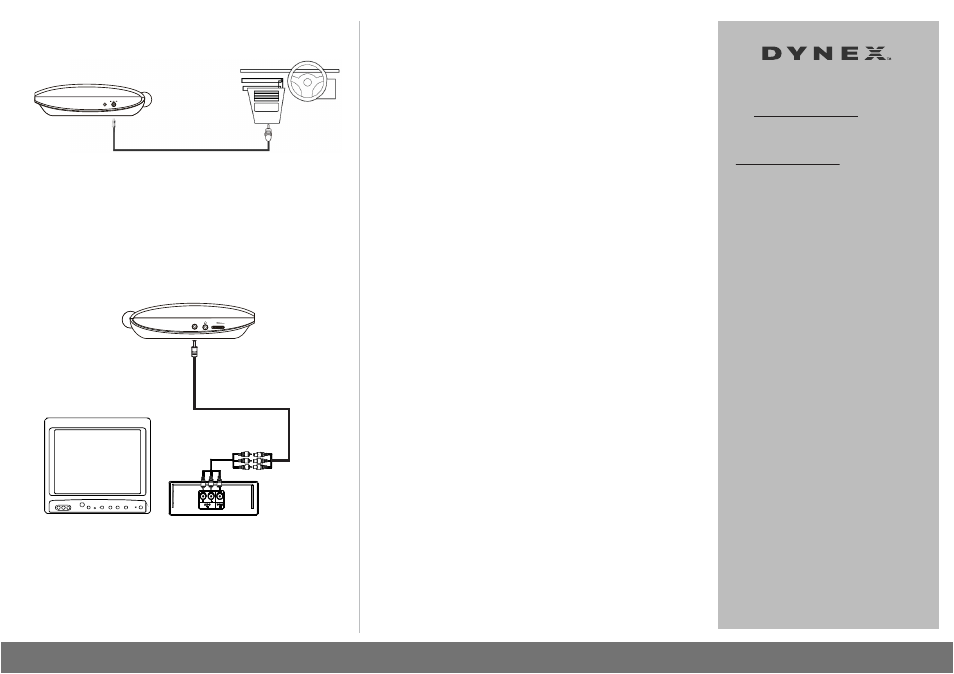
Connecting to a car cigarette lighter
NOTE: The car power adapter cannot be used to charge the battery
1 Plug one end of the car power adapter into the DC jack on the side of your
player.
2 Plug the other end of the adapter into a 12V car power outlet or cigarette
lighter socket.
3 Turn off your player. The red charge indicator will flash, reminding you that the
battery cannot be charged with the car power adapter.
Connecting headphones
• Plug headphones (not included) into the headphone jack. When
headphones are plugged into the headphone jack, no sound comes
from the built-in speakers.
Connecting a TV or monitor
1 Plug the black connector end of the supplied A/V cable into the AV jack on
your player.
2 Plug the connectors on an RCA cable (not included) into the connectors on
the other end of the supplied A/V cable. Make sure that the colors on the
connectors match.
3 Plug the other end of the RCA cable (not included) into the A/V jacks on the TV
or monitor. The white connector goes into the left audio jack. The red
connector goes into the right audio jack. The yellow connector goes into the
video jack.
90-day limited warranty
Visit www.dynexproducts.com for details.
We’re here for you
www.dynexproducts.com
For customer service, call:
800-305-2204 (U.S./Canada markets)
Distributed by Best Buy Purchasing, LLC
7601 Penn Avenue South, Richfield, MN USA 55423-3645
RFC#BBI0802114Q2
© 2010 BBY Solutions, Inc., All Rights Reserved.
DYNEX is a trademark of BBY Solutions, Inc. Registered in
some countries. All other products and brand names are
trademarks of their respective owners.
ENGLISH 10-0035
Using your player
Playing a DVD or audio CD
Note: Most DVDs and your player have region codes that help control illegal
distribution of DVDs. The region code for your player is 1. You can only play DVDs
with a region code of 1 or ALL. The region code for a DVD is printed on the DVD or
the DVD packaging.
1 Make sure that your player is connected to power or that the battery is charged.
2 Slide the ON/OFF switch inside your player to the ON position.
3 Press the OPEN button inside your player. The disc tray opens.
4 Place a disc, label side up, in the disc tray, then close the tray. Make sure the disc is
snapped completely into place. The disc starts playing automatically.
Legal notices
FCC Part 15
This device complies with Part 15 of the FCC Rules. Operation of this product is subject to the following two conditions: (1) this device
may not cause harmful interference, and (2) this device must accept any interference received, including interference that may cause
undesired operation.
This equipment has been tested and found to comply within the limits for a class B digital device, pursuant to Part 15 of the FCC Rules.
These limits are designed to provide reasonable protection against harmful interference in a residential installation. This equipment
generates, uses, and can radiate radio frequency energy and, if not installed and used in accordance with the instructions, may cause
harmful interference to radio communications. However, there is no guarantee that interference will not occur in a particular
installation. If this equipment does cause harmful interference to radio or television reception, which can be determined by turning
the equipment off and on, the user is encouraged to try to correct the interference by one or more of the following measures:
• Reorient or relocate the receiving antenna.
• Increase the separation between the equipment and receiver.
• Connect the equipment into an outlet on a circuit different from that to which the receiver is connected.
• Consult the dealer or an experienced radio/TV technician for help.
FCC warning
Changes or modifications not expressly approved by the party responsible for compliance with the FCC Rules could void the user’s
authority to operate this equipment.
Important safety instructions
1 Read these instructions.
2 Keep these instructions.
3 Heed all warnings.
4 Follow all instructions.
5 Do not use this apparatus near water.
6 Clean only with a dry cloth.
7 Do not block any ventilation openings. Install in accordance with the manufacturer’s instructions.
8 Do not install near any heat sources such as radiators, heat registers, stoves, or other apparatus (including amplifiers) that produce heat.
9 Do not defeat the safety purpose of the polarized or grounding-type plug. A polarized plug has two blades with one wider than
the other. A grounding type plug has two blades and a third grounding prong. The wide blade or the third prong are provided for
your safety. If the provided plug does not fit into your outlet, consult an electrician for replacement of the obsolete outlet.
10 Protect the power cord from being walked on or pinched particularly at plugs, convenience receptacles, and the point where they
exit from the apparatus.
11 Only use attachments/accessories specified by the manufacturer.
12 Unplug this apparatus during lightning storms or when unused for long periods of time.
13 Refer all servicing to qualified service personnel. Servicing is required when the apparatus has been damaged in any way, such
as power-supply cord or plug is damaged, liquid has been spilled or objects have fallen into the apparatus, the apparatus has
been exposed to rain or moisture, does not operate normally, or has been dropped.
14 To reduce the risk of fire or electric shock, do not expose this device to rain, moisture, dripping, or splashing, and no objects filled
with liquids, such as vases, shall be placed on it.
15 When the wall (AC) adapter is powering the device, the wall plug on the adapter must be readily operable in order to safely
disconnect the device from the wall outlet.
16 Batteries should not be exposed to excessive heat such as sunshine, fire, or the like.
Caution: Danger of explosion if battery is incorrectly replaced. Replace only with the same or equivalent type.
VOL
AV OUT
White=left audio
Red=right audio
Yellow=video