Programming the swi-x to control the head unit, Step 18, Step 19 – PAC SWI-X User Manual
Page 4: Step 14, Step 13, Step 15, Step 16, Step 17a, Step 17b, Step 11
4
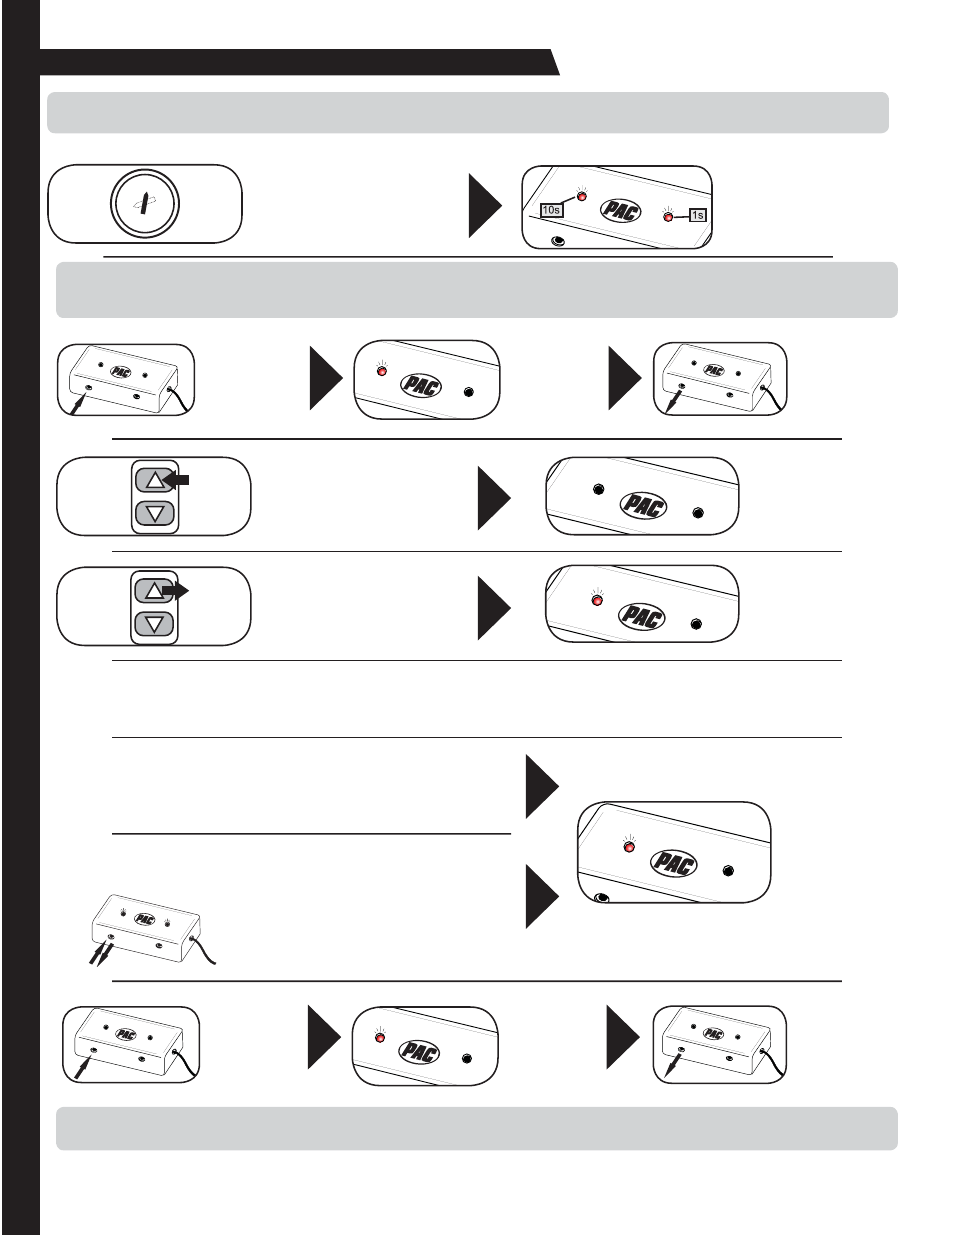
Step 18.
Press and
hold program-
ming/mode
button on
SWI-X.
Left LED will
light.
Step 19.
Release
programming/
mode button.
37) 8
37) 8
37) 8
You only need to press the programming/mode button once to program all the buttons. If you press this button again after the
interface is programmed, it will erase all previous learned buttons.
37) 8
37) 8
37) 8
37) 8
37) 8
If you programmed the interface for version #4, proceed with the following steps.
If you did not program the interface for version #4, skip to Step 18.
Step 12.
Press and hold
programming/
mode button
on SWI-X.
Step 14.
Press and hold the TEMP UP but-
ton on the steering wheel control.
Left LED will turn off.
Left LED will
light.
Step 13.
Release
programming/
mode button.
Step 15.
Release the TEMP UP button.
Left LED will turn on.
The function is pro-
grammed.
Step 16.
Repeat Steps 14 and 15, using the TEMP DOWN Button.
Step 17a.
If the vehicle is equipped with FAN UP and FAN DOWN buttons:
Repeat Steps 14 and 15 for these buttons as well.
Step 17b.
If the vehicle is NOT equipped with FAN UP and FAN DOWN buttons:
Press and release the programming/
mode button on the SWI-X.
37) 8
37) 8
In either case, left
/('ZLOOÀDVKRQFH
and stay on.
Skip to Step 20.
You have 7 sec-
onds to perform
the next step.
37) 8
Programming the SWI-X to Control the Head Unit
IMPORTANT! Some steps of the programming instructions must be completed within a certain number of seconds following the
previous step. Review the complete instruction before beginning the programming sequence.
Step 11.
Turn the vehicle ignition to the ON
position.
/('VZLOOÀDVKWR
indicate set version
number. Left LED: 10’s
place
Right LED: 1’s place
O
F
F
ACC
IG
N
ST
R
T
T
E
M
P
T
E
M
P