Kawasaki 840444 User Manual
Page 6
U
Usse
e o
on
nllyy K
Ka
aw
wa
assa
akkii™
™ 1
19
9..2
2V
V B
Ba
atttte
erryy P
Pa
acckk #
#6
69
91
10
03
34
4 o
orr
#
#6
69
91
12
24
40
0 w
wiitth
h tth
he
e O
On
ne
e H
Ho
ou
urr C
Ch
ha
arrg
ge
err #
#6
69
90
05
50
07
7 o
orr C
Ch
ha
arrg
ge
err #
#6
69
90
00
07
72
2 // A
Ad
da
ap
ptte
err
#
#6
69
90
00
07
74
4..
T
Th
he
e b
ba
atttte
erryy iiss n
no
ott ffu
ullllyy cch
ha
arrg
ge
ed
d..
C
Ch
ha
arrg
ge
err #
#6
69
90
00
07
72
2 // A
Ad
da
ap
ptte
err #
#6
69
90
00
07
74
4 -- Before first use, the battery pack
requires 8-10 hours charge time to be fully charged. Subsequent recharging
needs 3-5 hours for the battery to be fully charged.
O
On
ne
e H
Ho
ou
urr C
Ch
ha
arrg
ge
err #
#6
69
90
05
50
07
7 -- Before first use, the battery pack requires 3-5
hours charge time to be fully charged. Subsequent recharging needs 1 hour for
the battery to be fully charged.
A
Allw
wa
ayyss ssw
wiittcch
h tto
o a
a ffrre
essh
h b
ba
atttte
erryy w
wh
he
en
n tto
oo
oll p
pe
errffo
orrm
ma
an
ncce
e b
be
eg
giin
nss tto
o d
diim
miin
niissh
h..
Severe heat is most destructive to a battery; the more heat generated, the faster
the battery loses power. A battery that gets too hot can have a shortened life.
N
Ne
evve
err o
ovve
err--d
diisscch
ha
arrg
ge
e a
a b
ba
atttte
erryy b
byy u
ussiin
ng
g tth
he
e tto
oo
oll e
evve
en
n a
afftte
err tto
oo
oll p
pe
errffo
orrm
ma
an
ncce
e
h
ha
ass d
de
eccrre
ea
asse
ed
d.. Do not attempt to discharge a tool’s battery by continuing to
pull on the tool trigger. When tool performance begins to diminish, stop the tool
and recharge the battery for optimal performance.
C
Ch
ha
arrg
ge
e b
ba
atttte
erryy p
pa
acckk a
att a
am
mb
biie
en
ntt tte
em
mp
pe
erra
attu
urre
ess b
be
ettw
we
ee
en
n 5
50
0°° F
F –
– 1
10
04
4°° F
F..
S
Stto
orre
e tto
oo
oll a
an
nd
d b
ba
atttte
erryy p
pa
acckk iin
n llo
occa
attiio
on
nss w
wh
he
erre
e tte
em
mp
pe
erra
attu
urre
ess w
wiillll n
no
ott e
exxcce
ee
ed
d
1
12
20
0°°F
F.. This is important to prevent serious damage to the battery cells.
T
Th
he
e b
ba
atttte
erryy p
pa
acckk ssh
ho
ou
ulld
d a
allw
wa
ayyss b
be
e rre
ecch
ha
arrg
ge
ed
d w
wh
he
en
n tth
he
e C
Co
orrd
dlle
essss V
Va
accu
uu
um
m b
be
eg
giin
nss
tto
o rru
un
n ssllo
ow
wllyy..
W
Wh
he
en
n b
ba
atttte
erryy p
pa
acckk iiss n
no
ott iin
n u
usse
e,, kke
ee
ep
p iitt a
aw
wa
ayy ffrro
om
m o
otth
he
err m
me
etta
all o
ob
bjje
eccttss ssu
ucch
h a
ass
p
pa
ap
pe
err cclliip
pss,, cco
oiin
nss,, kke
eyyss,, n
na
aiillss,, ssccrre
ew
wss o
orr o
otth
he
err ssm
ma
allll m
me
etta
all o
ob
bjje
eccttss tth
ha
att cca
an
n
m
ma
akke
e a
a cco
on
nn
ne
eccttiio
on
n ffrro
om
m o
on
ne
e tte
errm
miin
na
all tto
o a
an
no
otth
he
err.. Shorting the battery terminals
together may cause sparks, burns, or fire.
R
RE
EM
MO
OV
VIIN
NG
G//A
AT
TT
TA
AC
CH
HIIN
NG
G B
BA
AT
TT
TE
ER
RY
Y P
PA
AC
CK
K
R
RE
EM
MO
OV
VE
E B
BA
AT
TT
TE
ER
RY
Y P
PA
AC
CK
K::
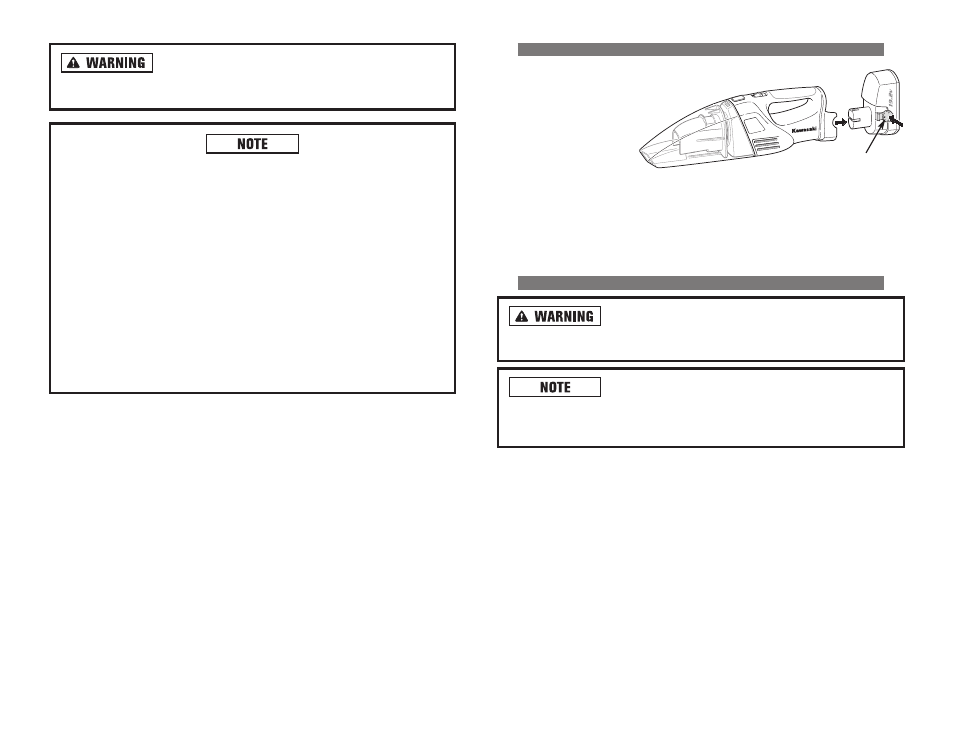
1. Press both release but-
tons on either side of
the Cordless Vacuum to
release the battery pack.
2. Pull battery pack free of
Cordless Vacuum.
A
AT
TT
TA
AC
CH
H B
BA
AT
TT
TE
ER
RY
Y P
PA
AC
CK
K::
1. Align the raised portion of the battery pack with the groove in the battery com-
partment of the Cordless Vacuum.
2. Press the battery pack into place. Make sure the latches are securely fastened.
Do not use the Cordless Vacuum if the battery pack is not seated properly.
C
CH
HA
AR
RG
GE
ER
R #
#6
69
90
00
07
72
2 // A
AD
DA
AP
PT
TE
ER
R #
#6
69
90
00
07
74
4
B
Be
effo
orre
e u
ussiin
ng
g b
ba
atttte
erryy cch
ha
arrg
ge
err,, p
plle
ea
asse
e rre
ea
ad
d cca
arre
effu
ullllyy a
allll
iin
nssttrru
uccttiio
on
nss a
an
nd
d cca
au
uttiio
on
na
arryy m
ma
arrkkiin
ng
gss o
on
n b
ba
atttte
erryy cch
ha
arrg
ge
err,, b
ba
atttte
erryy p
pa
acckk a
an
nd
d
p
prro
od
du
ucctt u
ussiin
ng
g b
ba
atttte
erryy..
T
Th
he
e cch
ha
arrg
ge
err w
wiillll n
no
ott a
au
utto
om
ma
attiicca
allllyy ttu
urrn
n “
“O
OF
FF
F”
” w
wh
he
en
n tth
he
e
b
ba
atttte
erryy p
pa
acckk iiss ffu
ullllyy cch
ha
arrg
ge
ed
d.. T
Th
he
e cch
ha
arrg
giin
ng
g iin
nd
diicca
atto
orr lliig
gh
htt w
wiillll rre
em
ma
aiin
n “
“O
ON
N”
”
u
un
nttiill tth
he
e cch
ha
arrg
ge
err iiss d
diisscco
on
nn
ne
ecctte
ed
d ffrro
om
m tth
he
e e
elle
eccttrriicca
all o
ou
uttlle
ett.. T
To
o p
prro
ollo
on
ng
g
b
ba
atttte
erryy lliiffe
e,, R
RE
EM
MO
OV
VE
E b
ba
atttte
erryy ffrro
om
m cch
ha
arrg
ge
err a
afftte
err 3
3--5
5 h
ho
ou
urrss o
off rre
ecch
ha
arrg
giin
ng
g..
U
Usse
e o
on
nllyy tth
he
e cch
ha
arrg
ge
err w
wh
hiicch
h a
acccco
om
mp
pa
an
niie
ed
d yyo
ou
urr p
prro
od
du
ucctt o
orr d
diirre
ecctt rre
ep
plla
acce
em
me
en
ntt a
ass
lliisstte
ed
d iin
n tth
hiiss m
ma
an
nu
ua
all.. Do not substitute any other charger. Use only Alltrade
approved chargers with your product.
D
Do
o n
no
ott d
diissa
asssse
em
mb
blle
e cch
ha
arrg
ge
err..
D
Do
o n
no
ott u
usse
e cch
ha
arrg
ge
err iiff iitt h
ha
ass b
be
ee
en
n d
da
am
ma
ag
ge
ed
d,, lle
efftt o
ou
uttd
do
oo
orrss iin
n tth
he
e rra
aiin
n,, ssn
no
ow
w,, w
we
ett
o
orr d
da
am
mp
p e
en
nvviirro
on
nm
me
en
nttss,, o
orr iim
mm
me
errsse
ed
d iin
n lliiq
qu
uiid
d..
T
Th
he
e b
ba
atttte
erryy p
pa
acckk a
an
nd
d cch
ha
arrg
ge
err h
he
ea
att d
du
urriin
ng
g cch
ha
arrg
giin
ng
g.. Place the charger on a flat,
non-flammable surface away from flammable materials with at least four inches of
clearance to allow proper air circulation around the charger and battery pack.
W
Wh
he
en
n tth
he
e b
ba
atttte
erryy p
pa
acckk rre
eq
qu
uiirre
ess rre
ecch
ha
arrg
giin
ng
g,, a
a 3
3--5
5 h
ho
ou
urr cch
ha
arrg
ge
e a
allllo
ow
wss tth
he
e tto
oo
oll tto
o
o
op
pe
erra
atte
e a
att ffu
ullll p
po
ow
we
err.. A charging indicator light on the charger will illuminate to
show that charging is taking place.
10
RELEASE BUTTON