Oil dai ly, Operation, Operación – Husky HDT103 User Manual
Page 2: Assembly, Pre-operation, Notice
3. Connect the chisel/hammer to the
air supply and cover the exhaust
port with a towel. Run the
chisel/hammer for 7 to 10 seconds.
Oil will discharge from the exhaust
port when air pressure is applied. If
the piston does not cycle, install a
bit into the spring retainer. Be
careful not to allow the towel to
catch in the spring retainer.
Operation
Always disconnect
the tool from air
supply when unattended, performing
any maintenance or repair, clearing a
jam, or moving the tool to a new
location.
SPRING RETAINER
The spring retainer holds the chisel in
place. The retainer must be securely
attached (See Figure 2). The retainer is
a normal wear item and should be
!
WARNING
Síntomas
Causa(s) Posible(s)
Acciones A Tomar
La herramienta funciona
demasiado lenta o no
funciona
Sale humedad por la
herramienta
El cincel/martillo está
atascado y no se mueve
hacia adelante o hacia
atrás
1. Hay arena o goma en la
herramienta
2. No hay aceite en la herramienta
3. Baja presión de aire
4. Fugas en la manguera de aire
5. Baja la presión
6. Regulador fijado demasiado bajo
1. Hay agua en el tanque
2. Hay agua en las líneas/
mangueras de aire
1. El pistón y el barril del
cincel/martillo están sucios u
oxidados
2. El pistón y el barril del
cincel/martillo están pegados
juntos por l óxido
1.
Enjuague la herramienta con aceite para herramientas neumáticas,
diluyente de gomas, o una mezcla de partes iguales de aceite de motor
SAE 10 y querosene. Si no se usa aceite para herramientas, lubrique la
herramienta después de la limpieza.
2.
Lubrique la herramienta según las instrucciones de lubricación en la
sección denominada Pre-Operación
3.
Ajuste el regulador del compresor al máximo permitido por la
herramienta mientras ésta funciona libremente
4.
Apriete y selle los accesorios de la manguera, si consigue fugas
5.
Asegúrese de que el tamaño de la manguera sea el apropiado. Las
mangueras largas o las herramientas que utilizan grandes volúmenes
de aire pueden requerir una manguera con un D.I. de 12,7 mm (1/2")
o superior, según el tamaño total de la manguera
6.
Ajuste el regulador hasta que la herramienta alcance la velocidad max
1.
Vacíe el tanque (Vea el manual del compresor de aire). Lubrique la
herramienta y hágala funcionar hasta que no haya agua. Vuelva a
lubricar la herramienta y hágala funcionar por 1 a 2 segundos
2a. Instale un separador/filtro de agua (PA2121). NOTA: Los separadores
funcionan debidamente sólo cuando el flujo de aire está fresco.
Ubique el separador/filtro lo más lejos posible del compresor
2b. Instale un secador de aire
2c. En cualquier momento que entre agua en la herramienta, deberá
lubricarla inmediatamente
1a. Lubrique abundantemente la herramienta para liberar el pistón
1b. Limpie el pistón y el barril con aceite para herramientas neumática
y elimine las rebabas de las superficies del pistón o barril*
1c. Reemplace el pistón o cilindro desgastado*
1d. En cualquier momento que entre agua en la herramienta, deberá
lubricarla inmediatamente
2.
Retire el pistón y elimine el óxido. Reemplace el pistón y el cilindro
si es necesario*
* Cuando vuelva a ensamblar el cilindro en el alojamiento, utilice Loctite
®
en las roscas del cilindro.
11 Sp
Operación
(Con’t)
NOTA: Puede usarse cualquier cincel
0,401 Parker con vástago ahusado.
REGULADOR
Este martillo neumático viene
equipado con un regulador de aire
integral para reducir la frecuencia de
los golpes. Está ubicado cerca de la
entrada de aire. Gire la perilla en
sentido antihorario para la apertura
total y velocidad máxima. Gire
Guía de Solución de Problemas
replaced when worn. Replace with
MP2896 (2) piece chisel spring set. The
retainer unscrews for easy chisel insertion.
NOTE: Any chisel with a .401 Parker
taper shank size can be used.
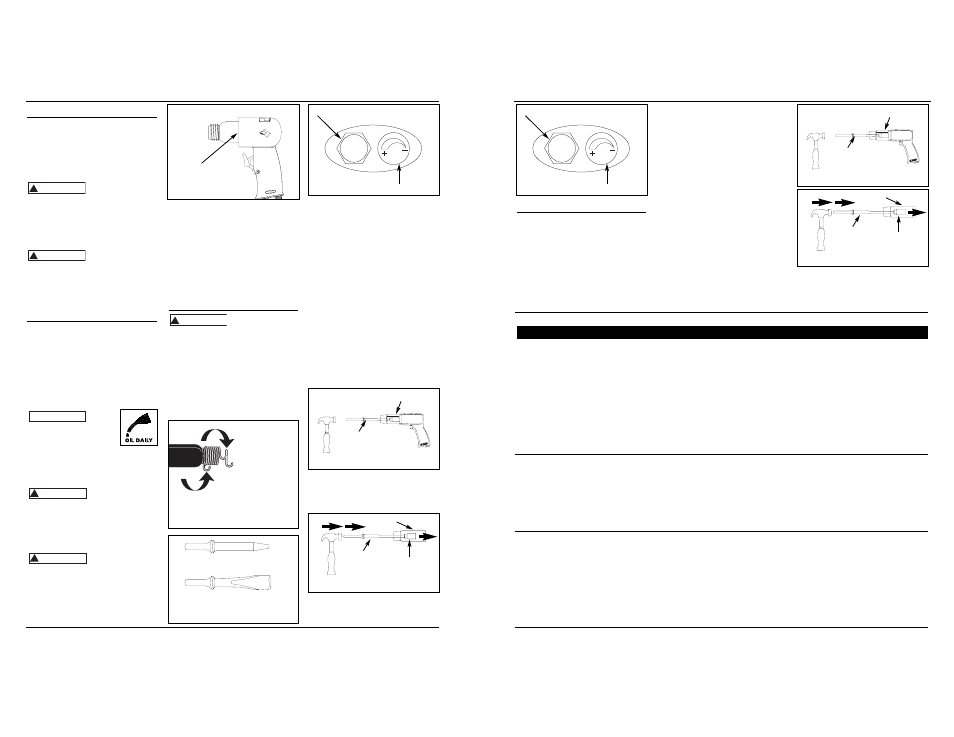
REGULATOR
This air hammer is equipped with a
built-in air regulator to reduce the
blow rate. It is located next to the air
inlet. Turn the knob counter-clockwise
for the fully open, highest speed.
Gradually turn the knob clockwise to
reduce the speed (See Figure 4).
REPARING JAMMED
PISTON
1. Tools required include: hammer and
punch.
2. Attempt to free jammed piston
using punch (See Figure 5).
3. If piston is jammed, disassemble
barrel from housing. Use punch to
push piston through barrel (See
Figure 6).
4. Reassemble barrel and piston.
2
Assembly
SYSTEM SETUP
Using fittings or air hoses which are too
small can create a pressure drop which
will result in a loss of power in the tool.
NOTE: Do not install a quick coupler set
between the tool and whip hose.
Do not misuse this
product. Excessive
exposure to vibration, work in awk-
ward positions and repetitive work
motions can cause injury to hands and
arms. Stop using any tool if discomfort,
numbness, tingling or pain occur, and
consult a physician.
Never carry a tool
by the hose or pull
the hose to move the tool or a
compressor. Keep hoses away from
heat, oil and sharp edges. Replace any
hose that is damaged, weak or worn.
Pre-Operation
Air tools require lubrication through-
out the life of the tool. Proper
lubrication is the owner’s responsibility.
Use airtool oil to lubricate, clean and
inhibit rust in one step. Failure to
lubricate and maintain the air tool
properly will dramatically shorten the
life of the tool and will void the
warranty.
This air
tool
requires lubrication before
initial use and before and
after each additional use.
AIR PISTON LUBRICATION
The air piston must be lubricated daily.
An air piston cannot be oiled too often.
Disconnect the
chisel/hammer from
the air supply before lubricating.
1. Turn the chisel/hammer upside
down.
2. While pulling the trigger, pour a
teaspoon of oil in the air inlet.
Cover exhaust port
with a towel before
applying air pressure. Oil will discharge
through the exhaust port during the
first few seconds of operation after an
airtool has been lubricated. Failure to
cover exhaust port can result in serious
injury.
!
CAUTION
!
CAUTION
NOTICE
!
WARNING
!
WARNING
Operating Instructions
Figure 6
Punch
Piston
Barrel
Figure 2 - Spring Retainer
A. Press tab here and twist
counter-clockwise to release spring
retainer and insert chisel bit
B. Press tab and
twist clockwise
to tighten
spring retainer,
firmly securing
chisel bit
Spring
Retainer
Figure 5
Punch
Piston
Figure 3 - Chisel Bits (.401 taper)
Punch
Flat
Figure 4
Air Inlet
Regulator
gradualmente la perilla en sentido
horario para reducir la velocidad (Ver
Figura 4).
REPARACIÓN DE UN
PISTÓN ATASCADO
1. Las herramientas requeridas son:
martillo y troquel.
2. Intente liberar el pistón atascado
con el troquel (Vea la figura 5).
3. Si el pistón está atascado, desarme
el barril del alojamiento. Utilice el
troquel para empujar el pistón a
través del barril (Vea la figura 6).
4. Vuelva a ensamblar el barril y el
pistón.
Figura 6
Troquel
Pistón
Barril
Figura 5
Troquel
Pistón
Figura 4
Entrada de aire
Regulador
Martillo Neumático
OIL DAI
LY
Figure 1
exhaust port