Hasbro Xevoz AGES 6+ User Manual
Sectoid, Dune stinger
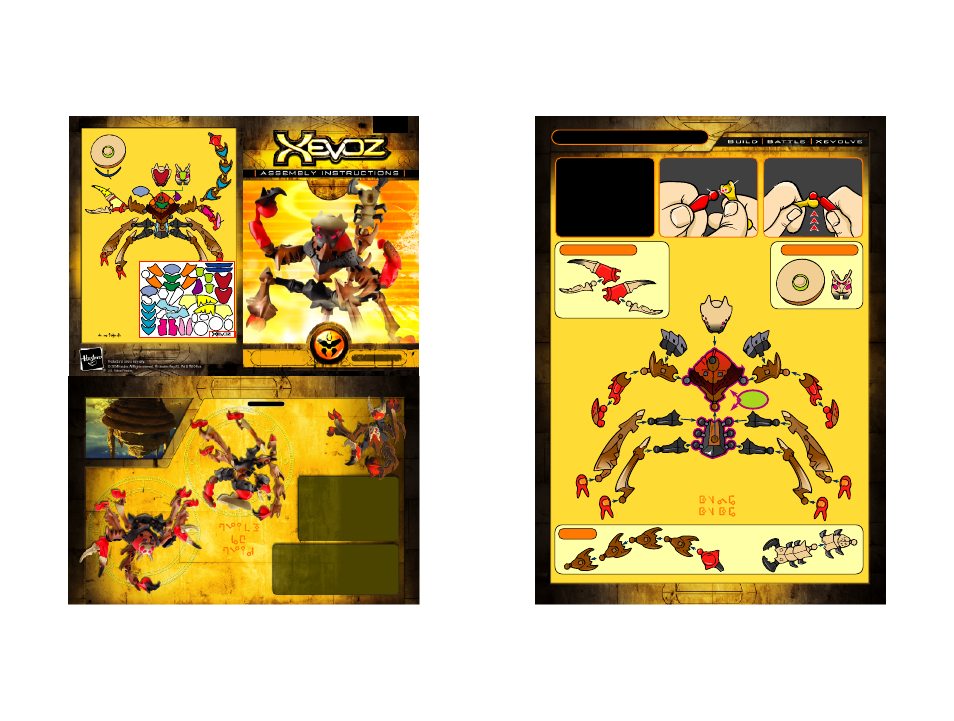
To build your most powerful
DUNE STINGER warrior,
first
snap the hip piece onto the
chest piece.
Then YOU DECIDE
which weapons, armor, and
body parts to add on!
HINT:
As you build, it may be
easier to assemble the arms and
legs before you snap them into
the figure's torso.
Sectoid
™
/
Dune Stinger
™
SE
CT
OID
™
>>
Div
ers
e s
pec
ies
of
in
tel
lig
ent
,
effi
cie
nt,
and
de
adl
y w
arr
ior
s. S
oci
ety
is
ce
nte
red
aro
und
a
vas
t n
etw
ork
of
in
ter
con
nec
tin
g
und
erg
rou
nd
pas
sag
es
kno
wn
as
the
H
ive
, w
hic
h
the
y p
rot
ect
at
an
y c
ost
. C
api
tol
C
ity
: “
Que
en
Hiv
e”
loc
ate
d in
th
e N
ort
her
n M
adr
aga
r W
ast
e.
WAR
NIN
G: w
ill
sw
arm
w
hen
an
noy
ed.
DU
NE
S
TIN
GE
R™
>>
Bri
ngi
ng
new
m
ean
ing
to
th
e p
hra
se
“si
len
t b
ut d
ead
ly”
, th
ese
ul
tim
ate
ste
alt
h tr
oop
s p
ack
a
par
aly
zin
g s
tin
g
of s
upe
r n
oxi
ous
, p
ollu
tio
n-b
ase
d
tox
ins
. K
now
n to
lu
rk
und
er
the
sa
nds
aro
und
H
ive
co
lon
ies
, s
tal
kin
g
int
rud
ers
, s
pie
s, c
lue
les
s to
uri
sts
, a
nd
oth
er
und
esi
rab
le
gue
sts
.
AGES 6+
™
™
Stick the Xevoz
champion stickers
on your figure as
shown, matching the
numbers and colors
to the parts. You
decide where to
stick the rest!
CUSTOMIZE IT!
Av
er
ag
e H
eig
ht
>>
Av
er
ag
e W
eig
ht
>>
St
re
ng
th
T
yp
e>
>
En
du
ra
nc
e T
yp
e>
>
5'1
0"
42
5 L
BS
6
8
sp
ec
if
ic
a t
io
ns
>>
Sectoid™
Dune Stinger™
632613
No
rt
he
rn
M
ad
ra
ga
r w
as
te
other hands
1
1
2
3
3
3
3
4
5
5
6
7
8
9
10
11
12
13
1
2
2
1
1
1
3
4
4
5
5
6
6
7
7
7
8
9
9
10 10
11
11
12
12
13
13
3
3
3
W a
nt
a
n e
ve
n m
or
e p
ow
er
fu
l w
ar
rio
r?
Ch
ec
k o
ut
X
EV
OZ
.C
OM
fo
r b
uil
din
g t
ip
s!
Stick the XEVOZ
CHAMPION
STICKERS™ on your
figure as shown, matching
the numbers and colors to
the parts. You decide
where to stick the rest!
CUSTOMIZE IT!
start
here
Tails
other heads
TO ASSEMBLE PARTS:
Snap the ball into the widest part
of the socket as shown.
Socket
Ball
TO DISASSEMBLE PARTS:
Bend at joint and pop ball out of
socket.
(Easier than pulling straight out!)