2 • installing the ceiling plate – Hunter Fan Ceiling Fans User Manual
Page 5
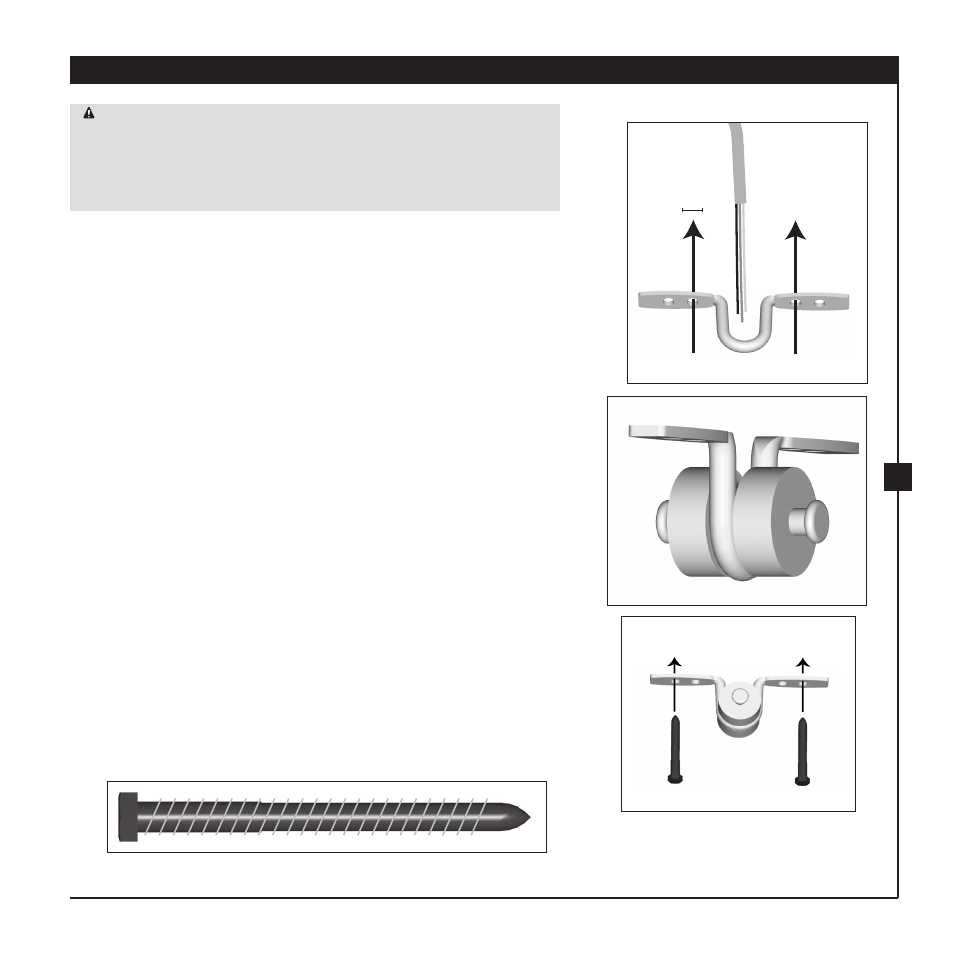
2 • Installing the Ceiling Plate
9/64”
CAUTION: To avoid possible electrical shock, before installing your fan,
disconnect the power by turning off the circuit breakers to the outlet box
and associated wall switch location. If you cannot lock the circuit breakers
in the off position, securely fasten a prominent warning device, such as a
tag, to the service panel.
2-1. Drill one hole on each side of the supply mains using the holes
in the u-bracket as a guide. The pilot holes should be 9/64” in
diameter.
2-2. Place the bushing pin assembly into the u-bracket.
2-3. Screw the u-bracket screws through the u-bracket and into the
pilot holes.
Step 2-1
Step 2-2
Step 2-3
43113-01 • 04/13/07
Hunter® Fan Company
See also other documents in the category Hunter Fan Fans:
- 21422 (2 pages)
- Hunter Ceiling Fans Type (12 pages)
- Type (16 pages)
- Type (18 pages)
- Type (13 pages)
- TypeG (17 pages)
- 21100 (2 pages)
- 28665 28642 (2 pages)
- 81004 (32 pages)
- 21325 (2 pages)
- fan parts 2.84453E+19 (4 pages)
- 20182 (2 pages)
- HUNTER Ceiling Fans (14 pages)
- Saturn 90054 (40 pages)
- 21337 (2 pages)
- 43041-01 (65 pages)
- 20178 (2 pages)
- 21562 (2 pages)
- Grandview 23923 (14 pages)
- 23963 (2 pages)
- 21317 (2 pages)
- 28528 (2 pages)
- 28039 (2 pages)
- Ceiling Fan Parts 23933 (2 pages)
- LA STRADA 82022 (63 pages)
- 42501-01 (15 pages)
- 82005 (28 pages)
- 21620 (4 pages)
- 25745 (2 pages)
- Hunter 21201 (2 pages)
- 21425 (2 pages)
- 83001 (40 pages)
- 21321 (2 pages)
- Fan Parts & Hardware 20806 (2 pages)
- VENTURA BATH VENTILATOR FAN WITH LIGHT 81004 (32 pages)
- Ceiling Fan Parts 28609A (2 pages)
- HUNTER CEILING FAN TYPE (15 pages)
- 23909 (2 pages)
- 82003 (28 pages)
- 20531A (2 pages)
- Fan Parts 25860 (1 page)
- ELLIPSE 90064 (40 pages)
- 23488 23489 (2 pages)
- 28665 (2 pages)