H2oaudio-nano2nd genf.pdf, H2o audio for ipod nano (2 gen), The t-seal – X-1 (H2O Audio) T-Seal User Manual
Page 6: Introduction 4. leak test, Housing features
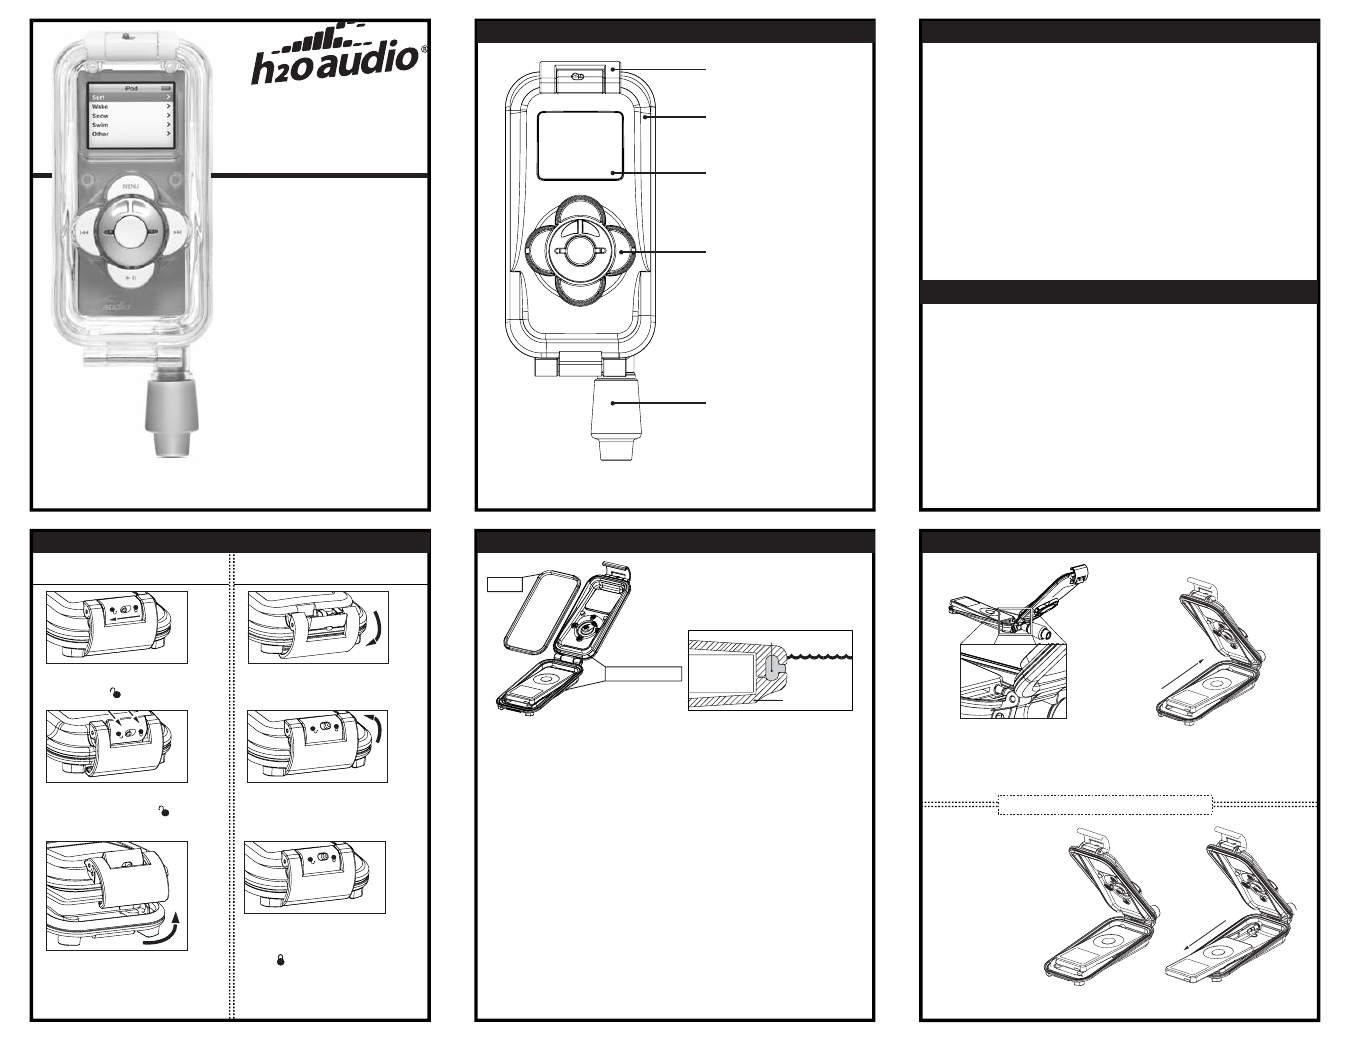
7. Installing the iPod into the Housing
Installing the iPod
Removing the iPod
1.
Align the audio port with the
stereo jack in the housing.
1.
Slide the player off
of the stereo jack.
Now the player can
slide straight out of the
housing.
2.
Gently snap the player into the
audio jack. Verify the player is
completely plugged into the
audio jack.
NOTE: Do not disturb the T-Seal during removal of the player. If the T-Seal is moved, Please use the
housing lid to completely seat the T-Seal.
IMPORTANT: Remove any skins or
covers from your iPod before installing
it into the housing.
Compatible with 2 Gen iPod nano
nd
6. The T-Seal
DO NOT USE SILICONE GREASE as this will damage the seal.
The removable, white, T-Seal (retained in
the lid), between the base and the lid of
the housing is what keeps your iPod safe
and dry.
Contact Surfaces
T-Seal
IT IS EXTREMELY IMPORTANT YOU ENSURE THE T-SEAL IS PROPERLY
SEATED DURING EACH CLOSURE. If it is out of alignment, or twisted you
will cause damage to or destroy your iPod.
Prior to use, verify:
1.
T-Seal is aligned properly in the
Contact Surface of the lid prior
to closure.
2.
T-Seal and contact surface have
been cleaned as necessary using
a soft, lint-free cloth.
3.
T-Seal and Contact Surface are
free of scratches and other
imperfections.
Do NOT use if:
1.
T-Seal is twisted, or out of
alignment during closure.
2.
T-Seal and Contact Surfaces
have any dirt, lint, hair, and/or
other debris.
3.
You see scratches or imperfections
on the T-Seal or Contact Surfaces.
To ensure the T-Seal is fully seated in the base of the housing, firmly squeeze
both sides (the base and lid) of the housing together after each insertion of
the player. Always check to make sure the latch is closed and locked prior to
use.
If you have any questions or doubts, please contact H2O Audio Customer Support
iPod nano
T-Seal
Water
Housing
5. Unlock / Locking the Housing
Unlocking your housing
Locking your housing
1.
Close the lid, and hook the
buckle under the base.
1
3.
Unhook the buckle from the
base.
3
3
2.
While holding the latch button
towards the unlock icon,
push up on the side of the latch.
2.
Pull the latch towards the
housing and snap in place.
2
2
1.
Slide latch button towards
the unlock icon.
1
3.
Verify the lid and latch are closed
and the button is positioned on
the icon prior to entering the
water.
3. Introduction
4. Leak Test
The H2O Audio waterproof housing lets you to listen to digital audio during
active watersports. It houses the Apple iPod nano (2 Gen) digital media
player.
HOUSING: The housing features the LatchTight Locking System which
keeps the unit waterproof during operation. The H2O Audio housing allows
for functional control of the player while in the water with the Commander
Scroll Wheel.
NOTE: The iPod is NOT waterproof without the H2O Audio housing and
headphones and is NOT covered under the product warranty. Any attempt
to use the housing with an audio player other than the Apple iPod nano
(2 Gen) will void the Warranty.
HEADPHONES: The housing is only waterproof when combined with H2O
Audio waterproof headphones (sold separately). Use of other headphones
with a 3.5mm stereo connector will result in a water resistant case, and should
not be submerged.
Before utilizing the system for the first time, it is highly recommended to
perform a 'Leak Test'. Follow the instructions below.
DO NOT INSTALL THE iPod nano (2 Gen) INSIDE THE HOUSING FOR THE
LEAK TEST
1. Open the housing, and visually inspect the housing T-Seal.
2. Verify the T-Seal is fully seated and free of debris, then close and lock
the housing using the latch.
3. Immerse the housing, without the iPod, in water and soak for 30
minutes.
4. Manipulate the controls during submersion.
5. Remove from the water, dry the exterior, and visually inspect the
housing for any sign of leaks before opening.
6. Open the housing upside down to prevent water from dropping into
the housing during opening.
7. After a successful 'Leak Test', install the iPod in the housing.
TM
TM
nd
nd
nd
2. Housing Features
IMPORTANT: Make sure the seal is fully seated against the housing base each time you close the
housing. Use the lid to compress the seal into the base if required.
SealTight Connector
TM
Commander Scroll
Wheel Control
TM
LatchTight Locking
System
TM
Lens Clear
Display Window
Compatible with
2 Gen iPod nano
nd
Printed Instructions
Before using this system, please be sure to read, understand, and follow the instruction of this manual.
h2oaudio.com
H2O Audio for iPod
nano (2 Gen)*
®
nd
st
st
*If you have a 1 Gen iPod nano please check out the
H2O Audio for iPod nano (1 Gen) S6-1A3
S9 - 70 20061013